Showing posts sorted by relevance for query lacey. Sort by date Show all posts

Thursday, August 5, 2010

Harnessing the Power of Recycling


If you came here from the MAKE Magazine Green Project page, please go here:
Harnessing the Power of Recycling--Green Project Entry for MAKE Magazine
(same project, slightly different writeup)--Thanks!


I adopted a really cute dog from a rescue organization (NARF) two weeks ago. Her name is Tulip. She came with a collar, but she clearly needed a harness for "walkies" or she'd choke herself pulling on the collar.

Tulip's hair was cut very short, and it's a different type from Lacey's hair, so Tulip looks pretty good in a T-shirt or harness (unlike Lacey: "Does this make my butt look big?" "Huge!"). Unlike Lacey, Tulip is very tolerant of being dressed and undressed repeatedly. Tulip is practically a rag doll--floppy, mellow, and pliant. So another project began...

I still have the leftover jeans parts from my jeans circle quilt, dining room chair covers, and other jeans projects. Since most of these used leg pieces, I have plenty of waistbands and upper sections handy. Time for some serious seam ripping!

I started with the one waistband and the attached upper back section of the jeans. I removed the back pockets to save for some other project. I cut the section to get a rough fit under and around Tulip's chest.

I also used a waistband from another pair of jeans.


Here is the chest part after stitching to fit Tulip. The separate collar section on the right is sewn closed, so the jeans button is now just decorative. The collar part just slips over Tulip's head.


I salvaged the buckle and webbing strap from one of my kids' old lunchboxes. My kids go through at least a couple a year by doing things like leaving spilled milk in them over Spring vacation (mmm, yum!), dragging them over concrete, and other things, so I regularly scavenge useful buckles, hardware, zippers, and straps from them (the picture shows a newer one).


I used part of another waistband to make the strap that goes between the collar and the chest strap, and sewed on a reused belt loop to hold the D-ring.

One thing I should mention is that I used a really simple-but-useful little gadget called the "JEAN-A-MA-JIG" by Dritz to sew over the really thick parts where the jeans seams and the belt loops were. This helps to prevent the stitches skipping when the presser foot is going up or down at a steep angle when you go over the big hump in the fabric.


The sewing still wasn't easy, but it was better. It actually turned out that for my machine with the "walking foot" (that contraption that includes the presser foot and sticks out behind the presser foot--it helps keep multiple layers from sliding out of place), I needed a thinner version to put under the foot in the back, while the thicker "JEAN-A-MA-JIG" fit under the front side. I made the thinner version from a plastic soft drink cup that was languishing in my recycling bin.


Done!

Here is the finished harness. The second button has been replaced on the chest strap so I would have two matching Levi's buttons. It is also sewn closed and is now just decorative, since the lunchbox buckle provides the adjustable fastening. If you look carefully, you can see that I completely removed the waistband that goes around the chest and then sewed it and the belt loop back on so the button and buttonhole would be in the right place! Tulip is fortunately much smaller than the original 36-inch waist. The triangular section goes on the dog's chest.


Here is the finished harness looking down at the top (the dog's back).


The buckle strap goes through a loop on the D-ring section.

Introducing Tulip

Here is Tulip in her cool new harness:


Here she shows off the D-ring on the belt loop:


Lacey and Tulip: Out and About


Yes, Lacey needs a matching jeans harness too. Maybe later...


Here's the whole doggy-infatuated gang! That's me in one of my favorite gaudy tie-dyed T-shirts.

That original 36-inch jeans waist might be just the right size for Moxie the giant schnauzer...

Monday, January 12, 2009

Another Year of Creativity

It's my first post of the Year 2009, and also an anniversary of sorts, so maybe it's time to reflect a little. Don't worry, it won't hurt...

It has been just over a year since I started a leave of absence from my unusually-long high-tech career at Oracle. I've been there since January 15, 1989 (wow, 20 years ago), and I just needed a (long) break.

I've been very busy in the intervening year, and I haven't been a bit bored. Some projects have been very successful, others less so.

Kid Rooms and Craft Room

I spent quite a while rearranging the contents of several rooms in my house so that my two daughters could each have their own bedrooms. My older daughter got the "new" room with a new loft bed and desk combo so she could study uninterrupted by her darling sibling, and my younger daughter got a new desk in her room and free run of both bunks in the existing bed set. Meanwhile, I would take the contents of my two old craft/storage rooms and combine them into one carefully-planned ultra-functional hobby workroom with built-in shelves and workbench (the Broder line from IKEA).

Eight months or so later, the verdict is decidedly mixed. The girls like having their own rooms, but I'm not having much luck getting them to go do their homework there. They'd rather be working with me or their dad at the kitchen table or sprawled across the living room. In fact, if my older daughter disappears into her room, it's usually because she's hiding in there reading her latest non-homework-related book, and I have to go pry it away from her!

As for my sleek new craft room? The Broder shelving on one side is stunning, and no earthquake is knocking it down without bringing down the walls too! I installed lots of other shelves, cabinets, and drawer units as well. But I haven't been able to get past those basic little laws of physics: I really can't get the contents of two full rooms to all fit in the space of one! Not only is that new room FULL, but so are the hallways and other spaces around the house that were meant to serve as staging areas while I moved stuff around. On the good side, we're all getting very good at sliding sideways through the hallways! In the meantime, my stuff has expanded as I've picked up more hobbies...

The Blog

I started this blog just about a year ago as part of my leave-of-absence plans. Since then, I've written about 50 entries (almost one a week) in this blog, plus quite a few entries in my blog on Turkey (I keep meaning to get back and write more about that!) and my random-topic blog.

Writing has been a major part of my Oracle career over the years, and one of my Oracle colleagues noted with amusement that "a writer just has to write" (or something like that) when he heard about my non-work blogging (yes, I even did a little blogging for Oracle some time ago).

I've been using my blog partly as a way to ramble on without boring people around me to tears. "Mom, haven't you talked about recycling blue jeans enough for today?" The nice thing about blog articles is that if they bore you, you can skip to the next one! It's harder to tell your darling wife or best friend that you really don't care all that much about discharge dyeing, and would she please hush up for a while?

The blog is certainly useful as a reference work, both for me and others. If somebody wants to know how I did some project with the elementary school or the middle school, I can give them the URL, and they can come back to me if they have further questions. It helps both sides. For me, it serves as a reminder of how I did something before. It's useful to have a place to "dump my brain" so I don't have to worry about remembering details in my head a couple years later.

I hadn't expected that my dog Lacey would be such an important part of my blog. She's a smart little dog, though, and it didn't take her long to figure that when the camera came out, posing cutely was a good way of getting attention and treats! Yes, yes, you'll get your Lacey pictures at the end of this article...

The Rental House Remodeling Project

I spent pretty much all Summer and Fall remodeling my rental house (with the help of a really good contractor) for my father-in-law. I was pretty happy with how that project came out, including the fireplace cover.

The Jeans Circle Quilt from Some-Very-Warm-Place-Far-Below-My-Feet

I've written about the jeans circle quilt multiple times already, and it looks like I will have to write updates about it a couple more times before it's finished. I'm still working on it, but I stab myself with all those pins so frequently that it provides pretty strong negative reinforcement! I tend to let my fingers heal before I try tackling it again. It's also so big that it takes a lot of physical effort to muscle it through the machine. It's in three long pieces (queen sized), but if I ever do one of these again I'd do it in much smaller blocks.

I don't usually make New Year's resolutions, but I am making one this year: I will finish my jeans circle quilt (at least by the end of 2010). Sometimes it's all in how you word them.

Tie-Dye

Interestingly, I haven't done much tie-dye of my own lately, though I've helped hundreds of other people do tie-dye over the year, and I expect to keep doing that. Beyond individual projects like the couch and the silk scarf dress, there are really only so many tie-dyed t-shirts, socks and such that one family can wear! I'm not into serious production so much as I'm into experimentation, so selling at craft fairs or similar isn't really of interest. Etsy and eBay aren't really good outlets for tie-dye, though perhaps I didn't try hard enough to build a market there.

I was really excited to get my own page on the Featured Artists section of Dharma's website several months ago. That section is a terrific source to both give and receive inspiration for what one can do with textiles and color!

Teaching and running tie-dye events have been great, though. I did tie-dye at an elementary school and a middle school, two summer camps and family camp, some small parties and some private lessons, and a corporate activity for a group at Google. I already have plans for more events this coming year.

Leather Is the Latest Hobby

I wrote recently that I've started doing leather tooling. Besides collecting a multitude of tools and supplies that are joining the tie-dye stuff spilling out of the craft room, I've been making belts since my last post. I'm now working on my third belt (I'll write up the belts when I finish the current belt). My kids are enjoying doing this hobby with me, and my older daughter especially is getting quite good at it. "Quality Time With Family" is a good justification for an expensive new hobby, right?

Lacey Resolves to Keep Appearing in My Blog

Lacey is cute, and she knows it. It's her key to survival, since she gets places she shouldn't and sheds on everything! I'm currently trying to sort all of my white stuff for tie-dye since I'm back to trying to fit everything in my craft room. I made the mistake of putting a big bin of soft, fluffy, clean white towels (that I'm intending to tie-dye eventually) on the couch. I later found her nestled in right on top!


Aaaah, very comfy. She's quite a princess. I wonder if she would notice if I put a pea underneath some of those layers of towels?


"Don't even think about it!"


"Do I really have to get up?"


Oh well, I'll have to wash the towels again anyhow after I dye them.


"Happy New Year, and May It Be Full of Treats!"

Tuesday, October 7, 2008

Discharging the Dog

After doing the discharge dyeing experiment I described in my lab report, I knew the Safeway cleanser was useless for discharge dyeing, so I didn't bother going further with that one--I guess I'll have to use it for cleaning my sink! Instead, I played with using stencils and sponge stamps with the Soft Scrub With Bleach cleanser, as well as with freehand squirting on other colors. Here I have taped the stencil onto a jeans sample and then dabbed the Soft Scrub on the stencil:


I used the flower stencil (the pink one in the picture above), and then went back and added extra Soft Scrub to the center flower motifs so they would appear brighter (more bleached) than the stems and leaves. Here you can see the results from making the layer of Soft Scrub thicker in some areas.


In the next sample, I used the stenciling sponge to stamp on some circles, and the centers got a very thin layer of Soft Scrub, while the outer edges got a thick layer. The outer edges are much more bleached than the centers. Here they are wet:


Then rinsed and dried:

This picture and the previous one show how you might use the thickness of the Soft Scrub to create subtle shading in your discharge dyeing pieces.

Note the yellowish tint in the circles in the upper sample with the red stitching. This was a pair of jeans that had been sewn together, then treated (probably stonewashed and over-dyed). If you look near the red stitching, you can see that the bleached parts near the red stitching are pale blue, not yellowish, because the seams of the jeans did not get the over-dyeing treatment like the rest of the pants.

Here is a sample of part of a mesh polo shirt that had been previously tie-dyed and loved and worn until it fell apart. In this case, the turquoise dye bleached to nearly white, but the fuchsia dye merely bleached to pink. My daughter did this one.


Here's an old tie-dyed sock (also loved and worn out) with greens and turquoise. Note that the greens didn't bleach to white. They kept a yellow-brown tinge (no, that's not just the ground-in dirt). My daughter did this one too.


This bandana had been previously dyed with turquoise and yellow-green. I was sloppy stenciling this one, and you can see white spots where I left the Soft Scrub a little too thick.


I also did a sample on a piece of plaid synthetic knit, and left it overnight. The result? Only the very faintest amount of fading, and I think that I may just be seeing some of the Soft Scrub grit that hasn't washed out completely.


I had better luck stenciling on an old towel that I use to catch the drips underneath my tie-dye pieces. Since I use these towels over and over, they get quite a medley of dye colors, so they have a nice medley of colors in the discharged area. I was pretty happy with this effect.


One of my loyal readers complained that he hadn't seen nearly enough dog pictures in my blog lately (yeah, that lab report really could have used a few Lacey pictures to liven it up!). My kids came to the rescue and created a couple of discharge-dyed bib/capes for Lacey. This dog will cheerfully put up with just about anything if there are treats involved! Here she is:


Lacey has officially discharged her duty (for now).

Wednesday, June 25, 2008

Jeans Circle Quilt -- It's a Start...

I mentioned in my last post that I was cutting out lots of circles for a circle blue jeans quilt. With a bit of help from my kids, I've now got all 221 circles cut out, plus a few more for good measure. I've spent a few days laying them out on the floor (with way too much help from Lacey, who knows she belongs in the center!), and now I have a design I'm pretty happy with.


The center 25 circles are already sewn together, since that part of the design was easy for me (and it was my proof-of-concept piece). The rest of it is all just pinned together.

What Was I Thinking?

This is a big project. My next step is to sew the rest of the circles together into squares with 4 "petals" on the reverse side. I also need to cut out squares of batting for each circle, as well as squares of colored fabric for each circle. The final step is to sew each petal down over the squares using a zigzag stitch to hold it together and quilt the piece. Each step times 221. No problem!

Dog, Again

And how can I do without a gratuitous dog picture, especially since Lacey's been spending so much time "helping" me with my layout?


Good thing for Lacey that pins don't seem to bother her!

Wednesday, January 23, 2008

Dog Blog

Fabulous, Poochie!

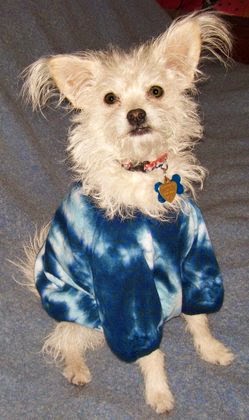
Lacey, our random-mixed puppy, is 11 months old and weighs about 8 pounds. This size S Dharma t-shirt fits her pretty well. Is she cute, or what? (Yes, she knows she's cute!)


I was doing a serious binge on doggie shirts the other day. Here are a couple more:


White dog in overly-large blue tie-dyed t-shirt
The green one above is a size M hoodie. It fits her fine, though she refuses to wear the hood (hey, I'm lucky she puts up with the clothes!).
The blue one is a size M T-shirt from Dharma, by the way. It's definitely too big--she gets her front paws tangled up in the sleeves.

Supermodel

Lacey has decided that she likes cameras! I was taking a picture of my throw pillows for my stitch resist page, and she jumped right up and posed with them. Aaaawww....

White dog in tie-dyed t-shirt with three small tie-dyed pillows

That's a size M ruffled dog T-shirt. I'm mentioning sizes and her weight because it's really hard to judge what sizes you need until you actually try it on the dog! She's a pretty leggy 8 pounds--thin chest and no fat on her--just fluff.

Puppy Love

In the following picture, Lacey is 3 months old and weighs just over 3 pounds. This size XS Dharma t-shirt is a bit big on her, but the XS purple hoodie shirt fits her pretty well!

Small white dog in tie-dyed t-shirt

Small white dog in tie-dyed purple hoodie


Big Dog in Town

Black giant schnauzer in green tie-dyed t-shirtThose doggie t-shirts even come in size 2XL! This giant schnauzer looks so handsome in his tie-dyed shirt! He weighs about 95 pounds.

Friday, March 14, 2008

Cute Pooch in Tie-Dye

Okay, I admit it: I wanted another excuse to put gratuitous cute pictures of my dog on my blog.


But I've been thinking for a while that while she's already got a few cool tie-dyed shirts, what Lacey really needs is a tie-dyed collar for her wardrobe. So I got some buckles and instructions from Creative Designworks and got to it.

I started with a cotton bandana that I had tie-dyed during a previous set of experiments with purple dyes.


I cut of a strip from one side of the scarf, ironed on interfacing and assembled it according to the instructions, and voila! A one-of-a-kind tie-dyed collar for my one-of-a-kind dog! I was pretty pleased with the stuff I got and how well it came out.

When I wanted to take pictures of Lacey in her fancy new collar, along with the remains of the scarf, she started playing with this scarf as if she were a cat with catnip!


I had a little trouble getting a shot of the actual collar through all that white fluff, but I did get at least the back of it.


And she finally agreed to do her "Sphinx" pose.

Lacey has previously chewed off a brand new store-bought nylon webbing harness the first time we put it on her, and she has also managed to rid herself of a webbing collar, so I know she's sensitive and doesn't put up with such discomforts. In this case, she seems pretty comfortable in her new collar, probably because it's soft washed cotton.

And, of course, because she knows she looks fabulous!

Thursday, March 20, 2008

Recycling and Dog Toys

How do I combine recycling, tie-dyeing, and dogs? In this case, my daughter and I made something very similar to the draft stoppers in my earlier post: tie-dyed jeans and cut-up old socks and shirts for stuffing made into a tube with closed ends. But there are two differences here: size and a not-so-secret ingredient, squeakers!

I got the squeakers at my local PetSmart. The brand is "Dr. Noys' Pet Toys", and they are marketed as replacement squeakers for that brand of dog toys. The PetSmart had them in two sizes. I used both sizes in each toy, because the different sizes sound different, and I thought it would be more interesting to the dogs to have different sounds in the same toy. I could have gotten them more cheaply in bulk via the Internet, but this was just an experiment, and I was looking for instant gratification!

The toy for Moxie, the 95-pound Giant Schnauzer, is a 14-inch-long piece cut from the bottom of the jeans leg, sealed at both ends.


Moxie's toy has four squeakers in it, two at each end. We sewed two squeakers into each of two old socks before putting them into the toy, so they would stay in place better.


I sewed the I-beam shape in the center before stuffing so it would be easier for Moxie to hold the toy in his mouth.


For Lacey, I made the toy much smaller, about 6 inches by 3 inches.


It has just two squeakers, one of each size.


The canine reviewers judged the experiment a success. Lacey particularly liked her toy, since she loves anything squeaky. She even came running when we squeaked the squeaker before putting it in the toy! The smaller toy worked better for squeaking, too, since there was less other fabric/stuffing to muffle the squeakers.

Now if we can just teach Lacey to put away her toys when she is done playing with them... !