Saturday, November 7, 2009

TV Chair Adventures -- Part 3

When I last wrote, I had given up the idea of trying to sew the leather pieces together to cover my chair. Gluing the leather on became the next obvious choice, but dealing with the contours was still giving me trouble. It wasn't until I was chatting with another artist (during a papier mache seminar I was attending), that I realized how to do it.

First, I removed the foam insulation tube from the chair form. I took the leather strip for the foam insulation tube and glued it onto the tube directly, with one long edge tucked into the slit of the tube and the other edge loose. Then I glued the big piece of leather directly onto the outside of the Deck-o-foam-covered Sonotube. Finally, I put the leather-covered insulation tube back around the edge of the leather-covered Sonotube and glued everything down (the loose edge of the leather on the insulation tube is glued to the inside of the Sonotube).

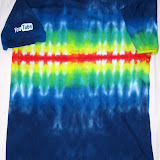
Here is how the back looks.


Cushions

Now that the outside of the chair is done, it's time to get back to work on the cushions.

For the round seat cushion, I cut three layers of 2-inch-thick, high-density polyurethane foam and stacked them inside the cover. I then stapled the cover very tightly onto one of the plywood circles.


For the back cushion, I cut out a piece of the scrap Sonotube so it would fit into the opening inside the insulation tube in the back of the chair.


I used the scraps of high-density foam left over from my denim-quilted dining room chairs to pad the back cushion. Since I wanted to contour the cushion to provide some lumbar support (opposite the direction of the Sonotube at the lower back area), it took some careful arranging!


Lacey shows off the careful use of duct tape to secure the foam scraps.


I wrapped a piece of the blue-green leather around the back assembly and fitted it in tightly, gluing down the leather flaps at the bottom to the inside of the main Sonotube piece. The piece of Sonotube inside the back cushion also helps to strengthen the back of the chair.


The seat cushion then got shoved up against the bottom of the back cushion. To fit the seat cushion properly against the back cushion, I needed to take it out, take off the seat cover, cut off some foam, and restaple the leather more loosely (besides, I didn't like the shiny stretched look of the tightly-stapled leather). I got it right eventually.


But Will It Hold My Weight?


The Sonotube is sturdy, but it's meant to meant to take outward-pushing stresses that cause tension around its circumference, not just downward along the axis of the tube. To deal with this, I want to make the plywood circles carry the weight, not the tube. I glued some wood pieces into the tube up against the top circle. Their job is to hold the plywood circles apart. I screwed the bottom circle into the wood pieces.

I added feet to the bottom circle so the Sonotube is suspended slightly above the floor and does not directly carry the weight of the chair's occupant.


Finished!

I had to be the first to try out the chair, and Lacey decided she had to join me!

Yes, it holds my weight just fine. I later tested it out with a much-heavier friend, and it held him with no trouble (he thought it was pretty comfy, so I had a hard time getting him out of it).

But Wait, There's More!

It would hardly be a proper TV chair without a matching ottoman, so I got a piece of 12-inch-diameter Quiktube and made one. I cut three lengths (9 inches plus two 7.5-inch pieces), and cut out thin sections out of the two short pieces so I could fit them inside the longer one to strengthen it (the 12-inch diameter tube is much thinner than the 18-inch-diameter Sonotube). I used the scraps of the leathers and cushion foam. I covered the outer tube with the black leather (no Deck-o-foam), and made the seat cushion the same way as the larger one, by stapling the leather over the foam onto a pre-cut plywood circle.

I glued wood pieces inside the tube between the plywood circles, and I screwed on the bottom plywood circle. Done!


Here's the set.


It's not the cheapest chair (it totaled about USD $250 for the set), but it's unique, small, comfortable, and my kids love it.

Getting to sit in my own chair without a fight: priceless.

A satisfied customer. It's just her size.

Friday, November 6, 2009

TV Chair Adventures -- Part 2

Part of what inspired me to make this chair was that I found an odd little piece of leather on one of my too-regular forays over to the local Tandy stores. They get odd lots of various upholstery leathers from tanning companies, and I'm always keeping my eyes open for nice bits in blues and greens that my kids might like. There was this one small piece (maybe 15 square feet) in a mottled blue-green with a shiny finish that caught my eye, and I nabbed it (it was one of a kind--none of the employees saw any others like it). Somehow I didn't manage to get a picture of the piece before I cut it up, but I started making a round cushion from it for the seat of the chair.


I found that stapling the pieces together worked better than pinning (in the seam allowance so holes won't show in the finished cushion). I got fewer stab wounds that way, too! I sewed the cushion sides on using heavy Gutermann polyester thread. This is pretty heavy and stiff leather (think of vinyl seats in a diner, and you'll be close), and I had a lot of trouble sewing through it on my machine (skipped stitches, etc., even with a "walking foot"). I got through the main seam around the cushion, but gave up sewing a second line around to stitch down the seam allowance. I ended up gluing that down.


Since I only had enough of the blue-green leather to cover the chair cushions, I got a huge black "Zora" hide from Tandy to cover the outside of the chair. This is beautiful soft matte garment leather. It's thin, a little stretchy, and it feels wonderful.


More Tubes: Foam Insulation
I find inspiration everywhere. I love to wander around hardware stores looking for tools and materials that might be good for projects. This time I found slit foam tubes that are used for insulating hot water pipes. They fit over the cut edge of the Sonotube and make a nice contour. Some of them even come with double-sided tape on the slit edges, so I was able to bend the foam around the edge of the chair and then pull out the plastic strip covering the adhesive. Here's how it looks on my sample piece.


Covering the Chair

My initial thought was that I would fit the leather over the chair with a big piece going around the Sonotube cylinder and a separate strip sewn onto the big piece so it would fit tightly over the contoured pipe insulation. So I cut it all out and pinned it together (the chair is upside down in this picture).


I sewed it all together (incurring many stab wounds in the process), put it on the chair, and it was a disaster. The contouring didn't work at all. This was one of those times where making a muslin version first would have been a good idea, but of course I just jumped in on sewing the leather, and in hindsight I think it would never have worked the way I had envisioned. I ripped out all of my seams, threw everything in a pile, and let the project sit stalled for a couple of weeks.

To be continued...

Friday, October 30, 2009

TV Chair Adventures -- Part 1

I need a special chair for my living room. My kids have both outgrown the teeny little wooden rocker they used to use to watch TV, as well as their cute little plastic chairs, and now they keep fighting over who gets to sit in MY favorite chair. My lovely tie-dyed couch is too far away from the TV for their viewing pleasure. Rather than all-out war, it's time to find a new solution.

I have some pretty specific requirements, since floor space is at a premium in my living room. After all, we have lots of bins of stuff, plus a consistent Wii-Fit user who wants enough space for the yoga mat and push-ups. So the new chair has to have a fairly small footprint. Also, I want a back for comfy TV watching, but the back and seat have to be fairly low so that anyone sitting on the tie-dyed couch behind it will still be able to see the TV. A "gamer's chair" would be a little too low--old people like me need to be able to get up from the chair. I searched for "low chair" on the Web, and I found some I'd love, but most of the ones I really liked were in the $2000 range (and while she may think she's worth it, do I really want Lacey taking over a $2000 chair?)!

My older daughter and I came up with a design that would fit the requirements without breaking the bank, and it would be uniquely ours.

Really Big Toilet Paper Tubes

It is possible to get really large heavy cardboard tubes that are used in construction work for pouring concrete posts and columns. Use "cardboard concrete form" as your search criteria. There are various makers such as Sonotube, Quikcrete, and Sakrete, but many contractors simply refer to them as Sonotube (similar to using the word "Kleenex" to refer to any type of facial tissue--bad for protecting brand trademarks, but everyone knows what you want). The big chain hardware stores (Home Depot, OSH) carry them in stock in up to 12 inches in diameter, but for the bigger ones (18, 24, 30, 36 inches in diameter), you need to go to a construction contractors' supply store. Here in the San Francisco Bay Area, I got some at Peninsula Building Materials Co. I got a 30-inch-long piece of 18-inch-diameter Sonotube there for USD $25.95 including tax ($9.50 per foot). I later got a 4-foot-long Quickcrete 12-inch-diameter tube at the local OSH for the matching ottoman.

Regular Old Toilet Paper Tubes

The kids and I spent a fun hour or two cutting up our large collection of used-up cardboard toilet paper tubes to make chair models.


After lots of time and discussion, we decided on the basic pattern to use for the chair (something in between the three middle models in the back row above).

We also did a fair amount of "design by comparison", where we sat in our existing chairs and measured how we fit in those chairs and where the contours were that made the chair comfortable or not.


We decided to make the seat platform about 12 inches from the floor. I made a full-size paper pattern to model the chair.


The pattern would later fit around the Sonotube so I could trace it for cutting.

Cutting the Sonotube

The large-diameter tubes such as my 18-inch-diameter tube are very thick (around 1/4-inch thick) cardboard (not corrugated), and they are quite hard to cut. I tried a number of (non-powered) things, but what worked the best for me was to use a utility knife (box cutter) to just stab through the cardboard. Later, for trimming edges and fine tuning, I would cut along my line as deeply as possible, peel off a layer of cardboard from the discarded side of the line, cut along the line again, peel off another layer, and so on, until I could finally cut directly through what was left.

I bought two pre-cut plywood circles (Closetmaid brand) that were 17.75 inches in diameter. I planned to use one inside the bottom edge to protect the Sonotube and the other as the seat platform.


While I was at the Peninsula Building Materials Co., I also bought a roll of Deck-o-foam, used for expansion joints in concrete, to cover the outside of the Sonotube. It's actually the same type of foam I used in my origami patterns, though a different shape (4 inches wide, half-an-inch thick, and 50-feet long for USD $20) and not rescued from a packing box.


I used the same FastBond 30 glue I currently use for making my sandals (I still have a lot left of the gallon I bought!).


I covered the entire outside surface of the tube with the Deck-o-foam.


Now I've got the basic structure of my chair.

Monday, September 28, 2009

Origami Revisited

Recently I wrote about how I was experimenting with origami paper and pushpins to come up with new tie-dye patterns. I had tied one design according to the paper pattern, but I hadn't gotten around to dyeing it yet:


This was the pattern I was (sort of) aiming for:


I finally got around to dyeing the bedsheet I had folded, and here is the result:


I didn't get quite enough dye into all the folds, so there is a bit more white than I would like, but you can see that the pattern actually came out quite a bit like the paper one!

Of course, if I have a tie-dyed top sheet, I need to dye the rest of the sheet set to match. So I folded and tied up the fitted sheet semi-randomly (that is, no particular plan but similar folding techniques), and it came out like this:


Here is the matching pillowcase:


I had a couple hand towels and washcloths handy, so I dyed them too:


One disadvantage of all-cotton sheet sets is that they wrinkle like crazy. Since I'm still practicing my "done is better than perfect" policy, I haven't bothered to iron them. But these pictures get the idea across, and my kids don't care--they've already started arguing over who should get these sheets!

Wednesday, September 23, 2009

Playing with YouTube

I recently did a corporate team-building activity at a local company's "Oktoberfest" event for their employees. Since there were lots of participants (they had ordered 150 shirts, and had a few left over), I got lots of help from a lot of great volunteers who are also really into tie-dye (thanks, everyone!). The activity seemed to be quite a hit!

I took home the leftover shirts and dyed them for myself and a few employees who didn't make it to the event. You can see pictures of those shirts here on my Picasa album site.

2009-09-22 Tie-dye for Oktoberfest

Is That Thing On?

I've been thinking about doing tie-dye demonstration videos to put onto YouTube, and I got one of the volunteers to video me while I was demonstrating how to do a couple of the fold patterns. The videos are completely rough and unedited, and there is polka music in the background! Who would have thought that polka makes a great soundtrack for tie-dye? Anyhow, I'm not sure when or if I'll get around to doing them the "right" way, so I figured I'll put them on YouTube for now just as they are. After all, I describe myself as a "recovering perfectionist"--where "done" is better than "perfect". I'd say these are worth lots of perfectionism recovery points!

In this video, I show how to fold an X pattern.


Here I demonstrate folding a diagonal stripe pattern.


Enough About Me...

Some of my faithful audience members have pointed out that they haven't seen my faithful hound Lacey lately. Here she is:


Amazingly, Lacey knows which shirts are the ones for me, and she just stands on those. Either that, or she just knows that she looks best with a backdrop of blues and greens!


Playtime with a cardboard tube.

Mandalas are great backdrops!

Monday, September 14, 2009

Black, Baby, Black!

I've been experimenting with black and gray dyes recently. I used Better Black, New Black, Charcoal Gray, and Black Cherry (okay, that's more of a dark red), all Procion dyes from Dharma. I made them up in various concentrations, starting with "1" strength as the formula recommended on the Dharma site: 2 to 8 teaspoons (10-40 ml) and 1 tablespoon (15ml) urea per 1 cup of water for the Procion dyes. The blacks needed 8 teaspoons each, while the charcoal gray only needed 2 teaspoons. The black cherry took 4 teaspoons of dye per cup.

I then mixed up "1/4", "1/8", and "1/16" dilutions of those dyes by adding more urea-water to the appropriate amounts of the "1" solutions.

I also mixed up one teaspoon of sodium alginate thickener in one cup of water (stirring and letting it stand overnight). When completely dissolved, it was about the consistency of molasses or honey. I put about 4 teaspoons of thickener mixture into each cup of dye at the various strengths. That proportion is a little rougher, since I wasn't extremely exact on those measurements of the thickener!

I marked up an old white shirt with permanent marker, soaked it in soda ash, then dripped on small amounts of each solution. Here is the shirt still wet, just after dyeing. You can see the blue edges on some of the spots where the dyes separate. It's even worse without the thickener. I tried again in the lower right corner after doubling the amount of thickener in the solutions (for "1/4" strength dyes).


Here is the same shirt after sitting overnight, then washing and drying. It looks like a chromatography experiment with all the bleeding and color separation!


If I need to do anything sharply black, I'll have to add a lot more thickener in the future. However, I really love the bleed effects and I like to use them intentionally to get all sorts of subtle shadings.

Time to Dye

This isn't my usual palette of blues, greens, and purples, but once I had all those different solutions mixed up, I had to use them, right?

Here is a "Moonlight Sonata" crop top done with a repurposed United Colors of Benetton shirt. I love the word "repurposed". It's like a "pre-owned" car. It sounds so much better than "used" or "thrift shop"! It even sounds better than "recycled", even if it's a little slower rolling off the tongue. I stitched the moon with dental floss and covered it with the repurposed thumbtip of a used rubber glove secured by the floss ends. No, the dental floss wasn't "used", though I guess using it for something other than teeth counts as "repurposed"!

I only did the moon on the front layer of the shirt.


Long "Moonlight Sonata" shirts: I made two of these, different sizes, opposite designs. You see the back of the left one and the front of the right (the front has ties at the neck). These shirt blanks are new from Dharma: Light Jersey Extended Sleeve shirts.

They are REALLY thin shirts, but I rather like the results. I'll have to get some more of these. They'll be good for high-resolution geometric designs.


I call these my "Three Sisters" shirts. I love the subtle shades. I used all the various blacks, grays, and the "black cherry" color. The shirts are cotton-spandex shirts from Justice, a chain store catering to pre-teens. I happened to pass by it one day and plain (white) shirts were on sale. I nearly cleaned out their supply! The "Two Sisters" (my kids), immediately ran off with them.

Here's a cotton bandana. It was folded, tied, soaked in soda ash and then let dry completely before dyeing.


I'm pretty happy with the results of my experiment. I might just have to use blacks more often!