I've been experimenting with black and gray dyes recently. I used Better Black, New Black, Charcoal Gray, and Black Cherry (okay, that's more of a dark red), all
Procion dyes from Dharma. I made them up in various concentrations, starting with "1" strength as the
formula recommended on the Dharma site: 2 to 8 teaspoons (10-40 ml) and 1 tablespoon (15ml) urea per 1 cup of water for the
Procion dyes. The blacks needed 8 teaspoons each, while the charcoal gray only needed 2 teaspoons. The black cherry took 4 teaspoons of dye per cup.
I then mixed up "1/4", "1/8", and "1/16" dilutions of those dyes by adding more urea-water to the appropriate amounts of the "1" solutions.
I also mixed up one teaspoon of sodium alginate thickener in one cup of water (stirring and letting it stand overnight). When completely dissolved, it was about the consistency of molasses or honey. I put about 4 teaspoons of thickener mixture into each cup of dye at the various strengths. That proportion is a little rougher, since I wasn't extremely exact on those measurements of the thickener!
I marked up an old white shirt with permanent marker, soaked it in soda ash, then dripped on small amounts of each solution. Here is the shirt still wet, just after dyeing. You can see the blue edges on some of the spots where the dyes separate. It's even worse without the thickener. I tried again in the lower right corner after doubling the amount of thickener in the solutions (for "1/4" strength dyes).

Here is the same shirt after sitting overnight, then washing and drying. It looks like a chromatography experiment with all the bleeding and color separation!

If I need to do anything sharply black, I'll have to add a lot more thickener in the future. However, I really love the bleed effects and I like to use them intentionally to get all sorts of subtle shadings.
Time to Dye
This isn't my usual palette of blues, greens, and purples, but once I had all those different solutions mixed up, I had to use them, right?
Here is a "Moonlight Sonata" crop top done with a repurposed United Colors of Benetton shirt. I love the word "repurposed". It's like a "pre-owned" car. It sounds so much better than "used" or "thrift shop"! It even sounds better than "recycled", even if it's a little slower rolling off the tongue. I stitched the moon with dental floss and covered it with the repurposed thumbtip of a used rubber glove secured by the floss ends. No, the dental floss wasn't "used", though I guess using it for something other than teeth counts as "repurposed"!

I only did the moon on the front layer of the shirt.
Long "Moonlight Sonata" shirts: I made two of these, different sizes, opposite designs. You see the back of the left one and the front of the right (the front has ties at the neck). These shirt blanks are new from Dharma:
Light Jersey Extended Sleeve shirts.
They are REALLY thin shirts, but I rather like the results. I'll have to get some more of these. They'll be good for high-resolution geometric designs.

I call these my "Three Sisters" shirts. I love the subtle shades. I used all the various blacks, grays, and the "black cherry" color. The shirts are cotton-spandex shirts from
Justice, a chain store catering to pre-teens. I happened to pass by it one day and plain (white) shirts were on sale. I nearly cleaned out their supply! The "Two Sisters" (my kids), immediately ran off with them.
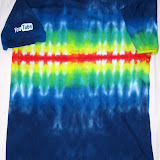
Here's a cotton bandana. It was folded, tied, soaked in soda ash and then let dry completely before dyeing.

I'm pretty happy with the results of my experiment. I might just have to use blacks more often!