Friday, May 30, 2008

Tie-Dye Group Dynamics

Over Memorial Day weekend, I went to YMCA Camp Jones Gulch Family Camp out under the California redwoods. I'm not much of a hiker, and I hate riding horses (the knees are just not flexible enough anymore), so I usually spend much of my weekend hanging out in the crafts area. The last few times I've gone to family camp, I've actually volunteered and run a tie-dye activity there, and I did it this time too.

I have done large groups several times, but there are different dynamics depending on the group.

The Whole First Grade, for the Fifth Year

When I work with my first graders, I'm working with a relatively homogeneous group. I have volunteer parent helpers and the teachers to keep things under control. It's pretty much a class project like any other, and the kids are expected to pay attention to the lecture and then do what they are supposed to. The kids get to make choices about how they want to fold their own shirt (which of three folding patterns) and what colors they want to use, but they all work pretty much in lockstep. They all fold at the same time, and they all dye at the same time (a class at a time, 5 classes). The results are uniformly decent-to-very-good (and you can tell what pattern they were trying to make), since everyone gets help. The kids love it, especially since they get to keep the finished shirts.

And Off to Family Camp

When I tie-dye at family camp, things are quite different. The group is more diverse in age and ability (kids of all ages, with or without their parents there, a few grandparents). The tying and dyeing are available all day Saturday, and people wander in when they want to, so sometimes it's a rush, and sometimes it's a trickle. I don't really know how many people are going to show up, since they might only come if they have time between other activities and aren't too tired. I think I had around a hundred people wander through, but I don't know for sure.

At family camp, I'm the only tie-dye "expert", and I have one or two counselors dedicated to working on this activity. We can't provide nearly as much help as we do for the first graders. Many people don't want help anyhow--they just want to do their own thing and go wild (such as the nine-or-ten-year-old boy who dyed his shirt by mopping up the puddles of dye left on the table by previous participants--in an example of how unfair the world is, his shirt came out quite nicely!). Many people are making things up as they go along. Some people achieve bold geometric patterns, while others go for random splotches of color. The results vary wildly.

[Me with a counselor, washing out all the tie-dye one year at family camp.]

[This picture shows the samples and instructional posters I put up the first time I taught tie-dye at family camp. These are all my work.]

It's Art and More

Group tie-dye is a very popular activity. In the first grade classes, it's a chance to make art, to make a mess, and to make a shirt of your own. At family camp, it's all of those things and more. The process can be a family bonding activity, and making matching shirts, bandanas, and so on helps bond families further when they all wear and show off the matching clothes.

For some, it's a chance to relive fond memories of doing camp or school activities they did when they were kids themselves, or a chance to catch up on fun they missed when "everyone else was doing it".

Cool.

[A happy camper and her counselor showing off the bandanas the camper made.]

Sunday, May 18, 2008

Classes Coming Up in Mountain View, CA

Now for some more shameless self promotion:

The Mountain View - Los Altos (MVLA) Adult Education catalog came out last week. I'm going to be teaching some tie-dye classes in June and July for them. The classes will be at Mountain View High School, and you can register online.

Here are the descriptions from the catalog:

Tie-Dye I, Classic American Tie-Dye! #200207

Do you love color? Do you see tie-dyed clothing at craft fairs and want something that's uniquely your own? Do you have a desire to make matching garments for your family? Come to class and learn classic American tie-dye folds and designs and make your own wearable works of art! IMPORTANT: bring white, 100% cotton articles to dye - t-shirts, tote bags, socks, bandanas - washed with NO fabric softener or dryer sheets. In addition Sara will have a limited number of white items available for purchase. Wear clothing that can get stained and bring an apron. Materials fee $28 payable at first class meeting. Instructor: Sara Woodhull, sara@amethistle.com, is an experienced and patient tie-dye instructor. She enjoys teaching tie-dye classes at elementary schools, parties, and corporate events. See her work at www.amethistle.com. Register before 6/11.

Tie-Dye II, Stitch Resist and Shibori #200208

Join this advanced class and learn how to do stitch-resist and shibori tie-dye to make your own wearable works of art! IMPORTANT: bring white, 100% cotton articles to dye - t-shirts, tote, bags, socks, bandanas - washed with NO fabric softener or dryer sheets. In addition Sara will have a limited number of white items available for purchase. Wear clothing that can get stained and bring a apron. Materials fee $28 payable at first class meeting. Instructor: Sara Woodhull, sara@amethistle.com. Register before 7/2.


It's going to be fun--I can hardly wait!

Wednesday, May 14, 2008

A Few of My Favorite Projects and Being an Enabler

A while back I put a couple tie-dye projects on my home page when I thought I'd just be writing about tie-dye on my Amethistle website. Now that I'm writing about other things as well (Turkey and random subjects), it's time to tidy up the home page a little and make it more generic.

As I started doing that, I thought about why I had chosen those projects to put on the home page (and why I'm moving them here). It turns out that my favorite tie-dye-related projects tend to be big, multi-phase projects, and they tend to involve enabling other people to do tie-dye. While I really enjoy doing my own tie-dye pieces, I also enjoy helping other people do it.

Wedding Clothes

Last year I was contacted by a woman who had gotten my name and wanted me to tie-dye her wedding dress. I'm a pretty hard-core tie-dye fan, but even I wouldn't think of doing that! I told her I didn't want to dye it--I definitely didn't want to take a chance on ruining somebody else's wedding dress! However, I was willing to teach her how to tie-dye it herself.

That started what became many sessions of private tie-dyeing lessons. She got very enthusiastic about it, and she even brought her fiance and some of her friends to some sessions. By the time we were done she had dyed her wedding outfit and a backup outfit, the groom's pants, gifts for her wedding party, and shirts for half the attendees to wear to the wedding! The clothes and the wedding came out terrific.


I made this tapestry as a wedding present for them (it now hangs in their baby's room). I did my dress, too, and wore it to the wedding (the bride's colors were "all of them!").

Kids

I love teaching people how to tie-dye, especially kids. Besides teaching tie-dye to individuals and friends, I've taught tie-dye at the elementary school, YMCA Family camp, Girl Scout meetings, and parties.

May/June 2007 was the fourth year I've done tie-dye with the entire first grade at a local school. The kids love the shirts they made! We had about a hundred kids that year. I'm just getting ready to work with this year's batch of kids. I know they are getting excited about it (especially those with older siblings who did tie-dye with me before). Even though it's a huge amount of work, I can hardly wait!

Thursday, May 8, 2008

The Things People Wear

I've been talking with some friends lately about life in a fifth grade class. Even at age 10, several of the girls have already become slaves to fashion and the popularity contest. Specifically, they strongly prefer to wear T-shirts where the name of the brand is splashed across the front of the shirt: Abercrombie & Fitch, Aeropostale, Hollister, American Eagle Outfitter, and the like. Some of them even put down other people because the others get clothes at places like - gasp - Target! Parental explanations of how the girls are advertising those trendy brands by wearing logo shirts - and paying dearly for the privilege - fall on deaf ears.

My discussions got me to thinking about some anti-trend statements. I poked around on the web for a bit and found a place where you can make custom t-shirts or buy designs others have done. I created a couple of satirical t-shirt designs here on a website called Zazzle.


Okay, it's not tie-dye, but it was fun. The "American Sheep" shirt says "Follow the Flock" on the back, and the "Abercowmbie" shirt says "Follow the Herd" on the back.

My general anti-logo leanings are nothing new. One of my favorite pieces is a "Polo by Ralph Lauren" polo shirt that I found at Goodwill and then dyed tied up in kite string. It's fun to get an expensive trendy brand name shirt and make it your own.


You'll never find this shirt at your local mall! I can just see ol' Ralph cringing...

Sunday, May 4, 2008

More Inspiration: Maker Faire in San Mateo

For the third year, the Maker Faire in San Mateo was geek-and-crafter's Heaven! It is put on by Make Magazine and Craft Magazine. It's a hands-on free-for-all for participants to show off their work, convert new hands and minds to a favorite hobby, sell stuff to feed their hobby habits, and generally have a good time. Attendees like me can try new things, marvel at artwork and crafts we'd never have thought of, and learn from experts.

Textile Crafts

There were a lot of textile-related crafts around, such as knitting, crochet, sewing, needle felting (I learned that at the Maker Faire last year!), and batik. People were sitting around crocheting animals from wool yarn, needle-felting fruit, and refashioning all manner of clothing on the spot. Other people were making leather masks or showing purses made of aluminum can tabs.

A woman named Teresa Mak had an interesting display called Batik Chic where she showed tools and materials she uses for her batik artwork. One thing she showed is that if you use pure beeswax for the batik, you can't get the traditional cracking effect because the beeswax is too flexible. You need to use a combination of waxes such as paraffin to get the cracked effect.

Interestingly, with all that textile crafting around, I didn't see much tie-dye. I didn't see any actual exhibits of tie-dyed materials or techniques (though maybe I didn't look hard enough). I saw a lot of people wearing tie-dye, but they were mostly kids, and the patterns were almost all (purchased) swirls. Pretty pedestrian.

What Possessed Them to Do That?!

There were a lot of odd exhibits where my immediate thought was "but why?" My immediate mental response, of course, was "why not?" and "because it's fun!" Displays in this category included "power tool drag racing" where people race oddly-decorated power tools with sawblade wheels...


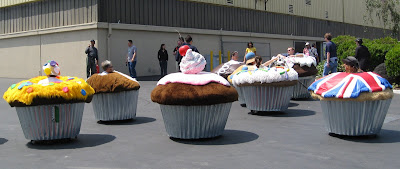
...and "muffin cars" where people drive around sitting in what look like giant cupcakes...

...or "art cars" covered with marking pens or other objects.

Photo by AKV
There were many art forms that would never occur to me, but that were really beautiful, such as the giant sculptures made of rusty steel cables.

One of my favorite displays was Sisyphus V by Bruce Shapiro.


Fabulous People-Watching

The people watching at the Maker Faire is fabulous! Many of the people there become their own artwork, with brightly-colored hair, elaborately trussed-up dreadlocks, and fabulous one-of-a-kind clothing concoctions. Other people dressed as they would for any other summer festival, in khaki or denim shorts, comfy t-shirts, sandals and hats.

I think the highlight for people and fashion watching was the Swap-O-Rama-Rama Fashion Show. In a great example of "reduce, reuse, recycle", many of these folks had spent the day creating new garments from old garments swapped by attendees (I swapped some of my old red stuff for somebody else's old blue jeans), and then got up and paraded them on the catwalk stage. Many of the results were both outlandish and beautiful.


This cool set of outfits is by Velvet Valentine (the 2 pictures above and the following picture).

These bicycle-based outfits below don't look very comfortable (note the metal gears in the center of his chest), but they sure are striking!

Reduce, Reuse, Recycle - Again

Finally, my personal prize for "Best Use of Recycled Materials" goes to the Portable Guerrilla-Gallery for their giant tent made of old billboard covers and other salvaged materials. All the art inside was made of recycled materials as well!

Photo by AKV
Now I need to figure out what to do with all those recycled blue jeans I picked up at Swap-O-Rama-Rama!

Thursday, May 1, 2008

Selling Out?

My friends have been after me, strangers have asked, and I've finally done it: I've put some of my tie-dyed stuff up on eBay.


I do a fair amount of experimentation with my dyeing. Often I want to do something like see how two different dye mixing methods compare, or different types of string, or rubber bands, or whatever. I might try out new dye colors, or look at the bleeding effects of the dyes with and without thickeners. And of course I'm always trying out various patterns.

My favorite canvases for such experimentation tend to be scarves, bandanas, and plain t-shirts. They are inexpensive and easy to get. The scarves and bandanas don't take much room to store, either.

Lately, though, some shirts have been piling up as I have dared to venture out of the blue-and-green palette strongly preferred by my older daughter. A blue-and-green item held up in front of her tends to disappear with a thunderclap as the air fills the space it once occupied, but other colors languish unloved.

The stuff I've been making lately has been way too big for my younger daughter, even though she'll try to make it fit ("I need another nightgown, Mom, really!"). And though I like the geometric pattern, the large shirt in bright orange, yellow, and brown just isn't "me" (and it definitely isn't my husband).


It's not your run-of-the-mill "spiral". Neither are the others. My experiments tend to be on the wilder side.


If you're interested, take a look at my auctions, and tell your friends. I'll probably be adding to them periodically.

We now return you to your irregularly-scheduled blog.

Tuesday, April 29, 2008

Mom, Where Are My Pants?

My younger daughter has had just about enough of my "Reduce, Reuse, Recycle" obsession. I've mentioned before that I save every pair of jeans my family outgrows or wears out, but it's more than just jeans.

Junk Salvage

Recently I took apart an abandoned pink "Disney Princesses" backpack to salvage the straps, zippers, and what hardware I could.
"Mom, I liked that backpack!"
"You haven't used it in over a year. Trust me, honey, you didn't want to see what was growing in those pockets!"

My other daughter had one of those all-in-one binder cases. It zips around the edge, has pockets to hold folders and pencils, has a three-ring binder, and has a shoulder strap with clips at each end.


She abandoned it when the zipper broke and spilled all her stuff out. It's big, and I figured it had to be good for something, so I put it aside and hung onto it (and I wonder why it's hard to walk around in my house!). So the other day I took my seam ripper and a hammer and went to it. I was amazed at how much work had gone into making it--some parts of it had 5 or 6 seams layered on top of each other! It was constructed in modules: the folder pocket, the pencil pocket, the backing module, the strap module, and so on, ending with the edging tape. Each one was pretty much self-contained and then layered onto the whole. I ended up tossing most of it after my reverse-engineering session, but the strap and related hardware are useful.


[Once again I marvel at the differences in the economic and labor structure between the US and China, where this was made. I think this binder case cost about $12 USD at Costco. Assuming the retail store had doubled the wholesale price, that doesn't leave much money to pay for the labor to make the binder case! If it had been made here, it probably would have cost $40!]

An old kids' winter jacket provides zippers, pull cords and those little barrel-shaped cord locks, among other things.

The Goal

With all my collected junk at hand, it was time to put my plan into action. I have recently started taking yoga. I like it, but the mat is kind of unwieldy, so I need a bag to carry it in. I looked on the Web and found lots of them, but they ran $20-$85! More than I want to spent on a glorified tote bag. I also found a couple of sewing patterns. The free yoga bag pattern by Amy Butler seems to be popular. Nothing was quite what I wanted (nothing was tie-dyed!), but I got a few ideas.

I used a couple pairs of my kids' old jeans, one sized 4T (not tie-dyed) and one size 6X (faded and previously tie-dyed). I cut the legs off the 4T, then separated the top front from the top back--I want to use the elastic waistband in the back, and I love the look of those little jeans pockets. I ripped open the inseam of the 6X pants, then sewed the legs together down the front and back to make a big tube. I made the seam allowance bigger at the crotch to lessen the shaping at the crotch (that is, I cut off part of that extra bit that goes between the legs). I didn't make it completely flat, so it's a little roomier in the seat. In the following picture you can see the new seam holding the legs together. I top-stitched the new seam to lie flatter.


On the front of the tube, I top-stitched on the rear end of the 4T jeans as a big pocket. Since I didn't undo the side seams of the 6X pants, I had to wrestle with getting the fabric through my sewing machine without sewing through more layers than I wanted. But I managed. With the elastic waistband, this is a great pocket for a water bottle. I just love the cute little ribbon-and-bead pocket embellishment! My daughter loved these jeans, and she howled when she saw I'd used them--never mind that they had holes in the knees and were three sizes too small!


Next came the second pocket, made from the front of the 4T jeans. Here I used a zipper (with that cute pompom zipper pull) that I scavenged from the pink backpack previously. First I sewed one side of the zipper to the waistband, then I sewed the other side of the (zipped) zipper to the big 6X tube with the pocket wrong side out like a big flap. Finally I sewed the pocket down onto the tube and top-stitched it.

Last, I sewed the bottom of the tube shut, matching the existing hem seaming as best I could. I included the heavy-duty plastic D-rings on their straps that I had salvaged from the binder case.


I hooked the other end of the binder case strap to one of the sturdy back belt loops of the 6X pants. Here's the back veiw of the finished bag:


I left the snap and zipper of the 6X pants usable because it makes it easier to get the yoga mat in and out. I had sewed up the snap and zipper for the pants that became the second pocket.

Here's the front view of the nearly-finished bag:


I added an elastic drawstring and cord lock (from the winter jacket) through the top belt loops, and voila! I'm ready to go to yoga class anytime.

And even though they aren't offering any yoga classes, I may bring my bag along when I go to the Maker Faire this weekend, just to show it off. :-)

Happy Ending

Oh yes. My daughter's 4T pants have a happy ending after all. Besides that ribbon-and-bead embellishment on the back pocket, they had an applique on one leg front of a star and a heart with more ribbons. I cut that out, cut out another heart from the same jeans leg, and ironed them on as knee patches with fusible webbing. I finished the edges with fabric paint.

So the dark blue jeans get a little more life thanks to patches over the holey knees, and my daughter gets to enjoy her embellishments a little longer.

I just love a happy ending; don't you?