Monday, September 28, 2009

Origami Revisited

Recently I wrote about how I was experimenting with origami paper and pushpins to come up with new tie-dye patterns. I had tied one design according to the paper pattern, but I hadn't gotten around to dyeing it yet:


This was the pattern I was (sort of) aiming for:


I finally got around to dyeing the bedsheet I had folded, and here is the result:


I didn't get quite enough dye into all the folds, so there is a bit more white than I would like, but you can see that the pattern actually came out quite a bit like the paper one!

Of course, if I have a tie-dyed top sheet, I need to dye the rest of the sheet set to match. So I folded and tied up the fitted sheet semi-randomly (that is, no particular plan but similar folding techniques), and it came out like this:


Here is the matching pillowcase:


I had a couple hand towels and washcloths handy, so I dyed them too:


One disadvantage of all-cotton sheet sets is that they wrinkle like crazy. Since I'm still practicing my "done is better than perfect" policy, I haven't bothered to iron them. But these pictures get the idea across, and my kids don't care--they've already started arguing over who should get these sheets!

Wednesday, September 23, 2009

Playing with YouTube

I recently did a corporate team-building activity at a local company's "Oktoberfest" event for their employees. Since there were lots of participants (they had ordered 150 shirts, and had a few left over), I got lots of help from a lot of great volunteers who are also really into tie-dye (thanks, everyone!). The activity seemed to be quite a hit!

I took home the leftover shirts and dyed them for myself and a few employees who didn't make it to the event. You can see pictures of those shirts here on my Picasa album site.

2009-09-22 Tie-dye for Oktoberfest

Is That Thing On?

I've been thinking about doing tie-dye demonstration videos to put onto YouTube, and I got one of the volunteers to video me while I was demonstrating how to do a couple of the fold patterns. The videos are completely rough and unedited, and there is polka music in the background! Who would have thought that polka makes a great soundtrack for tie-dye? Anyhow, I'm not sure when or if I'll get around to doing them the "right" way, so I figured I'll put them on YouTube for now just as they are. After all, I describe myself as a "recovering perfectionist"--where "done" is better than "perfect". I'd say these are worth lots of perfectionism recovery points!

In this video, I show how to fold an X pattern.


Here I demonstrate folding a diagonal stripe pattern.


Enough About Me...

Some of my faithful audience members have pointed out that they haven't seen my faithful hound Lacey lately. Here she is:


Amazingly, Lacey knows which shirts are the ones for me, and she just stands on those. Either that, or she just knows that she looks best with a backdrop of blues and greens!


Playtime with a cardboard tube.

Mandalas are great backdrops!

Monday, September 14, 2009

Black, Baby, Black!

I've been experimenting with black and gray dyes recently. I used Better Black, New Black, Charcoal Gray, and Black Cherry (okay, that's more of a dark red), all Procion dyes from Dharma. I made them up in various concentrations, starting with "1" strength as the formula recommended on the Dharma site: 2 to 8 teaspoons (10-40 ml) and 1 tablespoon (15ml) urea per 1 cup of water for the Procion dyes. The blacks needed 8 teaspoons each, while the charcoal gray only needed 2 teaspoons. The black cherry took 4 teaspoons of dye per cup.

I then mixed up "1/4", "1/8", and "1/16" dilutions of those dyes by adding more urea-water to the appropriate amounts of the "1" solutions.

I also mixed up one teaspoon of sodium alginate thickener in one cup of water (stirring and letting it stand overnight). When completely dissolved, it was about the consistency of molasses or honey. I put about 4 teaspoons of thickener mixture into each cup of dye at the various strengths. That proportion is a little rougher, since I wasn't extremely exact on those measurements of the thickener!

I marked up an old white shirt with permanent marker, soaked it in soda ash, then dripped on small amounts of each solution. Here is the shirt still wet, just after dyeing. You can see the blue edges on some of the spots where the dyes separate. It's even worse without the thickener. I tried again in the lower right corner after doubling the amount of thickener in the solutions (for "1/4" strength dyes).


Here is the same shirt after sitting overnight, then washing and drying. It looks like a chromatography experiment with all the bleeding and color separation!


If I need to do anything sharply black, I'll have to add a lot more thickener in the future. However, I really love the bleed effects and I like to use them intentionally to get all sorts of subtle shadings.

Time to Dye

This isn't my usual palette of blues, greens, and purples, but once I had all those different solutions mixed up, I had to use them, right?

Here is a "Moonlight Sonata" crop top done with a repurposed United Colors of Benetton shirt. I love the word "repurposed". It's like a "pre-owned" car. It sounds so much better than "used" or "thrift shop"! It even sounds better than "recycled", even if it's a little slower rolling off the tongue. I stitched the moon with dental floss and covered it with the repurposed thumbtip of a used rubber glove secured by the floss ends. No, the dental floss wasn't "used", though I guess using it for something other than teeth counts as "repurposed"!

I only did the moon on the front layer of the shirt.


Long "Moonlight Sonata" shirts: I made two of these, different sizes, opposite designs. You see the back of the left one and the front of the right (the front has ties at the neck). These shirt blanks are new from Dharma: Light Jersey Extended Sleeve shirts.

They are REALLY thin shirts, but I rather like the results. I'll have to get some more of these. They'll be good for high-resolution geometric designs.


I call these my "Three Sisters" shirts. I love the subtle shades. I used all the various blacks, grays, and the "black cherry" color. The shirts are cotton-spandex shirts from Justice, a chain store catering to pre-teens. I happened to pass by it one day and plain (white) shirts were on sale. I nearly cleaned out their supply! The "Two Sisters" (my kids), immediately ran off with them.

Here's a cotton bandana. It was folded, tied, soaked in soda ash and then let dry completely before dyeing.


I'm pretty happy with the results of my experiment. I might just have to use blacks more often!

Monday, August 10, 2009

Origami Paper, Tie-dye, and Birthday Parties

I first started doing tie-dye six years ago, when my older daughter wanted a tie-dye theme for her sixth-birthday party. I did some reading, a friend pointed out the Dharma website, I got some supplies, I tried it out a couple of weeks in advance, it came out well, and I was hooked.

Since then I've helped about a thousand people do tie-dye: more than 500 first graders, a couple of Girl Scout troops, several birthday and other parties, my class for middle schoolers, several kids' day camp and family camp sessions, three corporate team-building events, and lots of random sessions with friends. I love doing tie-dye as a hobby, but I'm actually more interested in teaching it to other people. I have no interest in doing it as a production-and-craft-fairs profession--Harmony can do a much better job, and I recognize their distinctive work on people all over town.

I've mentioned before how I like to sneak in a little education when I teach people how to do tie-dye. Math, spatial skills, and so on. They get practice in colors and manual dexterity. And of course I think doing tie-dye is good for the soul, too. No, buying the mass-market tie-dye t-shirts at the local big-box store doesn't count.

Origami (paper folding) and kirigami (paper cutting) are similar crafts that exercise those same mental and physical "muscles". I did lots of origami as a kid, and I loved it. I've also done some kirigami; those paper snowflakes I did in school were just the beginning. True, you don't end up with the same wearable results as with tie-dye (including shibori), but visualizing how the project is going to turn out is half the fun for all three crafts, as is the pleasure (for me) of folding materials precisely.

Lately I've been playing with origami paper as a quick and concrete way to visualize how various folds might come out in tie-dye. The basic paper is cheap, thin, colorful, and easy to fold (I get 60 sheets for $1.50 USD at the local Daiso store). I've been folding it up in various wedges, squares, or rectangles, then piercing it in patterns using a push-pin into a small block of firm packaging foam. I particularly like the foam that feels a little soft and waxy (not Styrofoam/polystyrene), but anything you can easily push a pin into will work fine.


I put the resulting pierced "snowflakes" up on a window so I can see the light pattern through them (dark paper colors work best), and they are very pretty.


My kids joined in, of course, producing some beautiful ones of their own. My younger daughter folded her paper in random directions before piercing it, and she came out with some very intriguing designs.

These paper creations were so easy, so fun, so cheap, and so clean (no cut-out pieces to sweep up!) that I added them to the activities roster for my younger daughter's ninth birthday party (a crafts theme, naturally) a couple weeks ago. It was a definite hit with most of the kids. For the goody bags (party favors), I sent home the foam blocks and push-pins the kids used, along with a fresh packet of origami paper for each child, in hope that they might do some more later and keep flexing those brains.

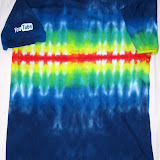
Now I'm starting to work on translating a few of those paper designs into tie-dye.


I'm using the fold-along-a-drawn-line technique shown in both of my favorite DVDs about tie-dye:
  • "Learn How to Tie Dye: Complete 3 Volume Set" available from Dharma or Amazon
  • "The Art of Tie-Dye" available from Dharma or Amazon


Sometimes I'm stitching the designs with dental floss, sometimes I'm just tying the designs without stitching. The more complex designs need to be stitched so they don't slip apart.

I haven't dyed any of these yet, and they won't come out exactly like the paper patterns, but I'll post them when I do. In the meantime, try out some paper pattern piercing!

Saturday, August 1, 2009

Tie-dyeing Blue Jeans

I had a couple of pairs of jeans that I wasn't wearing because they had blemishes in strategic locations, as well as some swapped jeans I picked up at the Maker Faire recently. And while I have dozens of tie-dyed shirts that I wear all the time, none of my jeans are (intentionally) tie-dyed. Time to change that.

Color on Color

I often get questions about dyeing garments that aren't white. I've done it a fair amount, but it's a little tricky. You have to remember that the colors are ADDITIVE. So if you start with a yellow shirt and put blue dye on it, you get green. Purple on yellow gives you brown, and so on. Also, the colors you put on may seem a little dull compared to how they would look on white. So it's worth trying, because you can get some interesting effects (blue and purple on a pale blue shirt looks good), but you may not get the results you expect or hope for.

Here, I did a crinkle pattern on a pair of light-blue 100% cotton Levi's (left) and the exact same crinkle pattern on a pair of medium-blue Gloria Vanderbilt partly-spandex stretch Amanda jeans (on the right). I smushed them both up into wrinkly pancakes, along with the shorts below, and I dyed all three pieces side-by-side with the same colors. I actually squirted the dyes on all three pieces with the same strokes of each color.


The Levi's give a much more vibrant and almost crystalline crinkle effect than the Vanderbilt jeans. The lighter original color of the Levi's gives a much better contrast with the dye colors than the darker blue, though I like both. The interesting part, though, is that the colors on the Levi's jeans look much crisper and sharper than on the Vanderbilt jeans. The denim of the Levi's is thicker and much stiffer than the Vanderbilt denim, giving the crinkles more definition. I think the thicker denim also prevents the soda ash from soaking in quite as well into the Levi's, leaving more undyed fibers in the denim (both pairs soaked for the same amount of time), helping the Levi's look a little brighter in the center parts of the crinkles.

The cargo shorts are from Lands' End in the light greyish color they call "light stone". My daughter managed to spill chocolate on them in strategic places almost immediately, so they were definitely in need of revamping with dye. These were the third piece in my crinkled assembly line. The light grey is almost white, but not enough to really brighten the dye colors.


My daughter likes them more now than in the original grey color, of course, and likes the hoodie I did for her while I was at it.

Stripes Front and Back

This is another medium-blue pair of the Vanderbilt jeans (my usual). This one really demonstrates the effect of working with multiple layers of thick, stiff fabric such as this denim.

Since the fabric is so thick, very little dye bleeds through from dyeing the folded piece on one side, so it's easy to get thick-and-thin effects on the stripes by dyeing a little less or more on the two sides of the folded piece, and it's hard to get dye all the way to the center of the pleats. In this pair, I folded first down the center of the jeans so the back is on the inside, then I pleated the whole thing starting up from the ankles. I like the multi-thickness effect, though.


Here is how they look on (and one of my current favorite shirts--bright enough to hurt the eyeballs!).


And the back...I like the two-toned effect on the legs here (mine, not Lacey's).


A Few Bonus Shirts

I dyed a few shirts for my daughters while I was at it. The third shirt from the left was twisted up like a hank of yarn and then dyed in stripes across it. The shirt on the right was a spiral started near the right shoulder.


Lacey Is at It Again

Such a big help!


My squeaky toy!

Sunday, July 19, 2009

I'm Not Dead Yet!

A friend of mine gently chided me today for no longer posting to my blog. And well, things have changed recently that leave me a bit less time for blogging. That is, I've gone back to having a day job as a product manager after being on leave of absence for a year and a half. It's kind of a night and early morning job too, since I live in California and the development team is in India and Orlando. I've already been on two conference call meetings that started at 5am, and one that ended just before midnight!

It's also summer, and that means I have another job too: chauffeur. My kids go to a plethora of day camps, where they are doing all sorts of fun things like building go-karts, studying and mimicking Egyptian art, creating claymation animated movies (short ones), face painting, and all sorts of other things that are making me hideously jealous as I drop them off and head for the office!

I'm not done creating, though, and I'm not done blogging. I've been doing lots of tie-dye lately with lots of people (including this year's first grade class!), and I never did blog about all of the shoes I've made so far (and now I'm going back and modifying one pair where I just didn't like the way it came out).

As for blogging, I actually have about ten blog posts partially written and waiting for me to upload just the right photos (with and without dog) and add just the right links and tags. I've gotten to the point where I start a draft post in the middle of the night if something comes to me that I just have to write about. I'm having a hard time keeping up with my inspirations, though, both in crafts and in blogs. I still have a tie-dye wedding present to make, several months after the wedding (I'm allowed a year after the wedding! Really! But it's slipping away...). But I'll get to it, someday. And a leather-wrapped coffee mug... but hey, I did finish that quilt, finally!

But for now, since I don't have any late-night meetings scheduled, I'd better finish this off and head for bed. And since I know I'll hear about it if I don't, here are a few pictures. With and without dog.

Official Gratuitous Dog Picture

Here she is, just being her cute self.


Other Recent Stuff

Somebody liked my daughter's discharged jeans so well, she wanted a pair just like them. Several months later, I finally got around to it. My daughter did that tie-dyed shirt herself.


Here I am at this year's Maker Faire, in one of my favorite tie-dyed shirts (funny how the ones I like the best are some of the earliest ones I made). I was trying to complete a circuit and light the lightbulb using nuts and nails to go across the tube in the middle of the board. I succeeded, and they said they hadn't seen anyone do it that way before. I must be nuts...


And here is the result of the 6th Annual First Grade Tie-dye Project! I'm so proud! Even better, the Mountain View Voice published my picture of them (that's about a hundred kids) on page 6.


And now, off to bed!

Saturday, June 20, 2009

Tie-Dyeing the Bookcases

Now that my older daughter is on summer vacation (though she still has homework to do), she has a bit more available time. It's time to do some rearranging in her room to make it easier for her to store and find all her stuff going forward.

Bookcases with Glass Doors and a Little Inspiration

We bought her two Billy 79.5-inch tall, 31.5-inch wide bookcases, along with two pairs of coordinating half-height (37.75-inch high) Billy Morebo glass/aluminum doors. IKEA mentions on its website, and displays in the showroom, that these can be easily personalized by adding wrapping paper, fabric, stickers, etc. between the glass and the backing insert of the door. Just that little hint, and off we go!

My daughter loves blues and greens, and her room is already decorated in those. She's excited about getting her glass doors done in blue-and-green tie-dye to match the rest of her room. Guess who had some influence on the color scheme when I tie-dyed the couch?

A while back I got a bunch of IKEA's Sova twin-sized flat sheets (cheap, 100% cotton, and they dye beautifully). Note that the Sova line has since been replaced by the Dvala line, which is still all cotton but a little more expensive. The Slumra line (now the cheapest line) is unsuitable because it is 52% polyester and won't dye well.

I folded a sheet in eighths (which turns out to be the perfect size, just a bit bigger than the door inserts), then tied it in a pattern and dyed it. After dyeing, I cut off half the sheet since we didn't need it. We hemmed it, and now my daughter can use it as a drape for her loft bed or whatever.


I cut out four matching pieces the size of the inserts plus 1.25 inches extra all around.

Here I laid one of the inserts on top of the corresponding fabric piece.


We're using the leftover strips (about 4-6 inches wide) to make scrunchies for hair.

We attached the fabric to the inserts with Scotch tape. We don't care if the back of the door looks a little messy, and the tape just has to hold well enough for us to install the inserts into the glass doors.


We installed the inserts into the glass doors and installed them according to the instructions. Once we got everything put together, it looked like framed posters of some wild graphic art.


That's the extra half sheet draped over a curtain rod on the right side of the picture. Here's how it looks with the doors open:


My daughter kept running around it singing "It's so pretty!" Well worth the cost and effort just for its looks. Now if only it helps her keep her room clean!

More Gratuitous Dog Pictures

Lacey knows when it's time to join the photo shoot. Here she's sitting on the wrapped inserts.

She's even brought her own props!


Who can resist that pose?