Showing posts with label hand dyeing. Show all posts

Monday, September 14, 2009

Black, Baby, Black!

I've been experimenting with black and gray dyes recently. I used Better Black, New Black, Charcoal Gray, and Black Cherry (okay, that's more of a dark red), all Procion dyes from Dharma. I made them up in various concentrations, starting with "1" strength as the formula recommended on the Dharma site: 2 to 8 teaspoons (10-40 ml) and 1 tablespoon (15ml) urea per 1 cup of water for the Procion dyes. The blacks needed 8 teaspoons each, while the charcoal gray only needed 2 teaspoons. The black cherry took 4 teaspoons of dye per cup.

I then mixed up "1/4", "1/8", and "1/16" dilutions of those dyes by adding more urea-water to the appropriate amounts of the "1" solutions.

I also mixed up one teaspoon of sodium alginate thickener in one cup of water (stirring and letting it stand overnight). When completely dissolved, it was about the consistency of molasses or honey. I put about 4 teaspoons of thickener mixture into each cup of dye at the various strengths. That proportion is a little rougher, since I wasn't extremely exact on those measurements of the thickener!

I marked up an old white shirt with permanent marker, soaked it in soda ash, then dripped on small amounts of each solution. Here is the shirt still wet, just after dyeing. You can see the blue edges on some of the spots where the dyes separate. It's even worse without the thickener. I tried again in the lower right corner after doubling the amount of thickener in the solutions (for "1/4" strength dyes).


Here is the same shirt after sitting overnight, then washing and drying. It looks like a chromatography experiment with all the bleeding and color separation!


If I need to do anything sharply black, I'll have to add a lot more thickener in the future. However, I really love the bleed effects and I like to use them intentionally to get all sorts of subtle shadings.

Time to Dye

This isn't my usual palette of blues, greens, and purples, but once I had all those different solutions mixed up, I had to use them, right?

Here is a "Moonlight Sonata" crop top done with a repurposed United Colors of Benetton shirt. I love the word "repurposed". It's like a "pre-owned" car. It sounds so much better than "used" or "thrift shop"! It even sounds better than "recycled", even if it's a little slower rolling off the tongue. I stitched the moon with dental floss and covered it with the repurposed thumbtip of a used rubber glove secured by the floss ends. No, the dental floss wasn't "used", though I guess using it for something other than teeth counts as "repurposed"!

I only did the moon on the front layer of the shirt.


Long "Moonlight Sonata" shirts: I made two of these, different sizes, opposite designs. You see the back of the left one and the front of the right (the front has ties at the neck). These shirt blanks are new from Dharma: Light Jersey Extended Sleeve shirts.

They are REALLY thin shirts, but I rather like the results. I'll have to get some more of these. They'll be good for high-resolution geometric designs.


I call these my "Three Sisters" shirts. I love the subtle shades. I used all the various blacks, grays, and the "black cherry" color. The shirts are cotton-spandex shirts from Justice, a chain store catering to pre-teens. I happened to pass by it one day and plain (white) shirts were on sale. I nearly cleaned out their supply! The "Two Sisters" (my kids), immediately ran off with them.

Here's a cotton bandana. It was folded, tied, soaked in soda ash and then let dry completely before dyeing.


I'm pretty happy with the results of my experiment. I might just have to use blacks more often!

Saturday, August 1, 2009

Tie-dyeing Blue Jeans

I had a couple of pairs of jeans that I wasn't wearing because they had blemishes in strategic locations, as well as some swapped jeans I picked up at the Maker Faire recently. And while I have dozens of tie-dyed shirts that I wear all the time, none of my jeans are (intentionally) tie-dyed. Time to change that.

Color on Color

I often get questions about dyeing garments that aren't white. I've done it a fair amount, but it's a little tricky. You have to remember that the colors are ADDITIVE. So if you start with a yellow shirt and put blue dye on it, you get green. Purple on yellow gives you brown, and so on. Also, the colors you put on may seem a little dull compared to how they would look on white. So it's worth trying, because you can get some interesting effects (blue and purple on a pale blue shirt looks good), but you may not get the results you expect or hope for.

Here, I did a crinkle pattern on a pair of light-blue 100% cotton Levi's (left) and the exact same crinkle pattern on a pair of medium-blue Gloria Vanderbilt partly-spandex stretch Amanda jeans (on the right). I smushed them both up into wrinkly pancakes, along with the shorts below, and I dyed all three pieces side-by-side with the same colors. I actually squirted the dyes on all three pieces with the same strokes of each color.


The Levi's give a much more vibrant and almost crystalline crinkle effect than the Vanderbilt jeans. The lighter original color of the Levi's gives a much better contrast with the dye colors than the darker blue, though I like both. The interesting part, though, is that the colors on the Levi's jeans look much crisper and sharper than on the Vanderbilt jeans. The denim of the Levi's is thicker and much stiffer than the Vanderbilt denim, giving the crinkles more definition. I think the thicker denim also prevents the soda ash from soaking in quite as well into the Levi's, leaving more undyed fibers in the denim (both pairs soaked for the same amount of time), helping the Levi's look a little brighter in the center parts of the crinkles.

The cargo shorts are from Lands' End in the light greyish color they call "light stone". My daughter managed to spill chocolate on them in strategic places almost immediately, so they were definitely in need of revamping with dye. These were the third piece in my crinkled assembly line. The light grey is almost white, but not enough to really brighten the dye colors.


My daughter likes them more now than in the original grey color, of course, and likes the hoodie I did for her while I was at it.

Stripes Front and Back

This is another medium-blue pair of the Vanderbilt jeans (my usual). This one really demonstrates the effect of working with multiple layers of thick, stiff fabric such as this denim.

Since the fabric is so thick, very little dye bleeds through from dyeing the folded piece on one side, so it's easy to get thick-and-thin effects on the stripes by dyeing a little less or more on the two sides of the folded piece, and it's hard to get dye all the way to the center of the pleats. In this pair, I folded first down the center of the jeans so the back is on the inside, then I pleated the whole thing starting up from the ankles. I like the multi-thickness effect, though.


Here is how they look on (and one of my current favorite shirts--bright enough to hurt the eyeballs!).


And the back...I like the two-toned effect on the legs here (mine, not Lacey's).


A Few Bonus Shirts

I dyed a few shirts for my daughters while I was at it. The third shirt from the left was twisted up like a hank of yarn and then dyed in stripes across it. The shirt on the right was a spiral started near the right shoulder.


Lacey Is at It Again

Such a big help!


My squeaky toy!

Saturday, November 29, 2008

Paint it Black, Part 2

Starting With Black

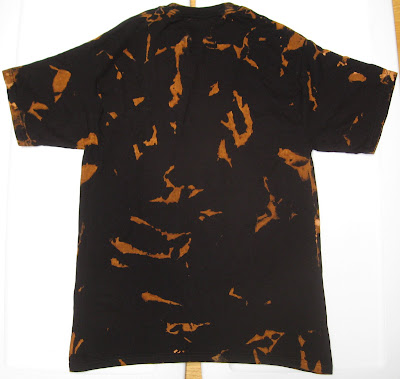
My latest effort has been trying out discharge dyeing on black shirts. This was pretty successful in my dyeing class, but I didn't get a chance to do it myself on the black shirts. So now that the class is over, it's my turn!

I took several black shirts of various sizes and brands (or at least models) and did them the way I'm used to doing shirts: in my favorite tie-dye patterns. I did a couple in the spiral tie (one as a "spiral", the other as "rays" or "sunburst"), one in my favorite V pattern, a crinkle, and one shibori-style just smooshed up (technical term) diagonally and tied.

I experimented a bit with the thickness of the Soft Scrub With Bleach. I was mostly using up the partially-filled squeeze bottles of Soft Scrub that I had left over from my class--I hate to waste anything, but it was time to start reclaiming my squeeze bottles.

Here is the "rays" shirt. I coated it thickly on one side.

On the other side, I added a little water to what was left in the bottle, shook it up, and squirted that over the whole second side. Note the little blobs of thicker Soft Scrub in places.


Here is the "rays" shirt with the thickly-coated side. Note the bright lines.


Here is the side coated with diluted Soft Scrub.


For the crinkle shirt, I coated one side in a thin layer of Soft Scrub by rubbing it in the puddle of drips from a different shirt (no waste!). Then I emptied another small squirt bottle onto it to make the web of white lines you see here:

Here is the side where I put the extra lines of thicker Soft Scrub. You can see brighter spots within the darker orange sections.

The second side has a more uniform effect.


This is the "spirals" shirt. I did thick layers on both sides, but I did not do the two narrow stripes on the other side.

With narrow stripes:

and without:

I put on thick bands of Soft Scrub on both sides of the folded V shirt.


Here is the first side of the V shirt.


And here is the second side. Not exactly what I had expected, but I had expected the Soft Scrub to penetrate more than just the single layer. It hardly penetrates at all beyond the first layer (just enough to make it look like a mistake).


For the "smooshed" shirt, I tied it pretty loosely, and pretty much used it to mop up all the remaining Soft Scrub dribbles on my table.


Here is the result. It had a thin layer of Soft Scrub, so it didn't bleach very strongly. Interestingly, though, it bleached to almost a heathery orange-grey, not to orange like the other shirts. Both this and the crinkle shirt are Fruit of the Loom Lofteez shirts, though the crinkle is a Medium and the other is a Small. 


Trying Again

I really liked how the shirts came out, but I thought all but one (the spiral) needed, well, more.  So I tied four of them back up again and redid them.

For the V, I refolded it the reverse way I had folded it before so I would get a design in the center of the plain back.


The shibori shirt just got more of the same:


For the rays shirt, I bleached it the opposite way (diluted, full-strength) so both sides now have both dark and light sections:

And I did something similar for the crinkle to give it more depth, though it ended up quite different from front to back. 

Front:


So I think once again I've failed  in producing something boring enough for my "I'd die rather than wear tie-dye" friends, because these turned out pretty interesting (aside from their rather limited color palette).  

Oh well, back to the lab again...

Monday, November 24, 2008

Paint It Black

Like most tie-dye fans, I often get all sorts of comments about being a hippie lost in the Sixties, and so on. Nope, I'm definitely not a hippie. But I'm getting used to the label, even if it's wrong.

And then there are people who would rather die than wear tie-dye, at least in public. You know who you are...

Anyway, sometimes it becomes a challenge to try to come up with something that doesn't scream "psychedelic throwback", something to make even the most staunch "I only wear dull clothes" person consider wearing my work. Hm, wait, is that something I even want to do?

Dyeing It Black

I tried doing some tie-dyeing with various shades of black dyes (Dharma carries four in their Fiber Reactive Procion line alone: "Black", "New Black", "Better Black" and "Jet Black"). But it's hard to get a good shade of black in tie-dye. Not impossible, but hard.

I made a few shirts a while back, but I wasn't very happy with the results. The black dyes are made of various mixtures of other colors, so some have tints of green, some blue, and some red, and they don't go well together. Further, the greys have a similar set of casts, so you have to really experiment with your dyes--more so than with your basic turquoise, fuchsia, and lemon yellow trio, which all go nicely together (unless you mix all three and get brown).

You can see tints of fuchsia in the following shirts (which, even though they are in blacks and greys, aren't at all dull!).


The following shirt shows more greenish tones in the main black parts, but also red tints and spots where the fuchsia ended up (fuchsia often doesn't dissolve well).


Interesting effects, and worth pursuing further, but not what I'd call "dull", by any means. Back to the lab...

Here She Comes Again

And what is a fluffy white dog to do? She sees all these black shirts laid out on the floor, and every gene in her little mongrel body screams "Shed!"


Looks like she owns them, doesn't she? And posing with her recycled jeans dog toy, as well!


To be continued...

Tuesday, November 18, 2008

Dressing for Success

Some friends of mine recently got married. When I got their invitation, the immediate thought (wail, more like) was "I haven't got a thing to wear!"

For the last several years I have pretty much always worn at least some tie-dye, usually a tie-dyed shirt and tie-dyed socks with blue jeans, or a tie-dyed "farmer's dress", or whatever. It's not a religious thing, but I like the bright colors, I have a lot of it, and it's comfortable. The last wedding I went to was a tie-dyed affair anyhow, so I was fine wearing one of my tie-dyed casual dresses (the one in my picture to the right with the bears-in-heart tapestry).

But this wedding was going to be a formal-to-semi-formal affair with dancing! My usual togs just wouldn't do. The groom-to-be and I joked about my having to pull out my formal tie-dye ("no, no, it only has to be semi-formal"). Pretty soon, it had to happen: I had to make myself a very fancy tie-dyed dress.

Designing

Designing the dress was fun. I had set myself a couple of constraints: the dress had to be tie-dyed, and it had to be silk (to lend it formality). Further, I would make it (almost) exclusively from silk charmeuse scarves from Dharma. With that decision, I could easily make prototypes of the dress. I also decided to make it a two-piece dress so it would be easier to get in and out of (and so I could wear the skirt with different tops later). I had been hankering to make myself a handkerchief-hem skirt for a while, too, so that became part of the design.

I started with paper towels and one of my favorite models, Barbie. Barbie is very cooperative for such endeavors--I have been making clothes for her since I was a kid. A little tape, some snips here and there, and soon we had a couple of prototypes (my daughter did one too).


I took the best prototype picture, massaged it a bit, and made what was essentially a coloring book page of it.


I borrowed my daughter's oil pastels and played with colors. So did my kids! I did the upper set.


Dyeing

I got a bunch of silk charmeuse scarves. The eight skirt pieces (two layers of four scarves each) were tied to make a diagonal stripe, while the others were done as diagonal stripes or X's. I also tied a sash.


I dyed them all using diluted turquoise, turquoise, electric blue, and strong navy and left them covered overnight.

Constructing

Once the scarves were dyed, washed, and dried, they made a glorious armful of colored silk. The white appeared on some scarves (but not all) where the dye hadn't penetrated. I had been aiming for a little white. The strong navy color came out purple (because I was dyeing silk instead of cotton), but fortunately purple is fine with me. After all, I always tell my students that tie-dye NEVER turns out exactly how you expect!


Now it was time to start putting them together. Easier said than done!

These are the eight scarves that will become the skirt.


I found information on "Making An 8-Point Skirt" on the web. I aligned each set of four scarves with the turquoise sections forming the diagonals of the squares as below, sewed each set together into a square, and put in the elastic waistband. I used 1.25-inch-wide elastic to give the waistband some strength. Those eight silk charmeuse 35" scarves make the skirt quite heavy!


Here is the skirt.
This is the top. The body of the top is essentially a tank top that is attached to the collar at the neck opening. The body is made of one 44" scarf that I cut in half diagonally. I used an existing tank top that I had as a pattern for the scarf pieces for the body.


The collar is one more 35" scarf set diagonally on the body. Since 35" was too big, I cut it in quarters and sewed it back together after taking part out of the middle (so it would preserve the turquoise sections). I essentially removed a thick "plus" ( + ) from the middle of the scarf. It has a V-neckline in the front and a more squared neckline in the back, and it can be worn either way.

Here you can see the blue broadcloth lining and the interfacing I used to give the collar layer a bit more stiffness and fullness. The body part is not lined, since it is very thick silk.


The Results

I finished the dress with only about five minutes to spare before I had to dress to go to the wedding! Here I am at the wedding in the dress.


The dress definitely didn't come out the way I expected it to, but I'm pretty pleased with it. I've worn it to three fancy occasions now (in less than a month!), and I expect to wear it a lot more.

I didn't expect the purple (short) sections to stick out the way they do--I think it's because I used such thick silk, so those sections don't have anywhere else to fall to. However, the weight of that heavy silk makes the skirt really flare out during turns and spins, which I love! I love ballroom dancing, especially swing and waltz, and this is definitely a great skirt for that. It's also got that gorgeous glossy silk glow that I like--it fills some of those Barbie doll dress fantasies I never quite grew out of.

I just wish the Barbie doll figure came with the dress!

Dog

Okay, here are the gratuitous dog pictures:

Ooh, she sees silk on the floor... "must go shed on it..."


"Isn't this turquoise just my color?"


Sorry, Lacey, the skirt is a little too big for you!