Showing posts with label shirt. Show all posts

Wednesday, September 23, 2009

Playing with YouTube

I recently did a corporate team-building activity at a local company's "Oktoberfest" event for their employees. Since there were lots of participants (they had ordered 150 shirts, and had a few left over), I got lots of help from a lot of great volunteers who are also really into tie-dye (thanks, everyone!). The activity seemed to be quite a hit!

I took home the leftover shirts and dyed them for myself and a few employees who didn't make it to the event. You can see pictures of those shirts here on my Picasa album site.

2009-09-22 Tie-dye for Oktoberfest

Is That Thing On?

I've been thinking about doing tie-dye demonstration videos to put onto YouTube, and I got one of the volunteers to video me while I was demonstrating how to do a couple of the fold patterns. The videos are completely rough and unedited, and there is polka music in the background! Who would have thought that polka makes a great soundtrack for tie-dye? Anyhow, I'm not sure when or if I'll get around to doing them the "right" way, so I figured I'll put them on YouTube for now just as they are. After all, I describe myself as a "recovering perfectionist"--where "done" is better than "perfect". I'd say these are worth lots of perfectionism recovery points!

In this video, I show how to fold an X pattern.


Here I demonstrate folding a diagonal stripe pattern.


Enough About Me...

Some of my faithful audience members have pointed out that they haven't seen my faithful hound Lacey lately. Here she is:


Amazingly, Lacey knows which shirts are the ones for me, and she just stands on those. Either that, or she just knows that she looks best with a backdrop of blues and greens!


Playtime with a cardboard tube.

Mandalas are great backdrops!

Saturday, August 1, 2009

Tie-dyeing Blue Jeans

I had a couple of pairs of jeans that I wasn't wearing because they had blemishes in strategic locations, as well as some swapped jeans I picked up at the Maker Faire recently. And while I have dozens of tie-dyed shirts that I wear all the time, none of my jeans are (intentionally) tie-dyed. Time to change that.

Color on Color

I often get questions about dyeing garments that aren't white. I've done it a fair amount, but it's a little tricky. You have to remember that the colors are ADDITIVE. So if you start with a yellow shirt and put blue dye on it, you get green. Purple on yellow gives you brown, and so on. Also, the colors you put on may seem a little dull compared to how they would look on white. So it's worth trying, because you can get some interesting effects (blue and purple on a pale blue shirt looks good), but you may not get the results you expect or hope for.

Here, I did a crinkle pattern on a pair of light-blue 100% cotton Levi's (left) and the exact same crinkle pattern on a pair of medium-blue Gloria Vanderbilt partly-spandex stretch Amanda jeans (on the right). I smushed them both up into wrinkly pancakes, along with the shorts below, and I dyed all three pieces side-by-side with the same colors. I actually squirted the dyes on all three pieces with the same strokes of each color.


The Levi's give a much more vibrant and almost crystalline crinkle effect than the Vanderbilt jeans. The lighter original color of the Levi's gives a much better contrast with the dye colors than the darker blue, though I like both. The interesting part, though, is that the colors on the Levi's jeans look much crisper and sharper than on the Vanderbilt jeans. The denim of the Levi's is thicker and much stiffer than the Vanderbilt denim, giving the crinkles more definition. I think the thicker denim also prevents the soda ash from soaking in quite as well into the Levi's, leaving more undyed fibers in the denim (both pairs soaked for the same amount of time), helping the Levi's look a little brighter in the center parts of the crinkles.

The cargo shorts are from Lands' End in the light greyish color they call "light stone". My daughter managed to spill chocolate on them in strategic places almost immediately, so they were definitely in need of revamping with dye. These were the third piece in my crinkled assembly line. The light grey is almost white, but not enough to really brighten the dye colors.


My daughter likes them more now than in the original grey color, of course, and likes the hoodie I did for her while I was at it.

Stripes Front and Back

This is another medium-blue pair of the Vanderbilt jeans (my usual). This one really demonstrates the effect of working with multiple layers of thick, stiff fabric such as this denim.

Since the fabric is so thick, very little dye bleeds through from dyeing the folded piece on one side, so it's easy to get thick-and-thin effects on the stripes by dyeing a little less or more on the two sides of the folded piece, and it's hard to get dye all the way to the center of the pleats. In this pair, I folded first down the center of the jeans so the back is on the inside, then I pleated the whole thing starting up from the ankles. I like the multi-thickness effect, though.


Here is how they look on (and one of my current favorite shirts--bright enough to hurt the eyeballs!).


And the back...I like the two-toned effect on the legs here (mine, not Lacey's).


A Few Bonus Shirts

I dyed a few shirts for my daughters while I was at it. The third shirt from the left was twisted up like a hank of yarn and then dyed in stripes across it. The shirt on the right was a spiral started near the right shoulder.


Lacey Is at It Again

Such a big help!


My squeaky toy!

Sunday, July 19, 2009

I'm Not Dead Yet!

A friend of mine gently chided me today for no longer posting to my blog. And well, things have changed recently that leave me a bit less time for blogging. That is, I've gone back to having a day job as a product manager after being on leave of absence for a year and a half. It's kind of a night and early morning job too, since I live in California and the development team is in India and Orlando. I've already been on two conference call meetings that started at 5am, and one that ended just before midnight!

It's also summer, and that means I have another job too: chauffeur. My kids go to a plethora of day camps, where they are doing all sorts of fun things like building go-karts, studying and mimicking Egyptian art, creating claymation animated movies (short ones), face painting, and all sorts of other things that are making me hideously jealous as I drop them off and head for the office!

I'm not done creating, though, and I'm not done blogging. I've been doing lots of tie-dye lately with lots of people (including this year's first grade class!), and I never did blog about all of the shoes I've made so far (and now I'm going back and modifying one pair where I just didn't like the way it came out).

As for blogging, I actually have about ten blog posts partially written and waiting for me to upload just the right photos (with and without dog) and add just the right links and tags. I've gotten to the point where I start a draft post in the middle of the night if something comes to me that I just have to write about. I'm having a hard time keeping up with my inspirations, though, both in crafts and in blogs. I still have a tie-dye wedding present to make, several months after the wedding (I'm allowed a year after the wedding! Really! But it's slipping away...). But I'll get to it, someday. And a leather-wrapped coffee mug... but hey, I did finish that quilt, finally!

But for now, since I don't have any late-night meetings scheduled, I'd better finish this off and head for bed. And since I know I'll hear about it if I don't, here are a few pictures. With and without dog.

Official Gratuitous Dog Picture

Here she is, just being her cute self.


Other Recent Stuff

Somebody liked my daughter's discharged jeans so well, she wanted a pair just like them. Several months later, I finally got around to it. My daughter did that tie-dyed shirt herself.


Here I am at this year's Maker Faire, in one of my favorite tie-dyed shirts (funny how the ones I like the best are some of the earliest ones I made). I was trying to complete a circuit and light the lightbulb using nuts and nails to go across the tube in the middle of the board. I succeeded, and they said they hadn't seen anyone do it that way before. I must be nuts...


And here is the result of the 6th Annual First Grade Tie-dye Project! I'm so proud! Even better, the Mountain View Voice published my picture of them (that's about a hundred kids) on page 6.


And now, off to bed!

Saturday, November 29, 2008

Paint it Black, Part 2

Starting With Black

My latest effort has been trying out discharge dyeing on black shirts. This was pretty successful in my dyeing class, but I didn't get a chance to do it myself on the black shirts. So now that the class is over, it's my turn!

I took several black shirts of various sizes and brands (or at least models) and did them the way I'm used to doing shirts: in my favorite tie-dye patterns. I did a couple in the spiral tie (one as a "spiral", the other as "rays" or "sunburst"), one in my favorite V pattern, a crinkle, and one shibori-style just smooshed up (technical term) diagonally and tied.

I experimented a bit with the thickness of the Soft Scrub With Bleach. I was mostly using up the partially-filled squeeze bottles of Soft Scrub that I had left over from my class--I hate to waste anything, but it was time to start reclaiming my squeeze bottles.

Here is the "rays" shirt. I coated it thickly on one side.

On the other side, I added a little water to what was left in the bottle, shook it up, and squirted that over the whole second side. Note the little blobs of thicker Soft Scrub in places.


Here is the "rays" shirt with the thickly-coated side. Note the bright lines.


Here is the side coated with diluted Soft Scrub.


For the crinkle shirt, I coated one side in a thin layer of Soft Scrub by rubbing it in the puddle of drips from a different shirt (no waste!). Then I emptied another small squirt bottle onto it to make the web of white lines you see here:

Here is the side where I put the extra lines of thicker Soft Scrub. You can see brighter spots within the darker orange sections.

The second side has a more uniform effect.


This is the "spirals" shirt. I did thick layers on both sides, but I did not do the two narrow stripes on the other side.

With narrow stripes:

and without:

I put on thick bands of Soft Scrub on both sides of the folded V shirt.


Here is the first side of the V shirt.


And here is the second side. Not exactly what I had expected, but I had expected the Soft Scrub to penetrate more than just the single layer. It hardly penetrates at all beyond the first layer (just enough to make it look like a mistake).


For the "smooshed" shirt, I tied it pretty loosely, and pretty much used it to mop up all the remaining Soft Scrub dribbles on my table.


Here is the result. It had a thin layer of Soft Scrub, so it didn't bleach very strongly. Interestingly, though, it bleached to almost a heathery orange-grey, not to orange like the other shirts. Both this and the crinkle shirt are Fruit of the Loom Lofteez shirts, though the crinkle is a Medium and the other is a Small. 


Trying Again

I really liked how the shirts came out, but I thought all but one (the spiral) needed, well, more.  So I tied four of them back up again and redid them.

For the V, I refolded it the reverse way I had folded it before so I would get a design in the center of the plain back.


The shibori shirt just got more of the same:


For the rays shirt, I bleached it the opposite way (diluted, full-strength) so both sides now have both dark and light sections:

And I did something similar for the crinkle to give it more depth, though it ended up quite different from front to back. 

Front:


So I think once again I've failed  in producing something boring enough for my "I'd die rather than wear tie-dye" friends, because these turned out pretty interesting (aside from their rather limited color palette).  

Oh well, back to the lab again...

Monday, November 24, 2008

Paint It Black

Like most tie-dye fans, I often get all sorts of comments about being a hippie lost in the Sixties, and so on. Nope, I'm definitely not a hippie. But I'm getting used to the label, even if it's wrong.

And then there are people who would rather die than wear tie-dye, at least in public. You know who you are...

Anyway, sometimes it becomes a challenge to try to come up with something that doesn't scream "psychedelic throwback", something to make even the most staunch "I only wear dull clothes" person consider wearing my work. Hm, wait, is that something I even want to do?

Dyeing It Black

I tried doing some tie-dyeing with various shades of black dyes (Dharma carries four in their Fiber Reactive Procion line alone: "Black", "New Black", "Better Black" and "Jet Black"). But it's hard to get a good shade of black in tie-dye. Not impossible, but hard.

I made a few shirts a while back, but I wasn't very happy with the results. The black dyes are made of various mixtures of other colors, so some have tints of green, some blue, and some red, and they don't go well together. Further, the greys have a similar set of casts, so you have to really experiment with your dyes--more so than with your basic turquoise, fuchsia, and lemon yellow trio, which all go nicely together (unless you mix all three and get brown).

You can see tints of fuchsia in the following shirts (which, even though they are in blacks and greys, aren't at all dull!).


The following shirt shows more greenish tones in the main black parts, but also red tints and spots where the fuchsia ended up (fuchsia often doesn't dissolve well).


Interesting effects, and worth pursuing further, but not what I'd call "dull", by any means. Back to the lab...

Here She Comes Again

And what is a fluffy white dog to do? She sees all these black shirts laid out on the floor, and every gene in her little mongrel body screams "Shed!"


Looks like she owns them, doesn't she? And posing with her recycled jeans dog toy, as well!


To be continued...

Wednesday, November 19, 2008

Dye Week at the Middle School

After months of off-and-on preparation work, I finally did my week-long half-day dyeing class for a bunch of middle school girls. We spent the time exploring several different ways of using "resists" with dye to create patterns on fabric. Like any class, it had both successes and failures, but overall, I think it went well, and both the girls and I learned a lot.

Day by Day

Monday we did basic tie-dye patterns such as stripes and spirals and rays, and each girl tie-dyed a white t-shirt. This is the same sort of thing I've been doing with groups for quite a while now, and the individual results mostly varied depending on how carefully they tied and dyed their shirts.

Tuesday we did stitch resist on bandanas. Stitch resist didn't work very well for the class. Most of the girls (grades 6-8) had trouble stitching their designs (on cotton bandanas) and pulling and tying them tightly enough, so the stitching didn't really resist the dye and their designs got lost. On the other hand, a shibori technique of folding and clamping silk hankies with various clips worked very well. Almost all the girls came out with strongly-geometric designs that were really beautiful.

Here is the group with their shibori silk hankies:

What beautiful patterns!


Wednesday we did discharge dyeing (bleaching dark colors to have light-colored patterns). We started with an experiment where we put Soft Scrub with Bleach on many different scraps of fabric to see what effects it would have. We saw that on the all-synthetic socks we got no effect, but that on dark blue fabric we got nearly white patterns. We then did designs on black T-shirts. Since I had gotten black shirts specifically meant for discharge dyeing, and I had run out of prep time beforehand, I hadn't tried one before class. They turned out to work well, bleaching much faster than I had expected, to a nice rust color (they don't bleach to white from the black). Several girls also bleached patterns onto jeans with stencils (I love that part--those jeans are now their own designs, not those of some brand name designer!). This technique was a big hit! One girl liked it so much she did more of it for the rest of the week during any free moments. We also did "regular" tie-dye on tote bags while they were waiting for the Soft Scrub to work.

Thursday we did "fake batik" (using glycerin soap instead of wax) on bandanas. The soap batik counts as the main failure for the week. Even though I had been successful with it in my trials at home, the conditions in class made it a lot harder. The main difference was the temperature of the melted soap when the girls tried to apply it to the cloth. At home, I worked right at the stove, and the soap stayed an even high temperature the whole time. At school, I couldn't have the girls working over the portable electric burner I used, so I took the pot to their table once the soap was melted. The soap cooled much too quickly, clogged up the tjanting tools, and hardened before going onto the fabric. Since the soap didn't penetrate the fabric properly, so it didn't resist the dye, and the designs were mostly lost. Wax would have had all the same problems under these working conditions (no heat at the working table). One additional problem with soap, though, is that very thin lines can get washed out in the soda ash soak, and many of the girls' lines were too thin as well.

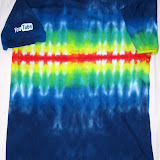
Friday I gave them each another cotton bandana, and we all folded them into eighths (triangles). I then showed them the marking-pen-and-pleating technique that I first learned from Michael Fowler's Art of Tie-Dye DVD. They dyed their pieces, and then I let the pieces sit about an hour. I rinsed them in cold water enough so we could look at the designs and hang them out to display for the end-of-week assembly. They came out beautifully, with bold geometric patterns. We finished the week with a short but fabulous fashion show at the assembly.


Now That It's Over

I had a lot of help with running this class. One of the moms came in to help for the whole class, and my housemate came in for two days as well (many thanks to both of them!). For a class of nine girls, that ended up being about the right amount of help, so nobody had to wait too long before we could help them The girls did need a fair amount of help, especially with the stitching and the batik, though not as much help as the first graders I usually work with.

If I were to do this class again, I'd do it a bit differently. I'd skip the stitch resist and the batik completely and save those for the adult classes. I'd do more "classic" patterns like crinkle on white shirts and bandanas. One thing I'm glad I did right was to confine the discharge dyeing to using just the Soft Scrub, and not using buckets of bleach in water or spray bottles of bleach and water. I had several pretty high-energy kids in this class, and those could have been a disaster. The Soft Scrub is really easy to deal with from a safety and control perspective.

Budget is always a factor for classes like these. I had a budget of $20/girl for the whole week, or $180 total. Bandanas are good pieces for the class. They cost about $1 each in bulk. I buy them at the same time I buy lots of other stuff, like all the inexpensive white t-shirts (about $2 each) and black t-shirts (about $3 each) . Silk hankies were less than a dollar each and the results were very satisfying; I'd do more of those next time. Tote bags were about $3 each. I spent about $22 on four bottles of Soft Scrub, and most of it got used up! I spent about $1.50 per girl on gloves (they preferred larger reusable latex gloves over the close-fitting disposable nitrile gloves), and the rest was trash bags (for smocks), dye (the largest portion, about $25) and chemicals. I've already got many sets of goggles and most of the infrastructure equipment (squirt bottles and such).

One thing the kids liked, of course, was that there was a lot of stuff to take home with them, and it was even better because they had made the pieces beautiful.

So would I teach this class again? Oh yeah, next chance I get!