Showing posts with label color. Show all posts

Saturday, August 1, 2009

Tie-dyeing Blue Jeans

I had a couple of pairs of jeans that I wasn't wearing because they had blemishes in strategic locations, as well as some swapped jeans I picked up at the Maker Faire recently. And while I have dozens of tie-dyed shirts that I wear all the time, none of my jeans are (intentionally) tie-dyed. Time to change that.

Color on Color

I often get questions about dyeing garments that aren't white. I've done it a fair amount, but it's a little tricky. You have to remember that the colors are ADDITIVE. So if you start with a yellow shirt and put blue dye on it, you get green. Purple on yellow gives you brown, and so on. Also, the colors you put on may seem a little dull compared to how they would look on white. So it's worth trying, because you can get some interesting effects (blue and purple on a pale blue shirt looks good), but you may not get the results you expect or hope for.

Here, I did a crinkle pattern on a pair of light-blue 100% cotton Levi's (left) and the exact same crinkle pattern on a pair of medium-blue Gloria Vanderbilt partly-spandex stretch Amanda jeans (on the right). I smushed them both up into wrinkly pancakes, along with the shorts below, and I dyed all three pieces side-by-side with the same colors. I actually squirted the dyes on all three pieces with the same strokes of each color.


The Levi's give a much more vibrant and almost crystalline crinkle effect than the Vanderbilt jeans. The lighter original color of the Levi's gives a much better contrast with the dye colors than the darker blue, though I like both. The interesting part, though, is that the colors on the Levi's jeans look much crisper and sharper than on the Vanderbilt jeans. The denim of the Levi's is thicker and much stiffer than the Vanderbilt denim, giving the crinkles more definition. I think the thicker denim also prevents the soda ash from soaking in quite as well into the Levi's, leaving more undyed fibers in the denim (both pairs soaked for the same amount of time), helping the Levi's look a little brighter in the center parts of the crinkles.

The cargo shorts are from Lands' End in the light greyish color they call "light stone". My daughter managed to spill chocolate on them in strategic places almost immediately, so they were definitely in need of revamping with dye. These were the third piece in my crinkled assembly line. The light grey is almost white, but not enough to really brighten the dye colors.


My daughter likes them more now than in the original grey color, of course, and likes the hoodie I did for her while I was at it.

Stripes Front and Back

This is another medium-blue pair of the Vanderbilt jeans (my usual). This one really demonstrates the effect of working with multiple layers of thick, stiff fabric such as this denim.

Since the fabric is so thick, very little dye bleeds through from dyeing the folded piece on one side, so it's easy to get thick-and-thin effects on the stripes by dyeing a little less or more on the two sides of the folded piece, and it's hard to get dye all the way to the center of the pleats. In this pair, I folded first down the center of the jeans so the back is on the inside, then I pleated the whole thing starting up from the ankles. I like the multi-thickness effect, though.


Here is how they look on (and one of my current favorite shirts--bright enough to hurt the eyeballs!).


And the back...I like the two-toned effect on the legs here (mine, not Lacey's).


A Few Bonus Shirts

I dyed a few shirts for my daughters while I was at it. The third shirt from the left was twisted up like a hank of yarn and then dyed in stripes across it. The shirt on the right was a spiral started near the right shoulder.


Lacey Is at It Again

Such a big help!


My squeaky toy!

Tuesday, November 18, 2008

Dressing for Success

Some friends of mine recently got married. When I got their invitation, the immediate thought (wail, more like) was "I haven't got a thing to wear!"

For the last several years I have pretty much always worn at least some tie-dye, usually a tie-dyed shirt and tie-dyed socks with blue jeans, or a tie-dyed "farmer's dress", or whatever. It's not a religious thing, but I like the bright colors, I have a lot of it, and it's comfortable. The last wedding I went to was a tie-dyed affair anyhow, so I was fine wearing one of my tie-dyed casual dresses (the one in my picture to the right with the bears-in-heart tapestry).

But this wedding was going to be a formal-to-semi-formal affair with dancing! My usual togs just wouldn't do. The groom-to-be and I joked about my having to pull out my formal tie-dye ("no, no, it only has to be semi-formal"). Pretty soon, it had to happen: I had to make myself a very fancy tie-dyed dress.

Designing

Designing the dress was fun. I had set myself a couple of constraints: the dress had to be tie-dyed, and it had to be silk (to lend it formality). Further, I would make it (almost) exclusively from silk charmeuse scarves from Dharma. With that decision, I could easily make prototypes of the dress. I also decided to make it a two-piece dress so it would be easier to get in and out of (and so I could wear the skirt with different tops later). I had been hankering to make myself a handkerchief-hem skirt for a while, too, so that became part of the design.

I started with paper towels and one of my favorite models, Barbie. Barbie is very cooperative for such endeavors--I have been making clothes for her since I was a kid. A little tape, some snips here and there, and soon we had a couple of prototypes (my daughter did one too).


I took the best prototype picture, massaged it a bit, and made what was essentially a coloring book page of it.


I borrowed my daughter's oil pastels and played with colors. So did my kids! I did the upper set.


Dyeing

I got a bunch of silk charmeuse scarves. The eight skirt pieces (two layers of four scarves each) were tied to make a diagonal stripe, while the others were done as diagonal stripes or X's. I also tied a sash.


I dyed them all using diluted turquoise, turquoise, electric blue, and strong navy and left them covered overnight.

Constructing

Once the scarves were dyed, washed, and dried, they made a glorious armful of colored silk. The white appeared on some scarves (but not all) where the dye hadn't penetrated. I had been aiming for a little white. The strong navy color came out purple (because I was dyeing silk instead of cotton), but fortunately purple is fine with me. After all, I always tell my students that tie-dye NEVER turns out exactly how you expect!


Now it was time to start putting them together. Easier said than done!

These are the eight scarves that will become the skirt.


I found information on "Making An 8-Point Skirt" on the web. I aligned each set of four scarves with the turquoise sections forming the diagonals of the squares as below, sewed each set together into a square, and put in the elastic waistband. I used 1.25-inch-wide elastic to give the waistband some strength. Those eight silk charmeuse 35" scarves make the skirt quite heavy!


Here is the skirt.
This is the top. The body of the top is essentially a tank top that is attached to the collar at the neck opening. The body is made of one 44" scarf that I cut in half diagonally. I used an existing tank top that I had as a pattern for the scarf pieces for the body.


The collar is one more 35" scarf set diagonally on the body. Since 35" was too big, I cut it in quarters and sewed it back together after taking part out of the middle (so it would preserve the turquoise sections). I essentially removed a thick "plus" ( + ) from the middle of the scarf. It has a V-neckline in the front and a more squared neckline in the back, and it can be worn either way.

Here you can see the blue broadcloth lining and the interfacing I used to give the collar layer a bit more stiffness and fullness. The body part is not lined, since it is very thick silk.


The Results

I finished the dress with only about five minutes to spare before I had to dress to go to the wedding! Here I am at the wedding in the dress.


The dress definitely didn't come out the way I expected it to, but I'm pretty pleased with it. I've worn it to three fancy occasions now (in less than a month!), and I expect to wear it a lot more.

I didn't expect the purple (short) sections to stick out the way they do--I think it's because I used such thick silk, so those sections don't have anywhere else to fall to. However, the weight of that heavy silk makes the skirt really flare out during turns and spins, which I love! I love ballroom dancing, especially swing and waltz, and this is definitely a great skirt for that. It's also got that gorgeous glossy silk glow that I like--it fills some of those Barbie doll dress fantasies I never quite grew out of.

I just wish the Barbie doll figure came with the dress!

Dog

Okay, here are the gratuitous dog pictures:

Ooh, she sees silk on the floor... "must go shed on it..."


"Isn't this turquoise just my color?"


Sorry, Lacey, the skirt is a little too big for you!

Friday, November 14, 2008

Painting Fire

One of my favorite hobbies has nothing to do with textiles, but everything to do with color. In one of my other lives, I'm a scenic artist for a local Gilbert & Sullivan theater company, the Stanford Savoyards. I enjoy painting fantasy worlds for fairies ("Iolanthe"), Venetian gondolas and mythical kingdoms ("Gondoliers"), and so on.

The main drawback to painting theater sets is their impermanence. Once the show is over, set pieces often get dumpstered, or they go back to the shop and usually get painted over for the next show. Even though a piece has had 40 hours of detailed painting work, if it isn't generic enough to use again, out it goes. I once painted a Yosemite scene for the mythical kingdom of Barataria, and I was really proud of it. But the curtain was barely closed before that one got recoated. I painted an eight-foot-high picture of the Hindu deity Ganesha for our "Bollywood Sorcerer", complete with many symbolic details. During the build for the next show, we held a small goodbye ceremony before He was painted over.


Opportunities to paint fun but permanent scenery outside of the theater are limited. Once in a while a mural comes along, but not often, and people pretty much line up for those. As for painting the walls in my house (if I could even find them), their very permanence is paralyzing, and they stay white. Besides, my kids would complain if I painted on the walls and didn't let them do so too! But once in a while, I can make an opportunity.

A Place

My father-in-law will be living in the house I am remodeling, and he doesn't plan to use the fireplace (this is California, after all). The fireplace isn't particularly pretty, and it lets in a wicked draft, even if all the doohickeys are properly closed. So I got somebody to make me a fireplace cover out of plywood to fit snugly over the opening.

What to paint on the fireplace cover? A fireplace with a fire in it, of course! Not terribly original, perhaps, but fun to paint, and that's what I care about.

Painting

"I see a fireplace and I want to paint it black..." This is the plywood cover. It looked a little blah completely unpainted, so I started by painting it black with a little grey highlighting around the edges.


Years of painting in the Stanford Savoyards set crew have made their mark--I love blue masking tape!

Now I'm starting to put the bricks on with a natural sponge. I mix colors right on the sponge. A little water helps to blend the colors more.


Here I've removed the mortar-masking tape, but I save it for covering sections later. Time to tweak the mortar colors bit by bit. At this point a couple people do a doubletake as they wonder why I'm putting blue tape on the fireplace! I'm still having various contractors wandering through finishing up on the remodeling.

Time to light the fire...

A couple hours later, it's looking good enough to call it "done"--of course, now that I'm looking at the photo, I see things I want to go back and fix! ("Sara, step AWAY from the paints!")

Now I've put back the real fireplace screen we've had there for years. The whole thing took me somewhere between 8 and 10 hours. This is for my father-in-law's house, and now I'm thinking my house needs one too. Of course, first I'd have to FIND our fireplace! It's behind some huge shelves full of kids' craft supplies. Maybe another time...


I'd say that fire is a good start on a housewarming!

Sunday, October 12, 2008

Ooh, That Waxy Buildup!

I'm still preparing for my class for middle school kids. I usually sign up to do these things if it's something that I'll learn from, as well as something my students will learn from. In this case, I've designed the class intentionally so that I'll teach the kids some things I've never done myself! It forces me to try new things and gives me inspiration. The discharge dyeing was one of those crafts I'd never done before, but I'm planning to teach it, so I had to try it out (I still have more experimenting with that to do, too!).

The next topic for the class is batik. That's on purpose. When I first got the dyeing bug five years ago, thanks to my daughter's 6th birthday party, I went a little crazy with exploring the color-on-fabric medium and Dharma's catalog full of textile arts goodies. Among other things, I got a pound of batik wax and some tjanting tools for applying the wax, planning to try out doing batik. Five years later, the stuff was still sitting unopened in a drawer, so drastic measures were required, such as teaching it to kids!

I found a lot of information on batik on the web. For example, Paula Burch has an excellent discussion on batik on her extensive hand dyeing website. I also have a book called "Tie Dye To Die For & Batik You Can't Resist!" with good information, among others.

Getting Started

I melted the batik wax in its foil tin inside an old (that is, sacrificed to the cause) frying pan that was full of boiling water. I kept the stove burner on a low setting, but I found that the water had to be at a bubbling boil for the wax to get hot enough. If the wax is too cool, it beads up on the surface of the fabric. It has to penetrate the fabric thoroughly to resist the dyes properly.

Using the tjanting really takes some practice. I was just making a sampler on a bandana, not a work of art, so it didn't matter much if I got drips all over, but if I were to get serious about batik I'd need to work on my tjanting skills--for about a year! The hard part is to tilt the tool up just enough to stop its dripping from the tip, but not so much that the wax dribbles out the filling hole on the top and runs down your arm. Yikes.

Here is my pan of boiling water. The batik wax is on the left with the tjanting in it. Notice the frothy, bubbly water in the frying pan--that's what it looks like with lots of wax dripped into it by a tjanting amateur. "Bubbling like a witch's brew in a cauldron" would be a good way to describe what I found to be the right temperature.


I taped my bandana taut to a jelly roll pan (that's a cookie sheet with 1-inch high sides) so my working area would not touch the metal (a handy version of a silk painter's frame). That was useful because I don't have many empty flat surfaces in my house, so I could just stack this on top of everything else to be near the stove (works better than just dumping everything else on the floor!). I did have to keep shifting and re-taping the bandana to get at all of the bandana's area, though.


Here is my bandana with the wax applied. In the lower right corner I tried using a metal cookie cutter to apply the wax. That's supposed to be a frog. Near that is a big dark area where I painted wax on with a paintbrush between lines I had already done with the tjanting. I wanted to have a big area to test out the crackle effect.


I wadded up the corner of the bandana to crack that big area of wax and the surrounding areas (though all of the wax got somewhat cracked due to my generally-rough handling).


Other Resists

Because getting rid of the wax is such a pain, many people have tried out using other resists instead of the wax. They have various limitations, though, such as not producing the characteristic cracked effect found in real batik. At some point, while I was making glycerin soaps with my kids, it occurred to me that the soap itself might make a good resist that could then just wash right out at the end. The melting temperature and viscosity is similar to that of wax.

I melted some of the glycerin soap in the same frying pan full of water with my batik wax. That's the small handled pot in the picture above. I applied the soap to the upper right corner of my bandana with a second tjanting.


The glycerin soap is shinier and less yellow than the wax.

Dyeing

I used direct application for the dyes--I'm a big fan of immediate gratification! I gently soaked the bandana in a small bucket of soda ash solution, separate from my usual soaking bucket, because I didn't want to contaminate all my mixed-up soda ash solution with the water-soluble soap. Then I painted or squirted on dyes that I had around from recent tie-dyeing (same Procion dyes anyhow). One advantage of batik direct application is that I used less dye than I would have to tie-dye the same bandana. I let it sit overnight.


Resisting Resists

Next came the not-so-fun part, removing the resists. The soap, as expected, came right out in the cold-water rinse I always do for tie-dyes (to remove the soda ash and the worst of the excess dye). Then I tried various things to get rid of the wax. I tried bending it to remove the big chunks and drips. That helped a little. Scraping with a dull table knife was hopeless.

Then I tried boiling in water. Unfortunately I didn't have a multi-gallon pot (as Paula suggests) that I was willing to sacrifice to the cause. The wax and the soap might be food-safe, but there is still a lot of excess dye in the bandana. The pot I used was small, and the water immediately became dark blue with excess dye (and the bandana stuck out of the water in places, too). So if I wanted to change the water multiple times rather than boil blue dye onto my nice white batik lines, I had to do something about the wax. It was a mess. I scraped some off with a cold spoon, which helped some but was ridiculously tedious. I tried a fine strainer, which simply clogged. I tried paper towels in a coarse strainer, and the water poured past the paper towel (not held in well enough). I hate to think how much wax is now clogging my kitchen pipes!

I finally had done enough rinsing and wax removal that I wasn't concerned with dye redepositing. I went out to the garden, got a few rocks, and plopped them in to boil with my bandana and hold it down under the surface. I then let the water cool, and I scraped enough wax off the surface to get my bandana out.

I hand-washed the bandana with Synthrapol, let it dry, and here it is.


Since I was just making a sampler, I didn't worry about the age of the mixed dyes, so they look a bit more faded than an experienced Procion dyer would expect. The purple especially didn't hold its color--it was the oldest mixed dye. I've found that greens particularly, then purples and blues, lose their color strength the fastest (the New Emerald Green here was fresh). I've learned to make up fresh batches of dyes when I'm doing something where the color and brightness is important.

Here's the corner where I used the soap as the resist. Soap didn't get the really sharp, crisp edges wax gets, but it does get some cracking. I think it would have been helpful to have the soap a little hotter than the wax, though, so it could have penetrated a little better.


For my class, given that we won't have much time and there is very little budget, I'll show my students the difference between the wax and the soap, and then we'll use the soap. The soap has the advantage that it's easy to get in any craft store, and they can melt it using a microwave (repeatedly, but it does work). Then they can take their work home to wash it, and I won't have to worry about their parents calling me to complain about clogged drains!

And in my case, I still have a lot of wax to clean off the stove, the oven below it, the floor, the sink, the pans... I'd hate to lose my crafts-in-the-kitchen privileges. I'm getting close to that, though, since I still have my sewing machine on the kitchen table while I work sporadically on that jeans circle quilt. Eeek!

Dang Dog!

My little publicity hound somehow sensed I was going to take blog pictures tonight. I had just laid the white sheet and the bandana down on the floor and had gone into the other room to get my camera. In that short time, she went and found a squeaky toy and started cavorting with it in the middle of my photo setup!


My daughter tried to help distract Lacey while I set up again (but Lacey had no intention of letting go of the toy).


She only gets away with it because she's cute...


I'm thinking next time maybe I should batik the dog. But I'll have to use the soap instead of the wax. Wouldn't want any waxy buildup on that fluffy white fur!

Sunday, October 5, 2008

Art, Science, and Cleaning Liquid

I've started doing some experimentation with discharge dyeing. That's "experimentation" as in "lab experiments".

I'm playing with discharge dyeing because I'm preparing to teach it to a bunch of middle school kids, and I haven't done discharge dyeing before. These kids are currently learning about the process of scientific inquiry and writing lab experiment reports. Their curriculum integrates that scientific method into several of their classes, and I'm going to integrate it into an art class too. I'm hoping they'll have fun doing the dyeing, so I won't make them write an actual report! In the meantime, it's time to brush up on doing lab reports myself (it's been quite a while!), and they can read mine. Here goes...


Lab Report

Title: Discharge Dyeing Using Liquid Cleanser with Bleach

Table of Contents
Introduction………………………….………………………………………………………page 1
Methods……………………..……………………………………………………………....page 2
Materials……………………..…………….………………………………………..page 3
Variables……………………..…………….………………………………………..page 4
Procedures……………………..…………….………………..……………………..page 5
Data & Observations……………………..…………….………………………………..…..page 6
Analysis……………………..…………….……………………………………..…………..page 7
Conclusion……………………..…………….………………………………..……………..page 8
Works Cited……………………..…………….……………………………………………..page 9


Background & Purpose

Discharge dyeing is the process of stripping out color that is already in the fabric (bleaching it) for artistic effect. Sometimes discharge dyeing happens by accident, such as when a cleanser with bleach in it was spilled on my favorite electric blue bathmat. It took me a while to realize how it got those bright pink spots on it, since bleaching doesn't always make the fabric white--often other colors result, depending on the dyes that were used. Here is a good example of accidental discharge dyeing.

There are many ways to do discharge dyeing. The methods and chemicals used depend on what type of fabric you want to alter. For example, common chlorine bleach works well on cotton, but it will deteriorate wool or silk fibers. For silk or wool, sodium hydrosulfite or thiourea dioxide can be used instead.

In addition, you can use different methods to achieve different bleaching or lightening effects. For example, to lighten an entire piece of cotton fabric, you might dip it in a dilute solution of chlorine bleach and water. However, to create stenciled effects, it might be helpful to have a thicker bleaching compound. The web page "DISCHARGE DYEING WITH COMET GEL" suggests using Comet Liquid Gel or Soft Scrub with Bleach for discharge dyeing with stencils.

Since I am planning to do stenciling with discharge dyeing, I decided to investigate how well the Soft Scrub with Bleach worked. The store had that and Safeway Liquid Cleanser with Bleach (on sale), so I got both.

My research question asks whether there is a difference between using different brands of liquid cleanser with bleach (Soft Scrub and Safeway) and how it is affected by time on the fabric. I selected my research question because I was curious as to which bleaching compound would work better and what time period was needed.

Hypothesis & Prediction

The hypothesis is that there is a slight difference in the performance of the two cleaning fluids for discharge dyeing, because store-brand products usually do not completely duplicate the national-brand products they are emulating (occasionally they are better). Typically the store-brand products are cheaper and may be made from cheaper materials. Because this is a non-standard use for the cleaning fluids, either may be the better performer for this purpose.

I predict that the outcome of my experiment will be that both products work for my purpose of discharge dyeing because both contain bleach. I predict that there may be a slight variation in the shades achieved with the two products. The null hypothesis is that there is no difference in the shades achieved with the two products.
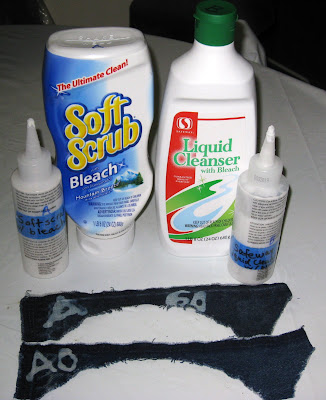

Materials
  • Soft Scrub with Bleach cleaning liquid (24 oz.)
  • Safeway Cleaning Liquid with Bleach (24 oz)
  • Denim fabric scraps (denim scraps from my jeans circle quilt) in various shades
  • Two small applicator squeeze bottles
  • Permanent marker (blue or black) that will show up on the darkest and lightest denim scraps
  • Warm water for washing off the liquid cleansers (running water in a sink)
  • Old toothbrush or scrub brush for scrubbing liquid cleanser off of denim scraps as needed
  • Goggles and plastic gloves


Variables
  • variable – something that can vary (or change) each time an experiment is done
  • controlled variables – the variables that you "control" or keep the same during all of your experiment. Controlling is also called standardizing.
  • manipulated variable – the variable that you are intentionally changing so that you can make comparisons between different situations, objects, or conditions. Also called the independent variable and is graphed on the x-axis.
The manipulated variables in my experiment were the brand of liquid cleanser, the time the cleanser spent on the fabric, and the shade of denim fabric.
  • responding variable – the variable that is changing due to differences in the manipulated variable. It is the variable you are measuring and recording as the outcome of the experiment. Also called the dependent variable and is graphed on the y-axis.
  • Since my experiment samples made up a 2-dimensional matrix with denim shade on one axis and time on the other axis, I essentially had multiple experiments. I controlled for denim shade against cleanser brand in one experiment, and I controlled for time against cleanser brand in the other experiment.
  • My manipulated variables were the brand of liquid cleanser on the sample, the time it was allowed to sit on the sample before being washed off, and the original shade of the denim.
  • My responding variable(results) was the whiteness/brightness (visibility) of the discharge-dyed area (the bleached mark on the fabric).
Procedures
  1. Put on gloves and goggles.
  2. Put some Soft Scrub cleanser into squeeze bottle (about half full) and mark the bottle as "A" with the permanent marker.
  3. Put some Safeway cleanser into squeeze bottle (about half full) and mark the bottle as "B" with the permanent marker.
  4. Prepare samples of the clean denim fabric scraps. Cut samples to sizes at least 2 inches by 6 inches. Cut four samples of each fabric shade (that is, cut 4 samples from each pair of jeans so you have multiple matching samples for each shade of denim).
  5. Use the permanent marker to label each sample with a time (in minutes): 10, 15, 25, and 60 or Overnight (Note: for some shades I did not have enough for all four samples, so I made fewer samples).
  6. Lay out all the samples on a table. You will have a matrix of samples with time in one direction and denim shade in the other direction.
  7. Using the "A" (Soft Scrub) squeeze bottle, write an "A" on one end of each sample.
  8. Using the "B" (Safeway) squeeze bottle, write a "B" on the other end of each sample.
  9. Start the timer.
  10. At the end of each interval (10, 15, 25, and 60 minutes or Overnight), wash out the samples for that time period under running warm water. Use the toothbrush or scrub brush if needed to get the cleanser grit out of the sample.
  11. Set the samples out to dry.
  12. Lay out all the dry samples and look at the quality of the discharge-dyed letters (A, B) on the samples. Are they hard or easy to see? Are the edges of the letters sharp or blurry? What colors are the letters (white, blue, pale blue, yellow, and so on)?
  13. Write down observations for each sample based on the key chart below.

Data & Observations

Without very sophisticated equipment, determining the amount of bleaching is fairly subjective, so I have made up a qualitative scale (key table) by which the bleaching can be judged.

Here are the results for the various samples, according to the key given above. Click on the following table to enlarge it:


Here is a bar graph of the results, where each group of bars represents all shades bleached for a specific period of time. Click on the graph to enlarge it:


Here are photos of the bleached, rinsed, and dried samples, arranged by denim shade (dark, medium, and stonewashed). "A" is bleaching from the Soft Scrub cleanser. A "B" should appear on the right-hand side of each sample, but it appears only faintly in two of the samples ("dark 60 minutes" and medium overnight, "BO").

Dark denim at 10, 15, 25, and 60 minutes:


Medium denim at 10, 15, and 25 minutes and overnight:

Stonewashed denim at 10 and 25 minutes (15 minutes not shown):

As listed in the results table, the "B" (Safeway brand cleanser) is not visible at all in most of the samples, and is only very faint in the two where it appears at all.

I observed that the Soft Scrub cleanser turned yellowish or orange around the edges as it bleached the dyes below it, probably from reacting with the dyes. It also became just a little less shiny than it was when it was applied. The Safeway brand cleanser remained bright white and shiny just as it was when it was applied. For the overnight samples, both cleansers became slightly dried out and less shiny.


In this experiment, I compared the bleaching effects of two different brands of liquid cleansers with bleach. I compared them across various soaking times. I also compared them across three different shades of denim.

I used an advanced set of equipment, my eyes, to collect the data (the responding variable), and quantified my results using the qualitative scale above.

The data does not support either the hypothesis or the null hypothesis. The null hypothesis was that the results would be the same for both brands of liquid cleanser, and that was clearly not the case, since the performance was very different between the two brands (and the Safeway brand barely bleached the denim at all). The hypothesis predicted a slight difference in performance between the two brands. Because the Safeway brand barely bleached the denim at all, while the Soft Scrub worked as expected (bleached the denim visibly in 10 minutes, and more with increasing time), I maintain that there is a significant, not slight, difference in bleaching performance between the two brands.


My personal prediction about the outcome of the experiment was surprisingly incorrect. I had expected the Safeway brand cleanser to produce results only slightly different from the results of the Soft Scrub cleanser, since both purported to contain bleach, which is the ingredient of interest. Instead, the Safeway cleanser had almost completely failed to bleach the denim, while the Soft Scrub cleanser had bleached the denim as expected. As expected, the Soft Scrub had produced more bleaching effect (whiteness) over greater time periods. For what little bleaching it did produce, the Safeway brand cleanser had also produced more bleaching for longer times, as expected.

Keeping the bleaching times precise was a challenge because I was participating in other activities at the same time and did not have a timer handy (just a wall clock). However, given the imprecise nature of quantifying the results, a minute or two, plus or minus, does not seem to affect the precision of the results. Also, I had originally intended to do a set of samples at five minutes. This became a ten-minute sample set because I missed the five-minute rinse time.

If I were to repeat the experiment again in order to do it more carefully or accurately, I would use one or more kitchen timers so I could time my experiment more carefully. I would also prepare somewhat smaller and more uniformly-shaped samples, and more of them so I could get a more complete data set.

For a future experiment, I would try using the Soft Scrub cleanser with additional types of fabrics beyond denim, such as with wools, synthetics, and so on, and with different colors and dyes, such as over-dyed jeans, printed synthetic fabrics, tie-dyed t-shirts, and so on.


WEBSITE

"DISCHARGE DYEING WITH COMET GEL" Purrfection Artistic Wearables. Dana Marie Design Co. 5 October 2008.
http://www.purrfection.com/projects/dischargedye.htm

"DISCHARGE DYEING". 5 October 2008
http://tpa4244-01.sp00.fsu.edu/discharge.htm

Vintage Threads(blog). "Discharge Dyeing Tutorial". 5 May 2008, accessed 5 October 2008.
http://vintagethreads.blogspot.com/2008/05/discharge-dyeing-tutorial.html

Hewitt, Paula. The Beauty of Life (blog). "Discharge dyeing: husbands and bleach don’t mix". 20 January 2008, accessed 5 October 2008.
http://paulahewitt.wordpress.com/2008/01/20/discharge-dyeing-husbands-and-bleach-don%E2%80%99t-mix/

"Discharge Dyeing FAQ". 5 October 2008.
http://www.quilt.com/FAQS/DischargeDyeingFAQ.html

Grace, Twila. Twila's Threads (blog). "Dye Discharge Results". 23 September 2007, accessed 5 October 2008.
http://twilagrace.blogspot.com/2007/09/dye-discharge-results.html