Showing posts with label groups. Show all posts

Wednesday, September 23, 2009

Playing with YouTube

I recently did a corporate team-building activity at a local company's "Oktoberfest" event for their employees. Since there were lots of participants (they had ordered 150 shirts, and had a few left over), I got lots of help from a lot of great volunteers who are also really into tie-dye (thanks, everyone!). The activity seemed to be quite a hit!

I took home the leftover shirts and dyed them for myself and a few employees who didn't make it to the event. You can see pictures of those shirts here on my Picasa album site.

2009-09-22 Tie-dye for Oktoberfest

Is That Thing On?

I've been thinking about doing tie-dye demonstration videos to put onto YouTube, and I got one of the volunteers to video me while I was demonstrating how to do a couple of the fold patterns. The videos are completely rough and unedited, and there is polka music in the background! Who would have thought that polka makes a great soundtrack for tie-dye? Anyhow, I'm not sure when or if I'll get around to doing them the "right" way, so I figured I'll put them on YouTube for now just as they are. After all, I describe myself as a "recovering perfectionist"--where "done" is better than "perfect". I'd say these are worth lots of perfectionism recovery points!

In this video, I show how to fold an X pattern.


Here I demonstrate folding a diagonal stripe pattern.


Enough About Me...

Some of my faithful audience members have pointed out that they haven't seen my faithful hound Lacey lately. Here she is:


Amazingly, Lacey knows which shirts are the ones for me, and she just stands on those. Either that, or she just knows that she looks best with a backdrop of blues and greens!


Playtime with a cardboard tube.

Mandalas are great backdrops!

Monday, January 12, 2009

Another Year of Creativity

It's my first post of the Year 2009, and also an anniversary of sorts, so maybe it's time to reflect a little. Don't worry, it won't hurt...

It has been just over a year since I started a leave of absence from my unusually-long high-tech career at Oracle. I've been there since January 15, 1989 (wow, 20 years ago), and I just needed a (long) break.

I've been very busy in the intervening year, and I haven't been a bit bored. Some projects have been very successful, others less so.

Kid Rooms and Craft Room

I spent quite a while rearranging the contents of several rooms in my house so that my two daughters could each have their own bedrooms. My older daughter got the "new" room with a new loft bed and desk combo so she could study uninterrupted by her darling sibling, and my younger daughter got a new desk in her room and free run of both bunks in the existing bed set. Meanwhile, I would take the contents of my two old craft/storage rooms and combine them into one carefully-planned ultra-functional hobby workroom with built-in shelves and workbench (the Broder line from IKEA).

Eight months or so later, the verdict is decidedly mixed. The girls like having their own rooms, but I'm not having much luck getting them to go do their homework there. They'd rather be working with me or their dad at the kitchen table or sprawled across the living room. In fact, if my older daughter disappears into her room, it's usually because she's hiding in there reading her latest non-homework-related book, and I have to go pry it away from her!

As for my sleek new craft room? The Broder shelving on one side is stunning, and no earthquake is knocking it down without bringing down the walls too! I installed lots of other shelves, cabinets, and drawer units as well. But I haven't been able to get past those basic little laws of physics: I really can't get the contents of two full rooms to all fit in the space of one! Not only is that new room FULL, but so are the hallways and other spaces around the house that were meant to serve as staging areas while I moved stuff around. On the good side, we're all getting very good at sliding sideways through the hallways! In the meantime, my stuff has expanded as I've picked up more hobbies...

The Blog

I started this blog just about a year ago as part of my leave-of-absence plans. Since then, I've written about 50 entries (almost one a week) in this blog, plus quite a few entries in my blog on Turkey (I keep meaning to get back and write more about that!) and my random-topic blog.

Writing has been a major part of my Oracle career over the years, and one of my Oracle colleagues noted with amusement that "a writer just has to write" (or something like that) when he heard about my non-work blogging (yes, I even did a little blogging for Oracle some time ago).

I've been using my blog partly as a way to ramble on without boring people around me to tears. "Mom, haven't you talked about recycling blue jeans enough for today?" The nice thing about blog articles is that if they bore you, you can skip to the next one! It's harder to tell your darling wife or best friend that you really don't care all that much about discharge dyeing, and would she please hush up for a while?

The blog is certainly useful as a reference work, both for me and others. If somebody wants to know how I did some project with the elementary school or the middle school, I can give them the URL, and they can come back to me if they have further questions. It helps both sides. For me, it serves as a reminder of how I did something before. It's useful to have a place to "dump my brain" so I don't have to worry about remembering details in my head a couple years later.

I hadn't expected that my dog Lacey would be such an important part of my blog. She's a smart little dog, though, and it didn't take her long to figure that when the camera came out, posing cutely was a good way of getting attention and treats! Yes, yes, you'll get your Lacey pictures at the end of this article...

The Rental House Remodeling Project

I spent pretty much all Summer and Fall remodeling my rental house (with the help of a really good contractor) for my father-in-law. I was pretty happy with how that project came out, including the fireplace cover.

The Jeans Circle Quilt from Some-Very-Warm-Place-Far-Below-My-Feet

I've written about the jeans circle quilt multiple times already, and it looks like I will have to write updates about it a couple more times before it's finished. I'm still working on it, but I stab myself with all those pins so frequently that it provides pretty strong negative reinforcement! I tend to let my fingers heal before I try tackling it again. It's also so big that it takes a lot of physical effort to muscle it through the machine. It's in three long pieces (queen sized), but if I ever do one of these again I'd do it in much smaller blocks.

I don't usually make New Year's resolutions, but I am making one this year: I will finish my jeans circle quilt (at least by the end of 2010). Sometimes it's all in how you word them.

Tie-Dye

Interestingly, I haven't done much tie-dye of my own lately, though I've helped hundreds of other people do tie-dye over the year, and I expect to keep doing that. Beyond individual projects like the couch and the silk scarf dress, there are really only so many tie-dyed t-shirts, socks and such that one family can wear! I'm not into serious production so much as I'm into experimentation, so selling at craft fairs or similar isn't really of interest. Etsy and eBay aren't really good outlets for tie-dye, though perhaps I didn't try hard enough to build a market there.

I was really excited to get my own page on the Featured Artists section of Dharma's website several months ago. That section is a terrific source to both give and receive inspiration for what one can do with textiles and color!

Teaching and running tie-dye events have been great, though. I did tie-dye at an elementary school and a middle school, two summer camps and family camp, some small parties and some private lessons, and a corporate activity for a group at Google. I already have plans for more events this coming year.

Leather Is the Latest Hobby

I wrote recently that I've started doing leather tooling. Besides collecting a multitude of tools and supplies that are joining the tie-dye stuff spilling out of the craft room, I've been making belts since my last post. I'm now working on my third belt (I'll write up the belts when I finish the current belt). My kids are enjoying doing this hobby with me, and my older daughter especially is getting quite good at it. "Quality Time With Family" is a good justification for an expensive new hobby, right?

Lacey Resolves to Keep Appearing in My Blog

Lacey is cute, and she knows it. It's her key to survival, since she gets places she shouldn't and sheds on everything! I'm currently trying to sort all of my white stuff for tie-dye since I'm back to trying to fit everything in my craft room. I made the mistake of putting a big bin of soft, fluffy, clean white towels (that I'm intending to tie-dye eventually) on the couch. I later found her nestled in right on top!


Aaaah, very comfy. She's quite a princess. I wonder if she would notice if I put a pea underneath some of those layers of towels?


"Don't even think about it!"


"Do I really have to get up?"


Oh well, I'll have to wash the towels again anyhow after I dye them.


"Happy New Year, and May It Be Full of Treats!"

Wednesday, November 19, 2008

Dye Week at the Middle School

After months of off-and-on preparation work, I finally did my week-long half-day dyeing class for a bunch of middle school girls. We spent the time exploring several different ways of using "resists" with dye to create patterns on fabric. Like any class, it had both successes and failures, but overall, I think it went well, and both the girls and I learned a lot.

Day by Day

Monday we did basic tie-dye patterns such as stripes and spirals and rays, and each girl tie-dyed a white t-shirt. This is the same sort of thing I've been doing with groups for quite a while now, and the individual results mostly varied depending on how carefully they tied and dyed their shirts.

Tuesday we did stitch resist on bandanas. Stitch resist didn't work very well for the class. Most of the girls (grades 6-8) had trouble stitching their designs (on cotton bandanas) and pulling and tying them tightly enough, so the stitching didn't really resist the dye and their designs got lost. On the other hand, a shibori technique of folding and clamping silk hankies with various clips worked very well. Almost all the girls came out with strongly-geometric designs that were really beautiful.

Here is the group with their shibori silk hankies:

What beautiful patterns!


Wednesday we did discharge dyeing (bleaching dark colors to have light-colored patterns). We started with an experiment where we put Soft Scrub with Bleach on many different scraps of fabric to see what effects it would have. We saw that on the all-synthetic socks we got no effect, but that on dark blue fabric we got nearly white patterns. We then did designs on black T-shirts. Since I had gotten black shirts specifically meant for discharge dyeing, and I had run out of prep time beforehand, I hadn't tried one before class. They turned out to work well, bleaching much faster than I had expected, to a nice rust color (they don't bleach to white from the black). Several girls also bleached patterns onto jeans with stencils (I love that part--those jeans are now their own designs, not those of some brand name designer!). This technique was a big hit! One girl liked it so much she did more of it for the rest of the week during any free moments. We also did "regular" tie-dye on tote bags while they were waiting for the Soft Scrub to work.

Thursday we did "fake batik" (using glycerin soap instead of wax) on bandanas. The soap batik counts as the main failure for the week. Even though I had been successful with it in my trials at home, the conditions in class made it a lot harder. The main difference was the temperature of the melted soap when the girls tried to apply it to the cloth. At home, I worked right at the stove, and the soap stayed an even high temperature the whole time. At school, I couldn't have the girls working over the portable electric burner I used, so I took the pot to their table once the soap was melted. The soap cooled much too quickly, clogged up the tjanting tools, and hardened before going onto the fabric. Since the soap didn't penetrate the fabric properly, so it didn't resist the dye, and the designs were mostly lost. Wax would have had all the same problems under these working conditions (no heat at the working table). One additional problem with soap, though, is that very thin lines can get washed out in the soda ash soak, and many of the girls' lines were too thin as well.

Friday I gave them each another cotton bandana, and we all folded them into eighths (triangles). I then showed them the marking-pen-and-pleating technique that I first learned from Michael Fowler's Art of Tie-Dye DVD. They dyed their pieces, and then I let the pieces sit about an hour. I rinsed them in cold water enough so we could look at the designs and hang them out to display for the end-of-week assembly. They came out beautifully, with bold geometric patterns. We finished the week with a short but fabulous fashion show at the assembly.


Now That It's Over

I had a lot of help with running this class. One of the moms came in to help for the whole class, and my housemate came in for two days as well (many thanks to both of them!). For a class of nine girls, that ended up being about the right amount of help, so nobody had to wait too long before we could help them The girls did need a fair amount of help, especially with the stitching and the batik, though not as much help as the first graders I usually work with.

If I were to do this class again, I'd do it a bit differently. I'd skip the stitch resist and the batik completely and save those for the adult classes. I'd do more "classic" patterns like crinkle on white shirts and bandanas. One thing I'm glad I did right was to confine the discharge dyeing to using just the Soft Scrub, and not using buckets of bleach in water or spray bottles of bleach and water. I had several pretty high-energy kids in this class, and those could have been a disaster. The Soft Scrub is really easy to deal with from a safety and control perspective.

Budget is always a factor for classes like these. I had a budget of $20/girl for the whole week, or $180 total. Bandanas are good pieces for the class. They cost about $1 each in bulk. I buy them at the same time I buy lots of other stuff, like all the inexpensive white t-shirts (about $2 each) and black t-shirts (about $3 each) . Silk hankies were less than a dollar each and the results were very satisfying; I'd do more of those next time. Tote bags were about $3 each. I spent about $22 on four bottles of Soft Scrub, and most of it got used up! I spent about $1.50 per girl on gloves (they preferred larger reusable latex gloves over the close-fitting disposable nitrile gloves), and the rest was trash bags (for smocks), dye (the largest portion, about $25) and chemicals. I've already got many sets of goggles and most of the infrastructure equipment (squirt bottles and such).

One thing the kids liked, of course, was that there was a lot of stuff to take home with them, and it was even better because they had made the pieces beautiful.

So would I teach this class again? Oh yeah, next chance I get!

Sunday, October 12, 2008

Ooh, That Waxy Buildup!

I'm still preparing for my class for middle school kids. I usually sign up to do these things if it's something that I'll learn from, as well as something my students will learn from. In this case, I've designed the class intentionally so that I'll teach the kids some things I've never done myself! It forces me to try new things and gives me inspiration. The discharge dyeing was one of those crafts I'd never done before, but I'm planning to teach it, so I had to try it out (I still have more experimenting with that to do, too!).

The next topic for the class is batik. That's on purpose. When I first got the dyeing bug five years ago, thanks to my daughter's 6th birthday party, I went a little crazy with exploring the color-on-fabric medium and Dharma's catalog full of textile arts goodies. Among other things, I got a pound of batik wax and some tjanting tools for applying the wax, planning to try out doing batik. Five years later, the stuff was still sitting unopened in a drawer, so drastic measures were required, such as teaching it to kids!

I found a lot of information on batik on the web. For example, Paula Burch has an excellent discussion on batik on her extensive hand dyeing website. I also have a book called "Tie Dye To Die For & Batik You Can't Resist!" with good information, among others.

Getting Started

I melted the batik wax in its foil tin inside an old (that is, sacrificed to the cause) frying pan that was full of boiling water. I kept the stove burner on a low setting, but I found that the water had to be at a bubbling boil for the wax to get hot enough. If the wax is too cool, it beads up on the surface of the fabric. It has to penetrate the fabric thoroughly to resist the dyes properly.

Using the tjanting really takes some practice. I was just making a sampler on a bandana, not a work of art, so it didn't matter much if I got drips all over, but if I were to get serious about batik I'd need to work on my tjanting skills--for about a year! The hard part is to tilt the tool up just enough to stop its dripping from the tip, but not so much that the wax dribbles out the filling hole on the top and runs down your arm. Yikes.

Here is my pan of boiling water. The batik wax is on the left with the tjanting in it. Notice the frothy, bubbly water in the frying pan--that's what it looks like with lots of wax dripped into it by a tjanting amateur. "Bubbling like a witch's brew in a cauldron" would be a good way to describe what I found to be the right temperature.


I taped my bandana taut to a jelly roll pan (that's a cookie sheet with 1-inch high sides) so my working area would not touch the metal (a handy version of a silk painter's frame). That was useful because I don't have many empty flat surfaces in my house, so I could just stack this on top of everything else to be near the stove (works better than just dumping everything else on the floor!). I did have to keep shifting and re-taping the bandana to get at all of the bandana's area, though.


Here is my bandana with the wax applied. In the lower right corner I tried using a metal cookie cutter to apply the wax. That's supposed to be a frog. Near that is a big dark area where I painted wax on with a paintbrush between lines I had already done with the tjanting. I wanted to have a big area to test out the crackle effect.


I wadded up the corner of the bandana to crack that big area of wax and the surrounding areas (though all of the wax got somewhat cracked due to my generally-rough handling).


Other Resists

Because getting rid of the wax is such a pain, many people have tried out using other resists instead of the wax. They have various limitations, though, such as not producing the characteristic cracked effect found in real batik. At some point, while I was making glycerin soaps with my kids, it occurred to me that the soap itself might make a good resist that could then just wash right out at the end. The melting temperature and viscosity is similar to that of wax.

I melted some of the glycerin soap in the same frying pan full of water with my batik wax. That's the small handled pot in the picture above. I applied the soap to the upper right corner of my bandana with a second tjanting.
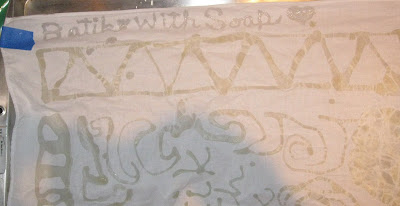

The glycerin soap is shinier and less yellow than the wax.

Dyeing

I used direct application for the dyes--I'm a big fan of immediate gratification! I gently soaked the bandana in a small bucket of soda ash solution, separate from my usual soaking bucket, because I didn't want to contaminate all my mixed-up soda ash solution with the water-soluble soap. Then I painted or squirted on dyes that I had around from recent tie-dyeing (same Procion dyes anyhow). One advantage of batik direct application is that I used less dye than I would have to tie-dye the same bandana. I let it sit overnight.


Resisting Resists

Next came the not-so-fun part, removing the resists. The soap, as expected, came right out in the cold-water rinse I always do for tie-dyes (to remove the soda ash and the worst of the excess dye). Then I tried various things to get rid of the wax. I tried bending it to remove the big chunks and drips. That helped a little. Scraping with a dull table knife was hopeless.

Then I tried boiling in water. Unfortunately I didn't have a multi-gallon pot (as Paula suggests) that I was willing to sacrifice to the cause. The wax and the soap might be food-safe, but there is still a lot of excess dye in the bandana. The pot I used was small, and the water immediately became dark blue with excess dye (and the bandana stuck out of the water in places, too). So if I wanted to change the water multiple times rather than boil blue dye onto my nice white batik lines, I had to do something about the wax. It was a mess. I scraped some off with a cold spoon, which helped some but was ridiculously tedious. I tried a fine strainer, which simply clogged. I tried paper towels in a coarse strainer, and the water poured past the paper towel (not held in well enough). I hate to think how much wax is now clogging my kitchen pipes!

I finally had done enough rinsing and wax removal that I wasn't concerned with dye redepositing. I went out to the garden, got a few rocks, and plopped them in to boil with my bandana and hold it down under the surface. I then let the water cool, and I scraped enough wax off the surface to get my bandana out.

I hand-washed the bandana with Synthrapol, let it dry, and here it is.


Since I was just making a sampler, I didn't worry about the age of the mixed dyes, so they look a bit more faded than an experienced Procion dyer would expect. The purple especially didn't hold its color--it was the oldest mixed dye. I've found that greens particularly, then purples and blues, lose their color strength the fastest (the New Emerald Green here was fresh). I've learned to make up fresh batches of dyes when I'm doing something where the color and brightness is important.

Here's the corner where I used the soap as the resist. Soap didn't get the really sharp, crisp edges wax gets, but it does get some cracking. I think it would have been helpful to have the soap a little hotter than the wax, though, so it could have penetrated a little better.


For my class, given that we won't have much time and there is very little budget, I'll show my students the difference between the wax and the soap, and then we'll use the soap. The soap has the advantage that it's easy to get in any craft store, and they can melt it using a microwave (repeatedly, but it does work). Then they can take their work home to wash it, and I won't have to worry about their parents calling me to complain about clogged drains!

And in my case, I still have a lot of wax to clean off the stove, the oven below it, the floor, the sink, the pans... I'd hate to lose my crafts-in-the-kitchen privileges. I'm getting close to that, though, since I still have my sewing machine on the kitchen table while I work sporadically on that jeans circle quilt. Eeek!

Dang Dog!

My little publicity hound somehow sensed I was going to take blog pictures tonight. I had just laid the white sheet and the bandana down on the floor and had gone into the other room to get my camera. In that short time, she went and found a squeaky toy and started cavorting with it in the middle of my photo setup!


My daughter tried to help distract Lacey while I set up again (but Lacey had no intention of letting go of the toy).


She only gets away with it because she's cute...


I'm thinking next time maybe I should batik the dog. But I'll have to use the soap instead of the wax. Wouldn't want any waxy buildup on that fluffy white fur!

Tuesday, August 19, 2008

Tie-Dye Classes, Take Two

The new Mountain View-Los Altos Adult Education Fall class catalog is now out: http://www.mvlaae.net/catalog/index.html The classes will be at Mountain View High School, and you can register online.

I have two tie-dye classes in the catalog, "Classic American" and "Stitch Resist and Shibori" (descriptions below). I had been planning to teach these over the summer, but the classes were both canceled due to low enrollment by the enrollment deadline. It seems that quite a few classes, not just mine, were canceled for the same reason. One coordinator I talked to thought it was partly due to the recent downturn in the economy coupled with the recent high gas prices. It makes sense: if you are having a hard time making ends meet for the necessities, it's a lot harder to justify going out and taking a "fun" class--and you're probably spending that extra time making more money if you can. Fun is important, but so is eating!

So we'll see if the Fall classes get a chance to take flight. I hope so, and I've been preparing more class materials and examples for them (like the clamped shibori T-shirt below). And if it doesn't happen this Fall? Maybe Spring. Or Summer. I'm patient. And I can always use at least some of my examples for teaching my first graders and summer camp groups!


Class Descriptions

Tie-Dye I, Classic American Tie-Dye!

Do you want to make your own unique holiday gifts? Tie-dye isn't just for summer anymore! Come to class and learn classic American tie-dye folds and designs and make your own wearable works of art! IMPORTANT: bring white, 100% cotton articles to dye - t-shirts, white cotton turtlenecks, tote bags, socks, bandanas, etc. - washed with NO fabric softener or dryer sheets. In addition Sara will have a limited number of white items available for purchase. Wear clothing that can get stained and bring an apron. Materials fee $28 payable at first class meeting. Register online or use form on inside back cover before 10/1

200207 W 10/8-10/15 2wks 6:00-9:00PM MVHS/109 $51*

Tie-Dye II, Stitch Resist and Shibori

Join this advanced class to learn how to do stitch-resist and shibori tie-dye to make your own wearable works of art! IMPORTANT: bring white, 100% cotton articles to dye - t-shirts, turtlenecks, tote bags, socks, bandanas, etc. - washed with NO fabric softener or dryer sheets. In addition Sara will have a limited number of white items available for purchase. Wear clothing that can get stained and bring a apron. Materials fee $28 payable at first class meeting. Register before 10/29

200208 W 11/5-11/12 2wks 6:00-9:00PM MVHS/109 $51*

Tuesday, July 22, 2008

The Importance of Protection

I helped run a tie-dye activity at my other daughter's Galileo camp today. One of the kids managed to get me with the dye today (not on purpose).

Here is a vivid demonstration on the importance of wearing eye protection (such as goggles, glasses, sunglasses, etc.) while doing tie-dye, even if you are not the one doing the dyeing (but especially if you are).


Here's the picture of where my face got hit by the dye. Good thing I was wearing my sunglasses! I wiped several drops of dye off of the sunglasses.


It's important to provide eye protection for the kids, even though it's a pain... the pain in the eyes is worse! And when you are working by yourself, you should still wear protection: squirts happen!

Happy--and safe--dyeing!

Tuesday, June 10, 2008

Most Colorful School Around!

Today the first graders got their shirts back! They came out beautifully, and the kids loved them! I also made shirts as a surprise for all the teachers at the school. They were very excited to receive them, and today's final assembly of the school year was our most colorful ever.

Here's the first grade, all squashed together:


Wow! Enough said.

Monday, June 9, 2008

Now It's a Floor of Many Colors...

I spent almost the entire weekend in my garage.

I worked with the first graders all day Friday, then I spent some time Saturday washing out a subset of them. But I also did a whole bunch of t-shirts myself as an end-of-year surprise for the teachers at the school. I don't usually do "production" tie-dye (Harmony does large-scale production much better than I ever could!), so the 59 shirts I was working on was quite a lot for me! My garage workshop was overflowing with t-shirts and humming with the sound of the washer and dryer.

With all that glorious color around, I couldn't resist spreading them out on the (clean) floor and taking some pictures.

Here they are stacked by size.


Ooooh, I can hardly wait to hand them out! And some of those I did are extras, so I can add something to my wardrobe too!

Friday, June 6, 2008

Rhapsody in Many Colors

Today I had my now-annual tie-dyeing day with the current crop of first graders at my local school. I do this project in four sessions:
  1. Measurement day: the kids measure each others' seated height (seat to shoulder) and waist size. We also look at the t-shirt sizes the kids are currently wearing. This gives me the data I need to order the shirts from Dharma. More importantly, it also gives the kids a little experience with measurement. First grade is is when most of them are just learning what a inch is. I can now pretty much tell a kid's t-shirt size by eye anyhow, and most of them are size 10-12s so they can still wear the shirts next year. I ordered 84 size 10-12s, about a dozen each of 6-8's and 14-16's, and 6 adult M. I often have one or two kids who take an adult L, partly because they like their shirts big.
  2. Tying day: about two weeks later I have all the shirts and have prewashed them. I go in and teach the kids the fold for stripes, X's, and diamonds (see this picture in my previous post). With the help of teachers and some parent volunteers, the kids all fold their shirts and tie them with 4-7 rubber bands. I leave the shirts in the classroom for the week.
  3. Dyeing day: this is the most work but also the most fun. I explain to the kids how to mix colors together on the shirts (I give them six colors to choose from), how to hold the squeeze bottles, how to check that they got dye on the inside of the folded shirt, behavior rules, and so on. Then an army of parents and other volunteers suit the kids up in gloves, goggles, and a garbage-bag smock, guides them to their soda-ash-soaked shirts, and supervises the dyeing process. The kids love this part!


  4. Shirt return day: a few of the parents take the shirts home to wash over the weekend. We time the whole project so the kids get their shirts back right before the final school assembly of the school year. I just love watching the kids show each other their results: "I love my shirt! I love my shirt!" It's so cool to see the entire first grade in the front of the assembly in their shirts. It's an amazing swath of color.
Behind the scenes, it's an amazing amount of work. I mix about 9 gallons of dye (6 colors), 12 gallons of soda ash solution, make 80 or so trash bag smocks, collect table coverings, order and prewash shirts, and so on. And of course there is washing out afterwards and lots of cleanup. But that's all stuff I can do at my leisure, at my own pace.

It's all the volunteer help that really makes it work and makes it a really fun experience. First graders aren't terribly patient about waiting in line for getting suited up or doing their dyeing. So we have half a dozen people swarm the kids quickly, popping garbage bags over heads and slipping on gloves and goggles. Other volunteers are waiting at the dye tables. With this effort, it goes very quickly, and we got through four batches of 20+ kids today in three hours! Of course, the cleanup took another few hours...

Sunday, June 1, 2008

What Do You Mean, "Soak It"?

One thing that often happens, especially in the uncontrollable chaos of group tie-dyeing at YMCA family camp, is that someone will carefully tie his or her piece and start dyeing it, then hear me telling someone else to go soak their tied piece in the bucket of soda ash solution.

"What do you mean, 'soak it'? I didn't do that..."

Thus begins a process I call a "rescue". The Procion fiber reactive dyes I use need the soda ash to make the color bond to the fibers in the fabric, making the colors permanent. What I usually do for these cases is place the dyed piece in an empty bucket and pour some of the soda ash solution over it (one year a camper dumped her blue piece in the main soda ash bucket on top of other pieces that were soaking. They all got dyed pale blue!) and let it soak. I then have the owner put more dye on to counteract the small amount of washing out that happens when we soak it.

The Experiment

This rescue process seems to work well enough, but I was curious as to how much of a difference it really made. So while I was there at camp, I tried an experiment. I tied three identical prewashed cotton bandanas the same way. I soaked one in soda ash, then I dyed all three the same way. The other two were dyed without soda ash. I took one of those two and did a "rescue", pouring soda ash over it and then adding more dye. I then let them sit overnight and washed as usual. So my three bandanas are the "control" (usual process), the "no soda ash", and the "rescue".

One initial observation: I generally dislike dyeing dry fabric, with or without soda ash (some people advocate soaking tied items in soda ash, drying them out and then dyeing). Even if the item is prewashed, the dye often beads up, runs off in unwanted directions, or pools up. Once it does soak in, it tends to spread unevenly. With the soda-ash-soaked bandana, the dye goes in smoothly and spreads more evenly, while I have to pretty much force the dye into the two dry bandanas.

The Results

There was a distinct difference among the three finished bandanas after I washed them out, though not quite as much difference as I expected. In the following picture, the "control" (usual soda ash soaking) sample is on the left, the "rescue" is on the right, and the one in the middle has no soda ash at all. The middle sample is definitely more dull and faded-looking than the other two, especially for the dark cobalt blue triangles on the sides. They are at least a shade lighter than their counterparts on the other bandanas. The "rescue" sample has more vibrant colors than the untreated sample, though it lacks the definition of the "control" sample.


I think part of the difference in pattern definition between the rescue and control samples may be due to dyeing on dry fabric--the dye absorption and spreading properties are different. Also, when the dyed "rescue" sample is soaked in soda ash after dyeing, the soda ash solution may be spreading the dye, blurring the whiter areas you see in the "control" sample. The re-dyeing after soaking may also aggravate the blurring.

Here is another picture where you can see the differences more directly (click on the picture to see a larger version).


Conclusions

It's clear that the best process for nice sharp tie-dye is to soak the item in soda ash before dyeing it. However, given that mistakes often happen, I think doing the "rescue" process is preferable over just going without the soda ash, so I'll continue to recommend that as necessary.

One further thing I want to do is to wash all three bandanas a couple more times. I know from experience that I won't see much change in the colors for the two that had soda ash, but I wonder if the untreated bandana will show visible washing out of the colors. I'll be doing a lot of
tie-dye washing in the next week or so, so I'll put an update out later.

Epi-dog (Gratuitous Dog Picture)


Once again, my dog Lacey, knowing how fabulous she looks on tie-dye, decided to help me out when she saw me getting ready to take tie-dye pictures! That's the "rescue" sample.


Aaaawwww...

Friday, May 30, 2008

Tie-Dye Group Dynamics

Over Memorial Day weekend, I went to YMCA Camp Jones Gulch Family Camp out under the California redwoods. I'm not much of a hiker, and I hate riding horses (the knees are just not flexible enough anymore), so I usually spend much of my weekend hanging out in the crafts area. The last few times I've gone to family camp, I've actually volunteered and run a tie-dye activity there, and I did it this time too.

I have done large groups several times, but there are different dynamics depending on the group.

The Whole First Grade, for the Fifth Year

When I work with my first graders, I'm working with a relatively homogeneous group. I have volunteer parent helpers and the teachers to keep things under control. It's pretty much a class project like any other, and the kids are expected to pay attention to the lecture and then do what they are supposed to. The kids get to make choices about how they want to fold their own shirt (which of three folding patterns) and what colors they want to use, but they all work pretty much in lockstep. They all fold at the same time, and they all dye at the same time (a class at a time, 5 classes). The results are uniformly decent-to-very-good (and you can tell what pattern they were trying to make), since everyone gets help. The kids love it, especially since they get to keep the finished shirts.

And Off to Family Camp

When I tie-dye at family camp, things are quite different. The group is more diverse in age and ability (kids of all ages, with or without their parents there, a few grandparents). The tying and dyeing are available all day Saturday, and people wander in when they want to, so sometimes it's a rush, and sometimes it's a trickle. I don't really know how many people are going to show up, since they might only come if they have time between other activities and aren't too tired. I think I had around a hundred people wander through, but I don't know for sure.

At family camp, I'm the only tie-dye "expert", and I have one or two counselors dedicated to working on this activity. We can't provide nearly as much help as we do for the first graders. Many people don't want help anyhow--they just want to do their own thing and go wild (such as the nine-or-ten-year-old boy who dyed his shirt by mopping up the puddles of dye left on the table by previous participants--in an example of how unfair the world is, his shirt came out quite nicely!). Many people are making things up as they go along. Some people achieve bold geometric patterns, while others go for random splotches of color. The results vary wildly.

[Me with a counselor, washing out all the tie-dye one year at family camp.]

[This picture shows the samples and instructional posters I put up the first time I taught tie-dye at family camp. These are all my work.]

It's Art and More

Group tie-dye is a very popular activity. In the first grade classes, it's a chance to make art, to make a mess, and to make a shirt of your own. At family camp, it's all of those things and more. The process can be a family bonding activity, and making matching shirts, bandanas, and so on helps bond families further when they all wear and show off the matching clothes.

For some, it's a chance to relive fond memories of doing camp or school activities they did when they were kids themselves, or a chance to catch up on fun they missed when "everyone else was doing it".

Cool.

[A happy camper and her counselor showing off the bandanas the camper made.]