Showing posts with label jeans. Show all posts

Wednesday, November 17, 2010

Harnessing the Power of Recycling--Green Project Entry for MAKE Magazine

Click on the MAKE icon to vote for my Recycled Jeans Dog Harness project! Tag Your Green

Introducing Tulip

Here is Tulip in her cool new harness:


I adopted a really cute dog from a rescue organization over the summer (does that make her a "reused" or "recycled" pet?). Her name is Tulip. She came with a collar, but she clearly needed a harness for "walkies" or she'd choke herself pulling on the collar.

Tulip's hair was cut very short, so Tulip looks pretty good in a T-shirt or harness. Tulip is practically a rag doll--floppy, mellow, and pliant--and she is very tolerant of being dressed and undressed repeatedly. So another project began...

I still have the leftover jeans parts from my jeans circle quilt, dining room chair covers, and other jeans projects. Since most of these used leg pieces, I have plenty of waistbands and upper sections handy. Time for some serious seam ripping!

I started with the one waistband and the attached upper back section of the jeans. I removed the back pockets to save for some other project. I cut the section to get a rough fit under and around Tulip's chest.

I also used a waistband from another pair of jeans.


Here is the chest part after stitching to fit Tulip. The separate collar section on the right is sewn closed, so the jeans button is now just decorative. The collar part just slips over Tulip's head.


I salvaged the buckle and webbing strap from one of my kids' old lunchboxes. My kids go through at least a couple a year by doing things like leaving spilled milk in them over Spring vacation (mmm, yum!), dragging them over concrete, and other things, so I regularly scavenge useful buckles, hardware, zippers, and straps from them (the picture shows a newer one).


I used part of another waistband to make the strap that goes between the collar and the chest strap, and sewed on a reused belt loop to hold the scavenged D-ring.

Done!

Here is the finished harness. The second button has been replaced on the chest strap so I would have two matching waistband buttons. It is also sewn closed and is now just decorative, since the lunchbox buckle provides the adjustable fastening. If you look carefully, you can see that I completely removed the waistband that goes around the chest and then sewed it and the belt loop back on so the button and buttonhole would be in the right place! Tulip is fortunately much smaller than the original 36-inch waist. The triangular section goes on the dog's chest.


Here is the finished harness looking down at the top (the dog's back).


The buckle strap goes through a loop on the D-ring section.

The Finished Product


Here she shows off the D-ring on the belt loop:


Lacey and Tulip: Out and About


Yes, Lacey needs a matching jeans harness too. Maybe later...


Let's go!

Thursday, August 5, 2010

Harnessing the Power of Recycling


If you came here from the MAKE Magazine Green Project page, please go here:
Harnessing the Power of Recycling--Green Project Entry for MAKE Magazine
(same project, slightly different writeup)--Thanks!


I adopted a really cute dog from a rescue organization (NARF) two weeks ago. Her name is Tulip. She came with a collar, but she clearly needed a harness for "walkies" or she'd choke herself pulling on the collar.

Tulip's hair was cut very short, and it's a different type from Lacey's hair, so Tulip looks pretty good in a T-shirt or harness (unlike Lacey: "Does this make my butt look big?" "Huge!"). Unlike Lacey, Tulip is very tolerant of being dressed and undressed repeatedly. Tulip is practically a rag doll--floppy, mellow, and pliant. So another project began...

I still have the leftover jeans parts from my jeans circle quilt, dining room chair covers, and other jeans projects. Since most of these used leg pieces, I have plenty of waistbands and upper sections handy. Time for some serious seam ripping!

I started with the one waistband and the attached upper back section of the jeans. I removed the back pockets to save for some other project. I cut the section to get a rough fit under and around Tulip's chest.

I also used a waistband from another pair of jeans.


Here is the chest part after stitching to fit Tulip. The separate collar section on the right is sewn closed, so the jeans button is now just decorative. The collar part just slips over Tulip's head.


I salvaged the buckle and webbing strap from one of my kids' old lunchboxes. My kids go through at least a couple a year by doing things like leaving spilled milk in them over Spring vacation (mmm, yum!), dragging them over concrete, and other things, so I regularly scavenge useful buckles, hardware, zippers, and straps from them (the picture shows a newer one).


I used part of another waistband to make the strap that goes between the collar and the chest strap, and sewed on a reused belt loop to hold the D-ring.

One thing I should mention is that I used a really simple-but-useful little gadget called the "JEAN-A-MA-JIG" by Dritz to sew over the really thick parts where the jeans seams and the belt loops were. This helps to prevent the stitches skipping when the presser foot is going up or down at a steep angle when you go over the big hump in the fabric.


The sewing still wasn't easy, but it was better. It actually turned out that for my machine with the "walking foot" (that contraption that includes the presser foot and sticks out behind the presser foot--it helps keep multiple layers from sliding out of place), I needed a thinner version to put under the foot in the back, while the thicker "JEAN-A-MA-JIG" fit under the front side. I made the thinner version from a plastic soft drink cup that was languishing in my recycling bin.


Done!

Here is the finished harness. The second button has been replaced on the chest strap so I would have two matching Levi's buttons. It is also sewn closed and is now just decorative, since the lunchbox buckle provides the adjustable fastening. If you look carefully, you can see that I completely removed the waistband that goes around the chest and then sewed it and the belt loop back on so the button and buttonhole would be in the right place! Tulip is fortunately much smaller than the original 36-inch waist. The triangular section goes on the dog's chest.


Here is the finished harness looking down at the top (the dog's back).


The buckle strap goes through a loop on the D-ring section.

Introducing Tulip

Here is Tulip in her cool new harness:


Here she shows off the D-ring on the belt loop:


Lacey and Tulip: Out and About


Yes, Lacey needs a matching jeans harness too. Maybe later...


Here's the whole doggy-infatuated gang! That's me in one of my favorite gaudy tie-dyed T-shirts.

That original 36-inch jeans waist might be just the right size for Moxie the giant schnauzer...

Saturday, August 1, 2009

Tie-dyeing Blue Jeans

I had a couple of pairs of jeans that I wasn't wearing because they had blemishes in strategic locations, as well as some swapped jeans I picked up at the Maker Faire recently. And while I have dozens of tie-dyed shirts that I wear all the time, none of my jeans are (intentionally) tie-dyed. Time to change that.

Color on Color

I often get questions about dyeing garments that aren't white. I've done it a fair amount, but it's a little tricky. You have to remember that the colors are ADDITIVE. So if you start with a yellow shirt and put blue dye on it, you get green. Purple on yellow gives you brown, and so on. Also, the colors you put on may seem a little dull compared to how they would look on white. So it's worth trying, because you can get some interesting effects (blue and purple on a pale blue shirt looks good), but you may not get the results you expect or hope for.

Here, I did a crinkle pattern on a pair of light-blue 100% cotton Levi's (left) and the exact same crinkle pattern on a pair of medium-blue Gloria Vanderbilt partly-spandex stretch Amanda jeans (on the right). I smushed them both up into wrinkly pancakes, along with the shorts below, and I dyed all three pieces side-by-side with the same colors. I actually squirted the dyes on all three pieces with the same strokes of each color.


The Levi's give a much more vibrant and almost crystalline crinkle effect than the Vanderbilt jeans. The lighter original color of the Levi's gives a much better contrast with the dye colors than the darker blue, though I like both. The interesting part, though, is that the colors on the Levi's jeans look much crisper and sharper than on the Vanderbilt jeans. The denim of the Levi's is thicker and much stiffer than the Vanderbilt denim, giving the crinkles more definition. I think the thicker denim also prevents the soda ash from soaking in quite as well into the Levi's, leaving more undyed fibers in the denim (both pairs soaked for the same amount of time), helping the Levi's look a little brighter in the center parts of the crinkles.

The cargo shorts are from Lands' End in the light greyish color they call "light stone". My daughter managed to spill chocolate on them in strategic places almost immediately, so they were definitely in need of revamping with dye. These were the third piece in my crinkled assembly line. The light grey is almost white, but not enough to really brighten the dye colors.


My daughter likes them more now than in the original grey color, of course, and likes the hoodie I did for her while I was at it.

Stripes Front and Back

This is another medium-blue pair of the Vanderbilt jeans (my usual). This one really demonstrates the effect of working with multiple layers of thick, stiff fabric such as this denim.

Since the fabric is so thick, very little dye bleeds through from dyeing the folded piece on one side, so it's easy to get thick-and-thin effects on the stripes by dyeing a little less or more on the two sides of the folded piece, and it's hard to get dye all the way to the center of the pleats. In this pair, I folded first down the center of the jeans so the back is on the inside, then I pleated the whole thing starting up from the ankles. I like the multi-thickness effect, though.


Here is how they look on (and one of my current favorite shirts--bright enough to hurt the eyeballs!).


And the back...I like the two-toned effect on the legs here (mine, not Lacey's).


A Few Bonus Shirts

I dyed a few shirts for my daughters while I was at it. The third shirt from the left was twisted up like a hank of yarn and then dyed in stripes across it. The shirt on the right was a spiral started near the right shoulder.


Lacey Is at It Again

Such a big help!


My squeaky toy!

Friday, June 12, 2009

Look! It's a Quilt!

If Abercrombie and Fitch were to sell quilts, this would be it. It's ratty and frayed. It has the dusky patina of ground-in dirt. It's irregular and uneven. Maybe it's not ripped up enough to meet those trendy A&F standards, but one has to draw the line somewhere.

The jeans circle quilt is done. Well, at least for now. Until I decide to do more stuff to it. But for now, done. Oddly, having it finished seems pretty anticlimactic. It's probably because I don't really have a place or a use for it, since I really just did it for the challenge of it. It took me so long to make (just over a year of on-again, off-again work), and so much physical effort, that I feel I have to hang onto it until I find the right place for it.


The Stats

The "Quilt from Hell", as I'd taken to calling it, has 221 jeans circles (from roughly 30 pairs of recycled adult jeans) and 221 ~5-inch squares cut from a tie-dyed recycled sheet (as well as 442 squares of polyester batting). It weighs 8 pounds according to my scale, but it feels like more.


I had made it up into three long sections, and then put the three sections together. That was one of the reasons making the quilt was so difficult; I had to physically muscle those huge and heavy sections around and through my regular home sewing machine (a Husqvarna Viking Emerald 118). In hindsight, I would have made nine smaller sections and put those together at the end.


It's Unique

The quilt is definitely unique. Besides the randomness of the recycled jeans circles in various shades, which are then laid out in a specific design, I also had the tie-dyed sheet. I had dyed it in a chevron pattern, then cut it all up and rearranged all the pieces. Someone I know wonders why people would take perfectly good fabric, cut it up, and sew it back together again. I just tell her to think of it as making paint from minerals and then smearing it on canvas--it's art. And in this case, it's taking something that isn't perfectly good (the worn out jeans) and putting them to good use.

Extra Special Style

My quilt has something that no Abercrombie and Fitch quilt would have: dog hair incorporated into its deepest recesses. Lacey thinks that's just perfect.


P.S.: I've managed to achieve my New Year's resolution! This may be a first!

Sunday, May 17, 2009

Seat of the Pants

I'm not all that fussy about appearances, and my house is furnished in "Early American Hand-Me-Down, Kids-and-Hobbies". However, I had to do something about the dining room chairs when their covers started ripping from long wear. The table-and-chairs set was left to us by an old housemate when he moved out, and he had bought them at a garage sale before that. They are perfect for our casual lifestyle of feet on the furniture, food spilling, painting, leather working and sewing at the kitchen table. So they were already ugly, but the rips made them uncomfortable too.


In keeping with my waste-not-want-not leanings, and because my friends are still giving me their worn-out jeans (Yay! Keep it up!), the perfect material was obvious: recycled denim! I had also recently bought a book at a silent auction, "The New Sampler Quilt" by Diana Leone, and making sampler blocks for the chair covers seemed like a project I might be able to finish in a reasonable time (where "reasonable" is defined as "less time than the still-unfinished Jeans Circle Quilt from Hell").

The Jeans

For my six chairs, I used the legs of 10 pairs of adult jeans. Four pairs of varying colors (black, dark blue, medium blue, light blue) went to form the quilt blocks. Then I used one pair of legs for the surrounding sections on each chair.

The jeans pocket sections went to the middle school for a group making bags for a school project.

Finding the Grain

Quilt tops work better if the pieces are cut on the grain of the fabric. The grain of reused jeans isn't always obvious because of the diagonal pattern of the denim weave, so I found the grain by pulling off thread after thread (fraying the denim) until I had a straight edge I could work from. Fortunately I had plenty of excess on the jeans legs.


The Squares

Each chair has a different classic quilt square design. I did Wheel, Spools, Ohio Star, Monkey Wrench, King's X, and Card Trick (the hands-down favorite of the household--it's the one behind the dog).


I made templates from the patterns in the sampler book, traced with kids' washable markers and cut them out, and machine pieced them following the instructions in the book.

Once the squares were pieced, I sewed on the fabric from a pair of legs around the square to make the background. I washed the covers after that to get rid of the washable marker.


Quilting

I used batting left over from a previous project. For the quilt backing, I reused six small flannel receiving blankets (complete with Pooh or teddy bear pictures!) that I had left from when my two kids were newborn babies. This would never be visible, but it wouldn't hurt to have something sturdy but soft wrapped around the padding and the wooden seat bases.


I machine quilted the three layers "in the ditch" along the seam lines between the square design pieces so the sewing wouldn't be very visible.


House of Foam

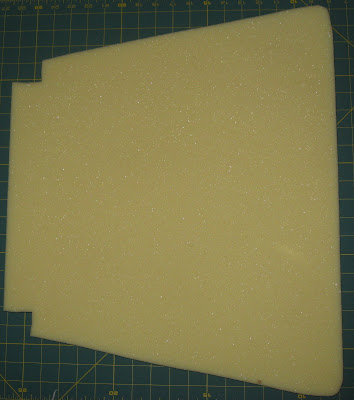
Padding matters. I got a couple of different "chair-sized" pieces of padding at the local fabric/crafts store. These were two inches thick. One was Airtex High Density Foam. The other was Poly-Fil NU-Foam, which is a compressed polyester fiber pad. Unfortunately they were too small for my chairs, but my family sat on them for a week or so to try them out. I found they were too thick to fit well under the backs of the chairs, but they weren't firm enough. When we sat on them, we'd go right down to the wood surface beneath.

I went to a place called House of Foam in Palo Alto, CA. The proprietor suggested 1" thick high resilience (HR) foam, which he said is the usual one he sells for dining room chairs. It cost about $12 per chair (just slightly more than the same amount of the other padding types would have cost), but as his website says, "Generally the firmer the foam, the longer its firmness will last, and the more expensive it is." However, what I got from House of Foam was definitely the right stuff. They even cut it to shape and glued it onto the the chair seats for me while I ate lunch across the street, making it well worth it for me to go to such a specialty shop.


Putting It Together

I cut off the excess from the quilted covers, then I sprayed the covers with a coat of Scotchgard in the (probably vain) hope that the covers would stay cleaner longer. I used a staple gun to attach the cover over the foam and around to the bottom of the wooden seat pieces. Each seat was then attached to the chair legs and back with four screws, so that part was easy.


Here is the finished set of chairs.


New Beginning and the End

Interestingly, when I removed the previous covers from the wood, I found that these chairs had been recovered at least twice before (old staples and tacks, shreds of two other fabrics). It feels kind of nice to be carrying on a tradition of reuse, and not just throwing something away because it was old. I did, however, grit my teeth and throw out the old cotton padding and fabric covers. They had done their share of service.

Gratuitous Dog Pictures

I managed to sneak in one or two blog entries without dog pictures, but this entry required a lot of pictures, and Lacey now comes running if she even hears the camera turn on.

She's a big help!


She looks like this chair is made for her.


After all, since I have to let my kids sit on these chairs, why not the dog? The kids are often messier!