Showing posts with label furniture. Show all posts

Saturday, June 20, 2009

Tie-Dyeing the Bookcases

Now that my older daughter is on summer vacation (though she still has homework to do), she has a bit more available time. It's time to do some rearranging in her room to make it easier for her to store and find all her stuff going forward.

Bookcases with Glass Doors and a Little Inspiration

We bought her two Billy 79.5-inch tall, 31.5-inch wide bookcases, along with two pairs of coordinating half-height (37.75-inch high) Billy Morebo glass/aluminum doors. IKEA mentions on its website, and displays in the showroom, that these can be easily personalized by adding wrapping paper, fabric, stickers, etc. between the glass and the backing insert of the door. Just that little hint, and off we go!

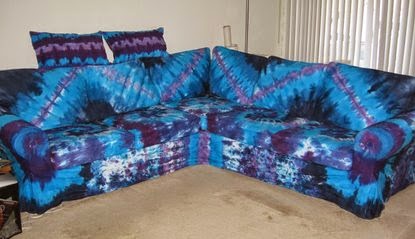
My daughter loves blues and greens, and her room is already decorated in those. She's excited about getting her glass doors done in blue-and-green tie-dye to match the rest of her room. Guess who had some influence on the color scheme when I tie-dyed the couch?

A while back I got a bunch of IKEA's Sova twin-sized flat sheets (cheap, 100% cotton, and they dye beautifully). Note that the Sova line has since been replaced by the Dvala line, which is still all cotton but a little more expensive. The Slumra line (now the cheapest line) is unsuitable because it is 52% polyester and won't dye well.

I folded a sheet in eighths (which turns out to be the perfect size, just a bit bigger than the door inserts), then tied it in a pattern and dyed it. After dyeing, I cut off half the sheet since we didn't need it. We hemmed it, and now my daughter can use it as a drape for her loft bed or whatever.


I cut out four matching pieces the size of the inserts plus 1.25 inches extra all around.

Here I laid one of the inserts on top of the corresponding fabric piece.


We're using the leftover strips (about 4-6 inches wide) to make scrunchies for hair.

We attached the fabric to the inserts with Scotch tape. We don't care if the back of the door looks a little messy, and the tape just has to hold well enough for us to install the inserts into the glass doors.


We installed the inserts into the glass doors and installed them according to the instructions. Once we got everything put together, it looked like framed posters of some wild graphic art.


That's the extra half sheet draped over a curtain rod on the right side of the picture. Here's how it looks with the doors open:


My daughter kept running around it singing "It's so pretty!" Well worth the cost and effort just for its looks. Now if only it helps her keep her room clean!

More Gratuitous Dog Pictures

Lacey knows when it's time to join the photo shoot. Here she's sitting on the wrapped inserts.

She's even brought her own props!


Who can resist that pose?

Tuesday, March 10, 2009

Remodel, Reuse, Recycle

Just a quick "reuse, recycle" note.

When I was doing the remodeling project at my rental house, I hated to throw away anything that might be usable again later. Yep, "Packrat" is my middle name.

One thing that got kept was a hollow door that was no longer needed. It got replaced by a wall. Not in perfect condition, and has a small chunk cut out of one side of it (it was a pocket door), but it is pretty clean and flat.

As I mentioned before, I have been working to make my craft room more usable for the many projects I always have going. The door is just small enough to fit in the room, so I got a couple of Vika Artur trestles from IKEA. I had a couple strips of leftover foam flooring, which I put on top of the trestles to help absorb vibration (I hope).


Well, flat surface in my house never stays bare for long, and this didn't even stay bare long enough for me to get a picture! But the door is under there, valiantly serving as a workbench table top, covered partly by a reused drycleaners' bag to protect it from the contact cement I'm using on my sandals.

And since I'm now buying contact cement by the gallon, I'm storing smaller quantities of it in a jar that once held Procion dye powder from Dharma (the black jar in the middle of the following picture). Gotta use them for something!


Another Recycling Note

I have been working on my jeans circle quilt a little bit at a time. At this point it is in three big pieces (safety-pinned together in these pictures), and I have sewn down most of the tie-dyed squares and batting. I have about 21 squares to go (out of 221) before I can sew the three pieces together, but now I need to stop and figure out which square fits where, since several have fallen out somewhere along the way. Good thing I have a few extras.

This is the first time I've laid the whole thing out since I started sewing down the squares, and it's huge! That's my whole seats-eight-comfortably dining room table underneath the quilt, with the two table leaves pulled a bit apart for extra length and the chair backs supporting the extra width. It didn't look quite so big upstairs on the floor of the kids' playroom.


I imagine it would go more quickly if I didn't have to clear everything off the dining room table to work on it.

Someday I'll finish this...

Tuesday, February 26, 2008

Tie-Dyeing the Furniture, Part 2

In a comment on my Tie-Dyeing the Furniture post, Anonymous said...

Oh wow I just love the furniture! I was pondering the possibility of tie-dying my two couches (that don't match...) and it gave me great hope to see yours! Now if I can just have the patience to try it myself.

Thanks!

After I did my couches, I went looking for others on the internet. I was surprised to find only a couple, and they were quite different from what I had done. I liked these ones by Wahmpee, and this one from Dye-abolical Designs. These are very different styles, so you can get a better idea of what you might like.

Really, patience isn't the main requirement, so much as the promise to yourself to really go for it and to like whatever you end up with! It's a bit of an investment, since those slipcovers range in price from $60 and up. That's not counting dyes, which can add up, especially for the really dark colors like navy that require extra dye powder per amount of water. But as long as you like what you end up with, or are willing to cheerfully throw away your investment if you really don't like it, it's well worth the effort. For my house, it makes a huge and positive change!

One tip: do some tie-dye on cheap cotton t-shirts first, with the pattern, dyes and colors you plan to use for the slipcovers. You can drape them over your furniture like swatches. You may find that you want to change the colors or pattern before doing the real thing. And hey, you can wear the shirts, or you can give them away if you hate them!

It also helps a lot to have a friend or two join you. It makes the folding and dyeing go much faster (and it's more fun, of course!), and they can help muscle the stuff around as well--it's really heavy when wet, and the slipcovers are quite large and awkward to fold.

Patience actually is helpful for a couple things: 1) letting it sit wet in the dye overnight, and 2) for ironing the slipcovers when they are washed out and finished! It's a lot to iron, but they just don't look very good until they are ironed. It's cotton, after all, and ironing makes a big difference.

If you are serious about getting the look, but don't want to do it yourself, Wahmpee does custom work, or I can. But where's the fun in having someone else do it if you can do it yourself?

Hm, I wonder how my couches would look in brown swirls to match my dog's brown t-shirt? Another project!

Monday, January 28, 2008

Tie-Dyeing the Furniture

Tie-dyeing the Couch!

Recently I met someone from Google who is actually more into tie-dye than I am (my close friends all gasped when they heard that). He has a huge wardrobe of tie-dye, but had never actually tried it himself before doing it at a group activity I ran at Google. And then he was off and running...

He later told me that he wanted to tie-dye his IKEA couch! It's a big L-shaped couch, and he got a white cotton slipcover for it (the great thing about IKEA couches is the availability of slipcovers).

We got together at my place to work on it. It took about 4 hours to tie (separate pieces for each cushion plus the body), another 4 hours to dye, and another 4 hours to wash out. We went through nearly 2 gallons of dye!


It's hard to see from the picture of the whole couch, but each seat cushion is a spiral. The couch looks even more fabulous in person than it does in the picture!

More Furniture!

Big chair with blue and green tie-dyed slipcover
This used to be an ugly orange chair left over from an old housemate
I liked his results so much that I got off-the-shelf slipcovers from Sure-Fit for my own sofa, loveseat, and chair. Like the first couch, this took about 4 hours to tie, 4 hours to dye, and 4+ hours to wash. This project also took about 2 gallons of dye. Now I finally have matching furniture, and I love them!
Long couch with blue and green tie-dyed slipcover


The back also continues the pattern: