Showing posts with label pattern. Show all posts

Tuesday, November 10, 2020

A Weighty Problem

I needed "real" pattern weights. Staplers and scissors tend to be my go-to pattern weights because I keep them nearby, but they get kind of unwieldy for holding down bra patterns that have lots of individual little fiddly pieces. 

FabMo, my favorite source for fabrics (except for bras!), also regularly gets donations of tiles from high-end bathroom design stores at the San Francisco Design Center. Many of these are plain (but handmade!) 4-inch or 6-inch square tiles and 2" by 4" subway tiles, but they often get other sizes and shapes, as well as mounted pattern examples that make great trivets. I recently found a square-foot sample of hand-cut marble pieces held together by fiberglass mesh and grout on the backs, as well as a few nice small shaped tiles. They would make great pattern weights!

I pulled apart the marble squares by hand, and pulled off as much of the mesh and grout as I could. It was only after doing that for an hour or so that I realized the mesh was fiberglass! Oops. Handling fiberglass with bare hands isn't a good idea, and I had lots of little fiberglass splinters in my hands to remind me. I did manage to get most of them out with Scotch tape or tweezers. I wore medical gloves for the rest of the time I was working with the fiberglass.

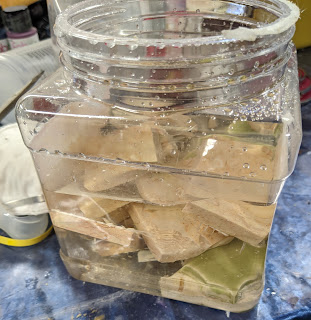
I found an article on the web that suggested using plain granulated sugar dissolved in water to help scrub the grout off tiles, so I put about a cup of sugar in two cups of water, stirred, and dumped in several of my marble tiles. It also suggested using a piece of wood to scrape off the grout to avoid scratching the tile.

Plastic jar full of marble pieces, tiles, and sugar water

Here are the tiles after I had tried to pull off the fiberglass and grout by hand and after soaking in the sugar water for half an hour. The stringy stuff is the fiberglass.

Three square pieces of marble showing the grout and fiberglass on the bottom of each one.

I used some disposable chopsticks to try scraping off the grout, but they were useless (and they broke). I finally tried a razor scraper, which worked, though I did go through several blades while scraping grout off about 16 tiles. I'm not sure the sugar water helped with the grout, but it did help keep the fiberglass under control because it was slightly sticky!

Three pieces of marble showing grout and fiberglass, plus gloved hand holding razor scraper tool. Two pieces of marble. One has had the grout and fiberglass scraped off in a chunk, also visible. Razor scraper tool.raper

I soaked one scraped marble piece in vinegar overnight. I had heard that vinegar (and acids in general) was bad for marble. Yep, it is! Here is the vinegar-soaked tile on the right, with another tile (polished to a nice shine, though the shine isn't really visible in the picture) on the left for comparison. The vinegar ate away at the matrix material of the tile, leaving a pale, soft chalky surface with little harder inclusions sticking out slightly. Lesson: don't pour vinegar on your marble floors!

Polished, darker marble tile on left. Vinegar-soaked, paler marble on right.

Making the Pattern Weights

Here is how to make the simple pattern weights.

Materials needed:
  • Small tiles or pieces of marble or stone with a flat bottom, from 1 inch by 2 inches up to 2 inches by 4 inches (about 2.5 cm by 5 cm up to 5 cm by 10cm). Approximately 2 inches by 2 inches (about 5 cm by 5 cm) is ideal for most uses.
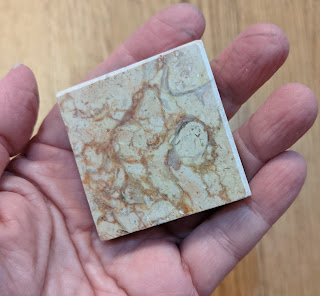
Example marble pieces, just under 2 inches by 2 inches, plus two example tiles that are each2 inches by 4 inches.
  • Cork sheet, about 1/8 inch thick (2-5 mm thick). Available at craft stores, office supply stores, and stores such as Daiso. My roll of cork sheet came from Office Depot.
Roll of cork sheet with label on it
  • Glue or adhesive. I used basic Elmer's white glue. Tacky glue will also work. Adhesive sheet or double-stick tape will also work, but I have found that those are more likely to come unstuck over time. The pattern weights do not need to be waterproof. If water gets on them while you are working with a pattern, your pattern would be more damaged than the pattern weight!

  • Scissors, knife or rotary cutter and ruler for cutting the cork.

  • Pen/pencil for marking the cork if needed. Do NOT use a marker to trace around the tile, not even a washable marker. The tile or marble sucks in the ink, and it's impossible to wash off! Yes, I found this out the hard way.

  • Ruler
Process

1. Trace around the tile or marble onto the cork. 
 
2. Cut your pieces of cork slightly smaller than the tile so the cork does not show from the top of the pattern weight. Make to cork piece approximately 1/16th of an inch (1-2 mm) inside each edge of the tile.
Hand holding a piece of marble and the corresponding cut piece of cork

3. Spread a small amount of glue onto one side of the cork and onto the bottom side of the tile. I spread the glue evenly with my finger on both pieces. You do not need much glue. If you have too much it will ooze out from the sides and make a mess.

4. Put the pieces together carefully and let dry. Clean off any excess glue if needed.

All done! 

Here are my finished pattern weights: 

Hand holding piece of marble with cork on bottom (not visible)  

Hand holding piece of marble with cork on bottom (visible)

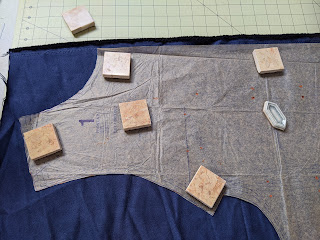
Pattern laid out on fabric with weights on pattern

Pattern laid out on fabric with weights on pattern


P.S. If you do not have tiles easily available or making these is just too much bother, a set of heavy plastic (imitation ivory) dominoes work well as pattern weights. Alternatively, you can search for pattern weights from several makers on Etsy. 


Wednesday, September 9, 2020

I'm Making What?

I like doing projects and crafts that are not quite mainstream. One of my current interests is making bras. Yeah, brassieres. Those things. Most women don't even like shopping for bras. The prospect of making them is even more daunting, even for people who consider themselves good at sewing!

As with many of my projects, this one started because I needed something. Well, actually, my daughter did. She has a really hard time finding bras that fit comfortably. She'll order half a dozen bras online (because brick-and-mortar stores rarely even carry her size, and there's a pandemic going on anyhow), try them all on, and send them all back. She's tried on a few dozen this way. It's time-consuming and discouraging for both of us.

I started poking around the Internet. Have I mentioned that I LOVE the Internet? I found a whole subculture of folks who make their own bras, sell bra-making supplies, design patterns, teach lessons, discuss bra-making on Facebook, and even record YouTube videos about making bras. Yay!

After reading discussions and watching videos, I soon settled on ordering supplies and patterns online from a shop in Canada called Bra-makers Supply. I ordered a couple of patterns (Shelley and Ingrid by Beverly V. Johnson, the "Fairy Bra Mother"), a fitting book, and a couple of kits. The Shelley pattern had been mentioned in multiple places as a good pattern for beginning bra makers. The Ingrid was wire-free, so I thought I would try both. Here is a picture of the bra kits, Ingrid pattern, and book that I got (the Shelley pattern is under the book):

Bra kits, pattern booklet, instruction booklet

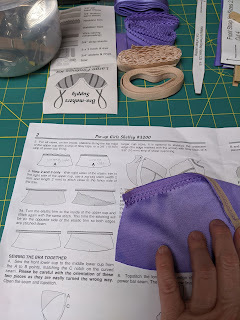
I made the Shelley bra first. I had found a YouTube "sew-along" video on the michoumakes channel from a woman who was making her second Shelley bra. I watched the first of six(!) parts of the sew-along, and that combined with the multi-page pattern instructions gave me enough confidence to dive right in.

Hand holding piece of bra in progress next to pattern instructions

Beverly Johnson has devised her own sizing system for her patterns. You need just two measurements to determine what pattern size to use (and the pattern includes a huge number of sizes). Unfortunately the measuring instructions say something like "start by wearing a well-fitting bra...", which my daughter didn't have! Chicken-and-egg problem. We measured as best we could, and I figured the first bra would be a prototype anyhow.

The pattern and kit were both great! Although it took me about 10-11 hours of work (including sewing, ripping out, and resewing), I made a bra that looked both pretty and professional. 


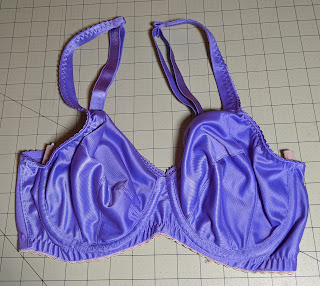
Lavender underwire bra (front) on grid cutting mat

Lavender underwire bra (back view) on grid cutting mat

The underwires are sticking out because I was trying out different underwires to see what fit best, so I didn't finish the underwire channel. I had already been keeping hardware and underwires from old dead bras because I might find a use for them someday!

My daughter tried the bra on, and... it didn't fit. Not even close. Oh well. It did give us a basis for figuring out what size would be closer, though. Fortunately I got a second kit for the Shelley bra. Back to the sewing machine!

Sunday, May 17, 2009

Seat of the Pants

I'm not all that fussy about appearances, and my house is furnished in "Early American Hand-Me-Down, Kids-and-Hobbies". However, I had to do something about the dining room chairs when their covers started ripping from long wear. The table-and-chairs set was left to us by an old housemate when he moved out, and he had bought them at a garage sale before that. They are perfect for our casual lifestyle of feet on the furniture, food spilling, painting, leather working and sewing at the kitchen table. So they were already ugly, but the rips made them uncomfortable too.


In keeping with my waste-not-want-not leanings, and because my friends are still giving me their worn-out jeans (Yay! Keep it up!), the perfect material was obvious: recycled denim! I had also recently bought a book at a silent auction, "The New Sampler Quilt" by Diana Leone, and making sampler blocks for the chair covers seemed like a project I might be able to finish in a reasonable time (where "reasonable" is defined as "less time than the still-unfinished Jeans Circle Quilt from Hell").

The Jeans

For my six chairs, I used the legs of 10 pairs of adult jeans. Four pairs of varying colors (black, dark blue, medium blue, light blue) went to form the quilt blocks. Then I used one pair of legs for the surrounding sections on each chair.

The jeans pocket sections went to the middle school for a group making bags for a school project.

Finding the Grain

Quilt tops work better if the pieces are cut on the grain of the fabric. The grain of reused jeans isn't always obvious because of the diagonal pattern of the denim weave, so I found the grain by pulling off thread after thread (fraying the denim) until I had a straight edge I could work from. Fortunately I had plenty of excess on the jeans legs.


The Squares

Each chair has a different classic quilt square design. I did Wheel, Spools, Ohio Star, Monkey Wrench, King's X, and Card Trick (the hands-down favorite of the household--it's the one behind the dog).


I made templates from the patterns in the sampler book, traced with kids' washable markers and cut them out, and machine pieced them following the instructions in the book.

Once the squares were pieced, I sewed on the fabric from a pair of legs around the square to make the background. I washed the covers after that to get rid of the washable marker.


Quilting

I used batting left over from a previous project. For the quilt backing, I reused six small flannel receiving blankets (complete with Pooh or teddy bear pictures!) that I had left from when my two kids were newborn babies. This would never be visible, but it wouldn't hurt to have something sturdy but soft wrapped around the padding and the wooden seat bases.


I machine quilted the three layers "in the ditch" along the seam lines between the square design pieces so the sewing wouldn't be very visible.


House of Foam

Padding matters. I got a couple of different "chair-sized" pieces of padding at the local fabric/crafts store. These were two inches thick. One was Airtex High Density Foam. The other was Poly-Fil NU-Foam, which is a compressed polyester fiber pad. Unfortunately they were too small for my chairs, but my family sat on them for a week or so to try them out. I found they were too thick to fit well under the backs of the chairs, but they weren't firm enough. When we sat on them, we'd go right down to the wood surface beneath.

I went to a place called House of Foam in Palo Alto, CA. The proprietor suggested 1" thick high resilience (HR) foam, which he said is the usual one he sells for dining room chairs. It cost about $12 per chair (just slightly more than the same amount of the other padding types would have cost), but as his website says, "Generally the firmer the foam, the longer its firmness will last, and the more expensive it is." However, what I got from House of Foam was definitely the right stuff. They even cut it to shape and glued it onto the the chair seats for me while I ate lunch across the street, making it well worth it for me to go to such a specialty shop.


Putting It Together

I cut off the excess from the quilted covers, then I sprayed the covers with a coat of Scotchgard in the (probably vain) hope that the covers would stay cleaner longer. I used a staple gun to attach the cover over the foam and around to the bottom of the wooden seat pieces. Each seat was then attached to the chair legs and back with four screws, so that part was easy.


Here is the finished set of chairs.


New Beginning and the End

Interestingly, when I removed the previous covers from the wood, I found that these chairs had been recovered at least twice before (old staples and tacks, shreds of two other fabrics). It feels kind of nice to be carrying on a tradition of reuse, and not just throwing something away because it was old. I did, however, grit my teeth and throw out the old cotton padding and fabric covers. They had done their share of service.

Gratuitous Dog Pictures

I managed to sneak in one or two blog entries without dog pictures, but this entry required a lot of pictures, and Lacey now comes running if she even hears the camera turn on.

She's a big help!


She looks like this chair is made for her.


After all, since I have to let my kids sit on these chairs, why not the dog? The kids are often messier!

Tuesday, November 18, 2008

Dressing for Success

Some friends of mine recently got married. When I got their invitation, the immediate thought (wail, more like) was "I haven't got a thing to wear!"

For the last several years I have pretty much always worn at least some tie-dye, usually a tie-dyed shirt and tie-dyed socks with blue jeans, or a tie-dyed "farmer's dress", or whatever. It's not a religious thing, but I like the bright colors, I have a lot of it, and it's comfortable. The last wedding I went to was a tie-dyed affair anyhow, so I was fine wearing one of my tie-dyed casual dresses (the one in my picture to the right with the bears-in-heart tapestry).

But this wedding was going to be a formal-to-semi-formal affair with dancing! My usual togs just wouldn't do. The groom-to-be and I joked about my having to pull out my formal tie-dye ("no, no, it only has to be semi-formal"). Pretty soon, it had to happen: I had to make myself a very fancy tie-dyed dress.

Designing

Designing the dress was fun. I had set myself a couple of constraints: the dress had to be tie-dyed, and it had to be silk (to lend it formality). Further, I would make it (almost) exclusively from silk charmeuse scarves from Dharma. With that decision, I could easily make prototypes of the dress. I also decided to make it a two-piece dress so it would be easier to get in and out of (and so I could wear the skirt with different tops later). I had been hankering to make myself a handkerchief-hem skirt for a while, too, so that became part of the design.

I started with paper towels and one of my favorite models, Barbie. Barbie is very cooperative for such endeavors--I have been making clothes for her since I was a kid. A little tape, some snips here and there, and soon we had a couple of prototypes (my daughter did one too).


I took the best prototype picture, massaged it a bit, and made what was essentially a coloring book page of it.


I borrowed my daughter's oil pastels and played with colors. So did my kids! I did the upper set.


Dyeing

I got a bunch of silk charmeuse scarves. The eight skirt pieces (two layers of four scarves each) were tied to make a diagonal stripe, while the others were done as diagonal stripes or X's. I also tied a sash.


I dyed them all using diluted turquoise, turquoise, electric blue, and strong navy and left them covered overnight.

Constructing

Once the scarves were dyed, washed, and dried, they made a glorious armful of colored silk. The white appeared on some scarves (but not all) where the dye hadn't penetrated. I had been aiming for a little white. The strong navy color came out purple (because I was dyeing silk instead of cotton), but fortunately purple is fine with me. After all, I always tell my students that tie-dye NEVER turns out exactly how you expect!


Now it was time to start putting them together. Easier said than done!

These are the eight scarves that will become the skirt.


I found information on "Making An 8-Point Skirt" on the web. I aligned each set of four scarves with the turquoise sections forming the diagonals of the squares as below, sewed each set together into a square, and put in the elastic waistband. I used 1.25-inch-wide elastic to give the waistband some strength. Those eight silk charmeuse 35" scarves make the skirt quite heavy!


Here is the skirt.
This is the top. The body of the top is essentially a tank top that is attached to the collar at the neck opening. The body is made of one 44" scarf that I cut in half diagonally. I used an existing tank top that I had as a pattern for the scarf pieces for the body.


The collar is one more 35" scarf set diagonally on the body. Since 35" was too big, I cut it in quarters and sewed it back together after taking part out of the middle (so it would preserve the turquoise sections). I essentially removed a thick "plus" ( + ) from the middle of the scarf. It has a V-neckline in the front and a more squared neckline in the back, and it can be worn either way.

Here you can see the blue broadcloth lining and the interfacing I used to give the collar layer a bit more stiffness and fullness. The body part is not lined, since it is very thick silk.


The Results

I finished the dress with only about five minutes to spare before I had to dress to go to the wedding! Here I am at the wedding in the dress.


The dress definitely didn't come out the way I expected it to, but I'm pretty pleased with it. I've worn it to three fancy occasions now (in less than a month!), and I expect to wear it a lot more.

I didn't expect the purple (short) sections to stick out the way they do--I think it's because I used such thick silk, so those sections don't have anywhere else to fall to. However, the weight of that heavy silk makes the skirt really flare out during turns and spins, which I love! I love ballroom dancing, especially swing and waltz, and this is definitely a great skirt for that. It's also got that gorgeous glossy silk glow that I like--it fills some of those Barbie doll dress fantasies I never quite grew out of.

I just wish the Barbie doll figure came with the dress!

Dog

Okay, here are the gratuitous dog pictures:

Ooh, she sees silk on the floor... "must go shed on it..."


"Isn't this turquoise just my color?"


Sorry, Lacey, the skirt is a little too big for you!