Showing posts with label dog. Show all posts

Monday, September 28, 2020

Cushy Round Cushion, Round Two

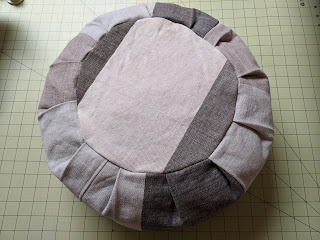
I like my new meditation cushion! I still had three of the 25-inch by 11-inch FabMo samples left of the same heavy cotton fabric, so I made another one almost the same. I used 11-inch circles, and I installed a salvaged backpack zipper across the bottom circle. The difference here was that I used a 49-inch strip (two pieces sewn together) instead of the 59-inch strip I used for the first cushion. I also stuffed it with all the teeny sewing scraps I've been saving for such a purpose. Here is the second cushion.

Slanted view of stuffed dark gray and off-white round meditation cushion

Top view of stuffed dark gray and off-white round meditation cushion

Yeah, it has pleats, it looks nice, blah-blah... so what's interesting here? 

Here are the two cushions together. The first cushion is on the right, and the second cushion is on the left.


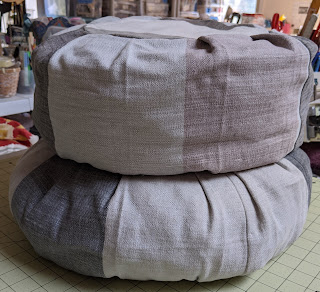
Now here they are stacked. The first cushion is on the bottom, and the second cushion is on the top.

Two round pillows, one stacked on top of the other


The first cushion has a bigger diameter than the second cushion. The first cushion is also a bit shorter in height than the second cushion. They both have the same top and bottom circles. So what's going on here?


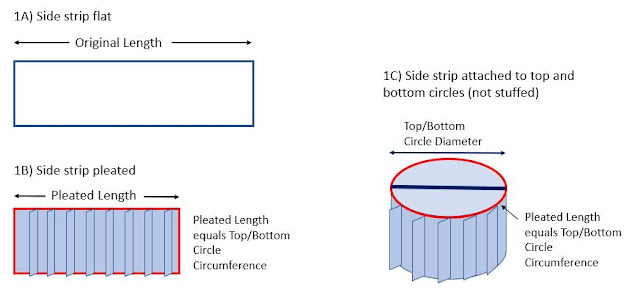
Since the top and bottom circles are the same, the differences have to do with the lengths of the strips that go around the sides. Let's take a look:

Figure 1 is described in the blog text

Figure 1A above shows the side strip rectangle flat and showing the original length of the strip. Figure 1B above shows the strip once it is pleated. The pleated length must match the circumference of the top and bottom circles! This is the problem I had on my first pillow: my pleated strip was longer than the circumference of my circles. The height of the strips is the same. 

Figure 1C above shows the pleated strip wrapped around to form a cylinder with the top and bottom circles. Note that I am ignoring seam allowances and overlap in these diagrams.

Figure 2 is described in the blog text

Figure 2A shows a view looking at the side of the filled cushion (an oval with a rectangle, where the rectangle shows the cylinder shape from the top and bottom circles). This side view also shows the maximum diameter of the finished cushion, which is where the side piece bends outward from the top and bottom circles. Figure 2B looks down on the circular cushion from the top. 

When I stuffed the cushion, the pleats unfolded as far as they could around the middle side but stayed folded where they were sewn to the top and bottom circles. Because the pleats could only unfold to the original length of the side piece, we see that the maximum diameter of the cushion is related to the original (unpleated) length of the side piece (Max Diameter = Original Length / Pi). Because my second cushion had a shorter original length, it cannot expand as far around the middle as my first cushion. And because the side pieces are the same height, and less of that height is absorbed by the expanding middle, my second cushion also stays taller than my first cushion. 

Both of my cushions could use a bit more stuffing, but that would not change the difference between them. And yes, there should be a formula for the cushion height based on the various other measurements, but that involves more math than I remember (and differential equations, which I hated when I learned them years ago)!

Who knew that making cushions could be so complicated and mathematical?

And because I still love gratuitous dog pics, here are my cushions with my little dogs Lacey and Pinto modeling on top of them.


Little white dog, Lacey, sitting on top of two cushions

Little white dog, Lacey, sitting on top of two cushions

Little brown dog, Pinto, sitting on top of two cushions


Sunday, September 6, 2020

The Tragedy of an Abandoned Blog...

 ... Oh my... has it really been almost six years since my last blog post? Time flies! I never meant to abandon my blog!

A lot has changed since my previous post. Blogger.com now has a new user interface (better, so far). Europe now has the GDPR privacy law that requires that I tell you this site uses browser cookies (I don't, but Google does), and California has a similar law. Somewhere along the line, Google rearranged their servers, and a bunch of my pictures have disappeared from a few of my older posts. I'm going to have to go back and fix those if I can find my corresponding ancient pictures.

The addition of Pinterest and Instagram to the online social media world have created major changes in the world of blogging and the ways that bloggers are now expected to interact with those. I have been spending lots of time on both (follow me on Pinterest and Instagram) instead of blogging! But with Pinterest and Instagram, blogs now include jazzier graphics, multiple title pictures, and more professional photos so they appear better in those media. I may or may not try to do that later.

Because I am a professional technical writer, when I'm NOT working at a "day job", I tend to be more interested in blogging because I feel a need to be writing something. Since my previous post, I continued working at my longtime employer, then I took a 6-month leave of absence for a volunteering gig in 2016. I returned to that employer in January 2017, and I got laid off three weeks later! I guess the universe was telling me I had been there too long (many years). I did some local volunteering, and I made a lot of doll clothes for a local annual boutique and Etsy (with a corresponding Instagram).

Late in 2017, I got bored and wanted to be around people, so I got a part-time job at a coffee shop. Total mistake: I'm terrible at that type of work (poor short-term memory, being on my feet), and it wasn't at all social. And I actually don't like drinking coffee, which was the primary perk. I quit that job in three months (yes, I should have been blogging instead)! I soon I got my dream job working at a startup. I was learning fun new nerd stuff, writing documentation, and doing training, among other things. That lasted almost two years. Unfortunately the company shut down. I looked (unsuccessfully) for a new writing job, and then the pandemic hit. So here I am, needing to write blog posts again.

I did a lot of craft stuff along the way, of course, and I have recently tried my hand at sewing machine repair. I have also been spending time volunteering at FabMo, a nonprofit that rescues unwanted fabric and similar materials and distributes them to the public, diverting many tons of goods from the landfills. FabMo gets a lot of its materials as samples from interior design houses in San Francisco: fine upholstery and drapery fabrics, designer tiles, luxury carpet samples, and more. Darn, I'm drooling again!

I'm still a dog fanatic. We've adopted two new rescues (Pinto and Kona) to keep Lacey on her toes, and our older dog Tulip went off to college with my son. I also spend a lot of time with my mom's two standard poodles, Sugar and Spice, who have their own Instagram

  
Four dogs sitting, waiting for a treat 
Left to right: Spice, Sugar, Pinto, and Lacey

Pinto Beans is a heavy chihuahua mix at 17 pounds, and he likes to chase the biggest dogs at the dog park. Amazingly, he can keep up with them, barking his fool head off all the way. He's FAST.

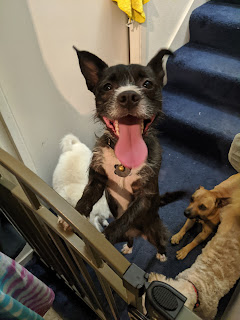
This is Kona the Destroyer, looking very pleased with herself! She's the scrawniest little pit bull terrier mix I've ever seen, full grown at just 20 pounds. 


Black and white dog with tongue out, leaning on a gate

That's it for now. I hope to put up my next post MUCH sooner than six years from now!


Wednesday, November 17, 2010

Harnessing the Power of Recycling--Green Project Entry for MAKE Magazine

Click on the MAKE icon to vote for my Recycled Jeans Dog Harness project! Tag Your Green

Introducing Tulip

Here is Tulip in her cool new harness:


I adopted a really cute dog from a rescue organization over the summer (does that make her a "reused" or "recycled" pet?). Her name is Tulip. She came with a collar, but she clearly needed a harness for "walkies" or she'd choke herself pulling on the collar.

Tulip's hair was cut very short, so Tulip looks pretty good in a T-shirt or harness. Tulip is practically a rag doll--floppy, mellow, and pliant--and she is very tolerant of being dressed and undressed repeatedly. So another project began...

I still have the leftover jeans parts from my jeans circle quilt, dining room chair covers, and other jeans projects. Since most of these used leg pieces, I have plenty of waistbands and upper sections handy. Time for some serious seam ripping!

I started with the one waistband and the attached upper back section of the jeans. I removed the back pockets to save for some other project. I cut the section to get a rough fit under and around Tulip's chest.

I also used a waistband from another pair of jeans.


Here is the chest part after stitching to fit Tulip. The separate collar section on the right is sewn closed, so the jeans button is now just decorative. The collar part just slips over Tulip's head.


I salvaged the buckle and webbing strap from one of my kids' old lunchboxes. My kids go through at least a couple a year by doing things like leaving spilled milk in them over Spring vacation (mmm, yum!), dragging them over concrete, and other things, so I regularly scavenge useful buckles, hardware, zippers, and straps from them (the picture shows a newer one).


I used part of another waistband to make the strap that goes between the collar and the chest strap, and sewed on a reused belt loop to hold the scavenged D-ring.

Done!

Here is the finished harness. The second button has been replaced on the chest strap so I would have two matching waistband buttons. It is also sewn closed and is now just decorative, since the lunchbox buckle provides the adjustable fastening. If you look carefully, you can see that I completely removed the waistband that goes around the chest and then sewed it and the belt loop back on so the button and buttonhole would be in the right place! Tulip is fortunately much smaller than the original 36-inch waist. The triangular section goes on the dog's chest.


Here is the finished harness looking down at the top (the dog's back).


The buckle strap goes through a loop on the D-ring section.

The Finished Product


Here she shows off the D-ring on the belt loop:


Lacey and Tulip: Out and About


Yes, Lacey needs a matching jeans harness too. Maybe later...


Let's go!

Thursday, August 5, 2010

Harnessing the Power of Recycling


If you came here from the MAKE Magazine Green Project page, please go here:
Harnessing the Power of Recycling--Green Project Entry for MAKE Magazine
(same project, slightly different writeup)--Thanks!


I adopted a really cute dog from a rescue organization (NARF) two weeks ago. Her name is Tulip. She came with a collar, but she clearly needed a harness for "walkies" or she'd choke herself pulling on the collar.

Tulip's hair was cut very short, and it's a different type from Lacey's hair, so Tulip looks pretty good in a T-shirt or harness (unlike Lacey: "Does this make my butt look big?" "Huge!"). Unlike Lacey, Tulip is very tolerant of being dressed and undressed repeatedly. Tulip is practically a rag doll--floppy, mellow, and pliant. So another project began...

I still have the leftover jeans parts from my jeans circle quilt, dining room chair covers, and other jeans projects. Since most of these used leg pieces, I have plenty of waistbands and upper sections handy. Time for some serious seam ripping!

I started with the one waistband and the attached upper back section of the jeans. I removed the back pockets to save for some other project. I cut the section to get a rough fit under and around Tulip's chest.

I also used a waistband from another pair of jeans.


Here is the chest part after stitching to fit Tulip. The separate collar section on the right is sewn closed, so the jeans button is now just decorative. The collar part just slips over Tulip's head.


I salvaged the buckle and webbing strap from one of my kids' old lunchboxes. My kids go through at least a couple a year by doing things like leaving spilled milk in them over Spring vacation (mmm, yum!), dragging them over concrete, and other things, so I regularly scavenge useful buckles, hardware, zippers, and straps from them (the picture shows a newer one).


I used part of another waistband to make the strap that goes between the collar and the chest strap, and sewed on a reused belt loop to hold the D-ring.

One thing I should mention is that I used a really simple-but-useful little gadget called the "JEAN-A-MA-JIG" by Dritz to sew over the really thick parts where the jeans seams and the belt loops were. This helps to prevent the stitches skipping when the presser foot is going up or down at a steep angle when you go over the big hump in the fabric.


The sewing still wasn't easy, but it was better. It actually turned out that for my machine with the "walking foot" (that contraption that includes the presser foot and sticks out behind the presser foot--it helps keep multiple layers from sliding out of place), I needed a thinner version to put under the foot in the back, while the thicker "JEAN-A-MA-JIG" fit under the front side. I made the thinner version from a plastic soft drink cup that was languishing in my recycling bin.


Done!

Here is the finished harness. The second button has been replaced on the chest strap so I would have two matching Levi's buttons. It is also sewn closed and is now just decorative, since the lunchbox buckle provides the adjustable fastening. If you look carefully, you can see that I completely removed the waistband that goes around the chest and then sewed it and the belt loop back on so the button and buttonhole would be in the right place! Tulip is fortunately much smaller than the original 36-inch waist. The triangular section goes on the dog's chest.


Here is the finished harness looking down at the top (the dog's back).


The buckle strap goes through a loop on the D-ring section.

Introducing Tulip

Here is Tulip in her cool new harness:


Here she shows off the D-ring on the belt loop:


Lacey and Tulip: Out and About


Yes, Lacey needs a matching jeans harness too. Maybe later...


Here's the whole doggy-infatuated gang! That's me in one of my favorite gaudy tie-dyed T-shirts.

That original 36-inch jeans waist might be just the right size for Moxie the giant schnauzer...

Friday, July 30, 2010

Big Wide Brown Sandals

Everyone's feet are different, but some feet are more "different" than others in a world where standardization and mass production are the norm. Very wide flat feet, for example, are hard to fit in standard shoe sizes, so they are good candidates for custom sandals. And since the particular feet in question belong to my husband, they are perfect candidates for my sandal experimentation.

Padding

I had tried, unsuccessfully, to find the padding that Michael of Island Sandals uses. Rob at Tandy suggested I try using a blue foam sleeping bag pad, which made sense to me, so I got one at REI and started hacking it up.

Once I had cut the strap holes and finished the top piece (Tandy Eco-Flo dye, Bison Brown followed by Carnauba Creme finish), I glued the blue foam to the top piece with Fast-bond 30 and wrapped the straps around the foam through the holes, as seen below:

I cut the sole pieces a bit oversized so I would have room for stitching and trimming later.

I'm working with quite thick leather again, like I did for my first pair of sandals: 13-15 oz. saddle skirting for the sole bottoms, with an extra layer for the heels. I used 6-7 oz. leather for the upper layer of the shoe, and 10-11 oz. leather for the straps (no way is he going to wear through these straps!). In hindsight, I should have used thinner leather for the straps, maybe 6-7 or 8-9 oz., because these straps are awfully thick, stiff, and bulky. Besides, the nice thing about the free-floating straps (that is, they are not permanently fastened to the sole anywhere so they can be infinitely adjusted) is that they are relatively easy to replace if they wear out or break.

I glued the top sole to the bottom sole (carefully not gluing where the straps are), then used a drill press with a small bit (around 1/16") to drill the holes around the edge. It worked pretty well, so long as I kept the straps out of the way! It was definitely easier than holding a power drill by hand like I did for my daughter's thong sandals.


Stitching by hand around the edges took a while, but I eventually finished them.


I like the wood-grained appearance of the hand-dyed leather. I got that by using a small paintbrush to apply the dye to the upper sole pieces.


Sole Bottoms

I glued a layer of SoleTech 3.5 onto the front part of the bottom, and glued a section of rubber chevron-patterned soling (also ordered from Louis Birns & Sons) onto the heels, as in the picture below:


When I took the picture above, my husband had already been wearing the sandals for a while (several months), so some wear is visible on the soles. The SoleTech 3.5 is a little too thin and dainty for this purpose. When he eventually wears all the way through it, I'll replace it with more of the chevron soling. Meanwhile, the sleeping-bag pad foam has held up pretty well so far and is still pretty resilient.
Lacey Too?

Lacey wants to know when I'll be making a pair of shoes for her, but she points out that she has much daintier little feet than my husband!


Saturday, April 3, 2010

A Touching Case for an iPod Touch

The latest project was a pretty quick one: a carrier for an Apple iPod Touch for my daughter. I had a deadline, since she was about to go off on a school trip and wanted to bring it with her. It needed a shoulder strap that would go across the chest so it would be easy to access but hard to lose.

I started by making a pattern/prototype of paper towel and Scotch tape (some of my favorite prototyping supplies).

I got some Wrights extra-wide (half inch wide) double-fold fleece binding for the strap so the strap would be soft against the skin. I reinforced it with the type of cheap plastic twine people use to tie purchases to car racks at IKEA. This piece actually came from my local Tandy store, where it had been used to tie up one of my large pieces of leather so I could get it home in my car! Yeah, I almost never throw anything away...

Here is the twine being stitched into the binding. That's a "walking foot" on the machine, which helps when sewing through multiple layers.


I cut out a few scraps of the soft black leather left over from my Sonotube-and-leatherTV chair. I used my sewing machine and heavy polyester thread to stitch a reinforcing outline for the iPod screen and the menu button as well as for the power cord and headset holes.

The crescent of stitching on the left was just for testing. It will be cut off later. Here is the right side of the leather:
I wanted a pocket for the case to hold the iPod headset when it wasn't being used, so I sewed a pocket piece onto the back and stitched the back to the front:


I cut out the rectangle for the screen and the slot at the bottom for the cord.

I sewed the sides of the case together using the machine, and then I sewed the fleece binding strap onto the sides of the case. Once the pieces were all together, I adjusted the fit and cut off the excess leather from the cover flap and the center tab (top of the front piece).


I had been planning to attach snaps to the tab and cover to hold the case closed, but after I had put the case together, I thought of using hook-and-loop fasteners (Velcro) instead. My daughter liked that idea. Since I had already sewed the pocket on, I stitched a strip of the loop part onto the pocket by hand. I used my sewing machine to sew the hook parts onto the center tab and the end of the cover.

The center tab (right at the top of the iPod) in the picture above fits through a slot in the back of the case and then holds the headset pocket closed. Note that I did not cut out a hole for the menu button at the bottom of the iPod. The stitching there is just to provide a tactile indication of the button location, since the leather is soft and thin enough to allow the button to be pressed right through the leather.


The cover flap folds completely down over the front of the iPod and up around the bottom of the back, covering the hole for the cords and fastening to the Velcro on the pocket back.


I cut up a recycled white plastic pill bottle to get a fairly stiff plastic rectangle, then I put some notches on it to make a "bobbin" for winding the headset around. The bobbin and headset fit nicely into the pocket on the back. Here you can also see the Velcro loop piece sewn onto the pocket:


Here is the finished case. My daughter wears it with the screen facing her body so it's easier to read the iPod without removing the case. I added a plastic buckle (left over from previous experiments with making tie-dyed dog collars!) to the strap so it would be adjustable and easy to take off.


The case seems to be a hit: my daughter has been wearing it around the house ever since I gave it to her, and her younger sister has already put in her request for one of her own!

And just to be complete, here's a completely gratuitous picture of Lacey. She wasn't interested in wearing the iPod case since my daughter wouldn't share the headset...