Wednesday, June 25, 2008

Jeans Circle Quilt -- It's a Start...

I mentioned in my last post that I was cutting out lots of circles for a circle blue jeans quilt. With a bit of help from my kids, I've now got all 221 circles cut out, plus a few more for good measure. I've spent a few days laying them out on the floor (with way too much help from Lacey, who knows she belongs in the center!), and now I have a design I'm pretty happy with.


The center 25 circles are already sewn together, since that part of the design was easy for me (and it was my proof-of-concept piece). The rest of it is all just pinned together.

What Was I Thinking?

This is a big project. My next step is to sew the rest of the circles together into squares with 4 "petals" on the reverse side. I also need to cut out squares of batting for each circle, as well as squares of colored fabric for each circle. The final step is to sew each petal down over the squares using a zigzag stitch to hold it together and quilt the piece. Each step times 221. No problem!

Dog, Again

And how can I do without a gratuitous dog picture, especially since Lacey's been spending so much time "helping" me with my layout?


Good thing for Lacey that pins don't seem to bother her!

Monday, June 16, 2008

Recycling More Jeans -- Work Apron

I'm currently working on making a circle blue jeans quilt. I haven't made much progress to show off yet, other than hitting up all my friends and family for their old ripped jeans and cutting out about 190 circles (so far), but I'm getting there.

In the meantime, I'm building up quite a pile of jeans scraps, particularly the hips-and-pockets upper sections of the jeans. The back pockets are useful for any number of kids' crafts, but that's not exactly my thing. I want something really useful. Maybe I'm channeling Thomas the Tank Engine or something--he wants to be a "really useful engine"!

Construction

I started with a pair of Levi's 501 button fly jeans with a 33" inch waist, which fits me pretty well. I took the upper section and cut it off about 1 3/4" below the bottom points of the back pockets. Then I ripped the side seams up to the waistband. I just want the back side and the waistband for this project. I ripped out the lower seam of the front waistband only as far as needed to get the front pocket sections loose so I could discard them. Now I have an apron-shaped piece with its own built-in button closure. I hemmed the bottom edge (under the back pockets) and stitched down the sides. I also restitched the waistband where I had ripped its seams.

I now have a pretty good sturdy apron with two pockets. For a finishing touch and one more pocket, I cut out the "fifth pocket" from the front pocket scraps. Since I want the look of the rivets, I cut an extra flap above the pocket.


I sewed the pocket down first by its flap (right sides together, pocket upside down). I used a zipper foot to let me get my seam right up against the thick layers of the pocket.


Then I folded it down into place and sewed it down over the existing pocket topstitching. Here is the finished apron. Note that I'm using the original fly button and buttonhole as the closure at the back of the apron. That little blur at the top of the pocket near the ruler is where I reinforced a worn spot with a little machine darning. Just adds to that recycled authenticity!

Very useful indeed!

Gratuitous Dog Pictures of the Day

Lacey must be competing with Moxie for who gets into my blog most often, because today when I was photographing the work apron, there she was, complete with her tie-dyed, recycled jeans dog toy!


I guess Lacey wants me to make her a work apron in her size...

Sunday, June 15, 2008

Tie-Dye in the Park with Dogs

I've been having a lot of fun posting pictures lately. It's been first graders for a while, and now it's back to dogs! We went to a park in Santa Rosa over the weekend, and of course had to wear tie-dye and take pictures.

Here is Moxie again, in his green and yellow dog shirt. It's always hard getting a good picture of a very black dog, but he looks good in the sun.

Introducing Cruella

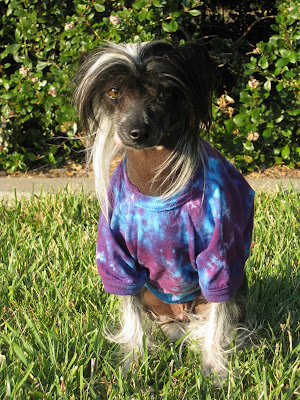
Cruella is a Hairless Chinese Crested Dog belonging to some friends of my mom. Cruella doesn't have any fur other than the bits on her head, ears, legs, and tail, so she gets cold easily, even during the summer. She is used to wearing shirts and sweaters and jackets almost all the time.

I had passed along a tie-dyed dog shirt through my mom, even though I had never met Cruella. A bunch of my mom's friends gather at the park regularly, and it just happened that Cruella happened to come wearing the tie-dye shirt this time. What luck! I finally got to meet Cruella and she's dressed for the occasion!


Cruella is quite the model, isn't she? She's wearing a size Small shirt.

Cruella and Moxie look fabulous together.


Why Do People Keep Calling Us "The Tie-Dye Family"?

Well, I suppose it's better than "The Polka-Dot Family"! As a family, we often wear our brightest, loudest tie-dye clothes when we go out in big public places such as Disney World. It's purely practical--it makes it much easier to keep track of our group ("Are you missing a little girl in tie-dye? She went thataway."). My mom and my father-in-law aren't into the tie-dye thing, but they were good sports for our park outing. I suppose you could consider my mom's shirt shibori rather than strictly tie-dye, but it's close enough.

Finally, a good family picture!

Friday, June 13, 2008

Mountain View Voice Likes Color Too

The Mountain View Voice newspaper just printed my photo of the first graders in their fabulous tie-dye!

The school PTA recently installed a brand new handball court ("ball wall"), so it seemed like the best backdrop for the picture. New shirts, new wall--many colors in front of some serious green!

It's on page 5 in the Local News section (June 13, 2008 edition) .

Thanks, Mountain View Voice!

Tuesday, June 10, 2008

Most Colorful School Around!

Today the first graders got their shirts back! They came out beautifully, and the kids loved them! I also made shirts as a surprise for all the teachers at the school. They were very excited to receive them, and today's final assembly of the school year was our most colorful ever.

Here's the first grade, all squashed together:


Wow! Enough said.

Monday, June 9, 2008

Now It's a Floor of Many Colors...

I spent almost the entire weekend in my garage.

I worked with the first graders all day Friday, then I spent some time Saturday washing out a subset of them. But I also did a whole bunch of t-shirts myself as an end-of-year surprise for the teachers at the school. I don't usually do "production" tie-dye (Harmony does large-scale production much better than I ever could!), so the 59 shirts I was working on was quite a lot for me! My garage workshop was overflowing with t-shirts and humming with the sound of the washer and dryer.

With all that glorious color around, I couldn't resist spreading them out on the (clean) floor and taking some pictures.

Here they are stacked by size.


Ooooh, I can hardly wait to hand them out! And some of those I did are extras, so I can add something to my wardrobe too!

Friday, June 6, 2008

Rhapsody in Many Colors

Today I had my now-annual tie-dyeing day with the current crop of first graders at my local school. I do this project in four sessions:
  1. Measurement day: the kids measure each others' seated height (seat to shoulder) and waist size. We also look at the t-shirt sizes the kids are currently wearing. This gives me the data I need to order the shirts from Dharma. More importantly, it also gives the kids a little experience with measurement. First grade is is when most of them are just learning what a inch is. I can now pretty much tell a kid's t-shirt size by eye anyhow, and most of them are size 10-12s so they can still wear the shirts next year. I ordered 84 size 10-12s, about a dozen each of 6-8's and 14-16's, and 6 adult M. I often have one or two kids who take an adult L, partly because they like their shirts big.
  2. Tying day: about two weeks later I have all the shirts and have prewashed them. I go in and teach the kids the fold for stripes, X's, and diamonds (see this picture in my previous post). With the help of teachers and some parent volunteers, the kids all fold their shirts and tie them with 4-7 rubber bands. I leave the shirts in the classroom for the week.
  3. Dyeing day: this is the most work but also the most fun. I explain to the kids how to mix colors together on the shirts (I give them six colors to choose from), how to hold the squeeze bottles, how to check that they got dye on the inside of the folded shirt, behavior rules, and so on. Then an army of parents and other volunteers suit the kids up in gloves, goggles, and a garbage-bag smock, guides them to their soda-ash-soaked shirts, and supervises the dyeing process. The kids love this part!


  4. Shirt return day: a few of the parents take the shirts home to wash over the weekend. We time the whole project so the kids get their shirts back right before the final school assembly of the school year. I just love watching the kids show each other their results: "I love my shirt! I love my shirt!" It's so cool to see the entire first grade in the front of the assembly in their shirts. It's an amazing swath of color.
Behind the scenes, it's an amazing amount of work. I mix about 9 gallons of dye (6 colors), 12 gallons of soda ash solution, make 80 or so trash bag smocks, collect table coverings, order and prewash shirts, and so on. And of course there is washing out afterwards and lots of cleanup. But that's all stuff I can do at my leisure, at my own pace.

It's all the volunteer help that really makes it work and makes it a really fun experience. First graders aren't terribly patient about waiting in line for getting suited up or doing their dyeing. So we have half a dozen people swarm the kids quickly, popping garbage bags over heads and slipping on gloves and goggles. Other volunteers are waiting at the dye tables. With this effort, it goes very quickly, and we got through four batches of 20+ kids today in three hours! Of course, the cleanup took another few hours...