
I like my new meditation cushion! I still had three of the 25-inch by 11-inch FabMo samples left of the same heavy cotton fabric, so I made another one almost the same. I used 11-inch circles, and I installed a salvaged backpack zipper across the bottom circle. The difference here was that I used a 49-inch strip (two pieces sewn together) instead of the 59-inch strip I used for the first cushion. I also stuffed it with all the teeny sewing scraps I've been saving for such a purpose. Here is the second cushion.


Yeah, it has pleats, it looks nice, blah-blah... so what's interesting here?
Here are the two cushions together. The first cushion is on the right, and the second cushion is on the left.

Now here they are stacked. The first cushion is on the bottom, and the second cushion is on the top.

The first cushion has a bigger diameter than the second cushion. The first cushion is also a bit shorter in height than the second cushion. They both have the same top and bottom circles. So what's going on here?

Since the top and bottom circles are the same, the differences have to do with the lengths of the strips that go around the sides. Let's take a look:
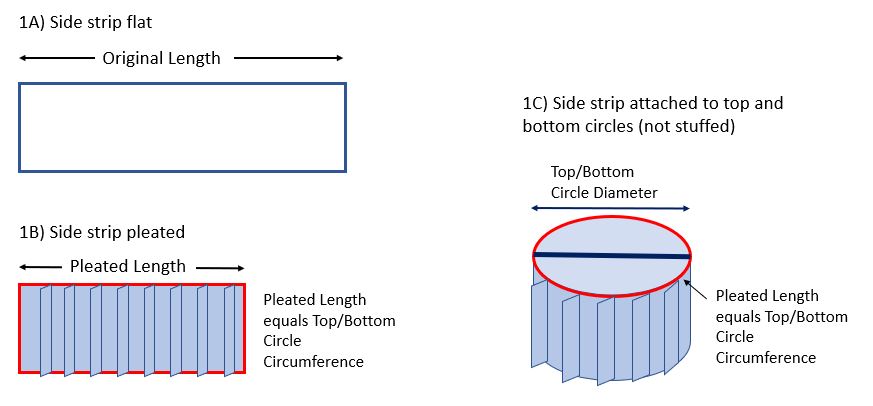
Figure 1C above shows the pleated strip wrapped around to form a cylinder with the top and bottom circles. Note that I am ignoring seam allowances and overlap in these diagrams.

When I stuffed the cushion, the pleats unfolded as far as they could around the middle side but stayed folded where they were sewn to the top and bottom circles. Because the pleats could only unfold to the original length of the side piece, we see that the maximum diameter of the cushion is related to the original (unpleated) length of the side piece (Max Diameter = Original Length / Pi). Because my second cushion had a shorter original length, it cannot expand as far around the middle as my first cushion. And because the side pieces are the same height, and less of that height is absorbed by the expanding middle, my second cushion also stays taller than my first cushion.
Both of my cushions could use a bit more stuffing, but that would not change the difference between them. And yes, there should be a formula for the cushion height based on the various other measurements, but that involves more math than I remember (and differential equations, which I hated when I learned them years ago)!
Who knew that making cushions could be so complicated and mathematical?
And because I still love gratuitous dog pics, here are my cushions with my little dogs Lacey and Pinto modeling on top of them.


No comments:
Post a Comment