Monday, September 28, 2020

Cushy Round Cushion, Round Two

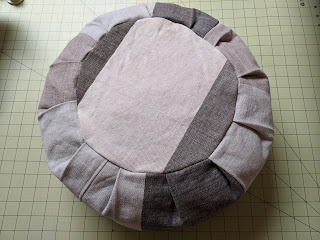
I like my new meditation cushion! I still had three of the 25-inch by 11-inch FabMo samples left of the same heavy cotton fabric, so I made another one almost the same. I used 11-inch circles, and I installed a salvaged backpack zipper across the bottom circle. The difference here was that I used a 49-inch strip (two pieces sewn together) instead of the 59-inch strip I used for the first cushion. I also stuffed it with all the teeny sewing scraps I've been saving for such a purpose. Here is the second cushion.

Slanted view of stuffed dark gray and off-white round meditation cushion

Top view of stuffed dark gray and off-white round meditation cushion

Yeah, it has pleats, it looks nice, blah-blah... so what's interesting here? 

Here are the two cushions together. The first cushion is on the right, and the second cushion is on the left.


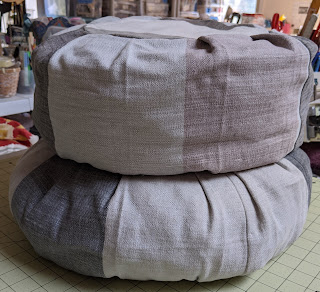
Now here they are stacked. The first cushion is on the bottom, and the second cushion is on the top.

Two round pillows, one stacked on top of the other


The first cushion has a bigger diameter than the second cushion. The first cushion is also a bit shorter in height than the second cushion. They both have the same top and bottom circles. So what's going on here?


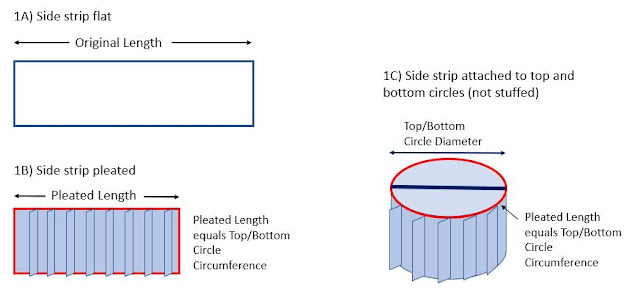
Since the top and bottom circles are the same, the differences have to do with the lengths of the strips that go around the sides. Let's take a look:

Figure 1 is described in the blog text

Figure 1A above shows the side strip rectangle flat and showing the original length of the strip. Figure 1B above shows the strip once it is pleated. The pleated length must match the circumference of the top and bottom circles! This is the problem I had on my first pillow: my pleated strip was longer than the circumference of my circles. The height of the strips is the same. 

Figure 1C above shows the pleated strip wrapped around to form a cylinder with the top and bottom circles. Note that I am ignoring seam allowances and overlap in these diagrams.

Figure 2 is described in the blog text

Figure 2A shows a view looking at the side of the filled cushion (an oval with a rectangle, where the rectangle shows the cylinder shape from the top and bottom circles). This side view also shows the maximum diameter of the finished cushion, which is where the side piece bends outward from the top and bottom circles. Figure 2B looks down on the circular cushion from the top. 

When I stuffed the cushion, the pleats unfolded as far as they could around the middle side but stayed folded where they were sewn to the top and bottom circles. Because the pleats could only unfold to the original length of the side piece, we see that the maximum diameter of the cushion is related to the original (unpleated) length of the side piece (Max Diameter = Original Length / Pi). Because my second cushion had a shorter original length, it cannot expand as far around the middle as my first cushion. And because the side pieces are the same height, and less of that height is absorbed by the expanding middle, my second cushion also stays taller than my first cushion. 

Both of my cushions could use a bit more stuffing, but that would not change the difference between them. And yes, there should be a formula for the cushion height based on the various other measurements, but that involves more math than I remember (and differential equations, which I hated when I learned them years ago)!

Who knew that making cushions could be so complicated and mathematical?

And because I still love gratuitous dog pics, here are my cushions with my little dogs Lacey and Pinto modeling on top of them.


Little white dog, Lacey, sitting on top of two cushions

Little white dog, Lacey, sitting on top of two cushions

Little brown dog, Pinto, sitting on top of two cushions


Thursday, September 17, 2020

Cushy Round Cushion


As I mentioned in my previous post, I tend to make specific things because I want or need them. This time, I wanted to make a round meditation cushion (also called a zafu). I took up meditation at the beginning of the year, doing at least a little almost every day. But I was having a hard time sitting still on my bed, and I realized it was because I needed to be lifted up a bit to be more comfortable.

I started looking for meditation cushion ideas and tutorials on Pinterest. After eventually climbing back out of the Pinterest rabbit hole, I had created a whole board about meditation cushions. I found an interesting tutorial on Buddhamind.info along with several different versions from different people, including this version on YouTube and this version on Instructables. All of these versions are pretty good, so I'm not going to do my own step-by-step version!

I used some really sturdy cotton upholstery fabric samples from FabMo. They were similar to heavy denim in weight and texture. Each of the samples was about 11 inches wide by 25 inches long. The Buddhamind tutorial said to cut two circles between 11 inches and 13 inches in diameter. Since my samples were only 11 inches wide, I went with 11-inch circles. All of the instructions said to make a strip 59 or 60 inches long for the sides of the cushion, so I sewed three samples together to get a long-enough strip. Then the tutorials provided very exact directions about how to pleat the strip, starting at the 6.5-inch point. I followed the pleating instructions, but when I went to pin the strip to the top circle, I realized that the strip, even pleated, was way too long for my circle! Clearly everyone went with the 13-inch circle and hadn't tried the 11-inch version. For mine, I did some fudging, added extra pleats, and moved a few pleats around until I got something that fit better around the top circle. 

I had actually read all the way through the instructions before starting (you know, the way they tell you to do with recipes and other instructions, but many people don't!). At the end, the instructions casually mentioned that you could put a zipper in the opening where the strip overlapped. I realized that putting in a zipper would be difficult to do once the cushion was sewn together. Instead, I cut out the bottom circle as two separate pieces with a little extra fabric between them, so both pieces were slightly more than semi-circles. I installed a salvaged backpack zipper in the circle so I would have a zipper running across the bottom of the cushion. I sewed that circle to the bottom edge of the pleated strip.

Here is the (not stuffed) cushion bottom showing the zipper.
 
Bottom view of not-stuffed dark gray and off-white round meditation cushion showing a zipper going across the center of the bottom circle

I stuffed the completed cushion with my kids' (clean) discarded old t-shirts (because of course I still have them!) and t-shirt scraps. Here is the stuffed cushion.

Slanted view of stuffed dark gray and off-white round meditation cushion

Top view of stuffed dark gray and off-white round meditation cushion

It turns out that when the cushion is fully stuffed, the center of the side panel loses its pleats. At least with this fabric, it's not really noticeable that my pleats aren't uniformly spaced. Of course, now that I have mentioned it, the non-uniformity becomes really obvious!

Here are the gratuitous dog pictures for today. That's Lacey (white) and Pinto (brown)

Small white dog next to gray and off-white cushion

Small brown dog and small white dog next to gray and off-white cushion


Wednesday, September 9, 2020

I'm Making What?

I like doing projects and crafts that are not quite mainstream. One of my current interests is making bras. Yeah, brassieres. Those things. Most women don't even like shopping for bras. The prospect of making them is even more daunting, even for people who consider themselves good at sewing!

As with many of my projects, this one started because I needed something. Well, actually, my daughter did. She has a really hard time finding bras that fit comfortably. She'll order half a dozen bras online (because brick-and-mortar stores rarely even carry her size, and there's a pandemic going on anyhow), try them all on, and send them all back. She's tried on a few dozen this way. It's time-consuming and discouraging for both of us.

I started poking around the Internet. Have I mentioned that I LOVE the Internet? I found a whole subculture of folks who make their own bras, sell bra-making supplies, design patterns, teach lessons, discuss bra-making on Facebook, and even record YouTube videos about making bras. Yay!

After reading discussions and watching videos, I soon settled on ordering supplies and patterns online from a shop in Canada called Bra-makers Supply. I ordered a couple of patterns (Shelley and Ingrid by Beverly V. Johnson, the "Fairy Bra Mother"), a fitting book, and a couple of kits. The Shelley pattern had been mentioned in multiple places as a good pattern for beginning bra makers. The Ingrid was wire-free, so I thought I would try both. Here is a picture of the bra kits, Ingrid pattern, and book that I got (the Shelley pattern is under the book):

Bra kits, pattern booklet, instruction booklet

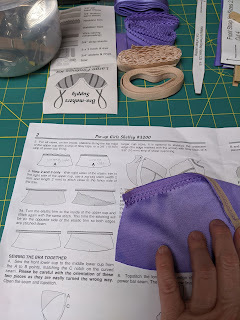
I made the Shelley bra first. I had found a YouTube "sew-along" video on the michoumakes channel from a woman who was making her second Shelley bra. I watched the first of six(!) parts of the sew-along, and that combined with the multi-page pattern instructions gave me enough confidence to dive right in.

Hand holding piece of bra in progress next to pattern instructions

Beverly Johnson has devised her own sizing system for her patterns. You need just two measurements to determine what pattern size to use (and the pattern includes a huge number of sizes). Unfortunately the measuring instructions say something like "start by wearing a well-fitting bra...", which my daughter didn't have! Chicken-and-egg problem. We measured as best we could, and I figured the first bra would be a prototype anyhow.

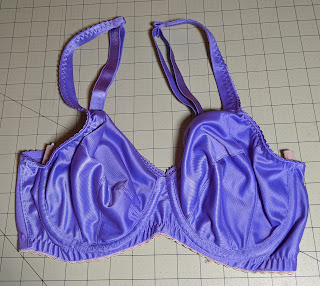
The pattern and kit were both great! Although it took me about 10-11 hours of work (including sewing, ripping out, and resewing), I made a bra that looked both pretty and professional. 


Lavender underwire bra (front) on grid cutting mat

Lavender underwire bra (back view) on grid cutting mat

The underwires are sticking out because I was trying out different underwires to see what fit best, so I didn't finish the underwire channel. I had already been keeping hardware and underwires from old dead bras because I might find a use for them someday!

My daughter tried the bra on, and... it didn't fit. Not even close. Oh well. It did give us a basis for figuring out what size would be closer, though. Fortunately I got a second kit for the Shelley bra. Back to the sewing machine!

Sunday, September 6, 2020

The Tragedy of an Abandoned Blog...

 ... Oh my... has it really been almost six years since my last blog post? Time flies! I never meant to abandon my blog!

A lot has changed since my previous post. Blogger.com now has a new user interface (better, so far). Europe now has the GDPR privacy law that requires that I tell you this site uses browser cookies (I don't, but Google does), and California has a similar law. Somewhere along the line, Google rearranged their servers, and a bunch of my pictures have disappeared from a few of my older posts. I'm going to have to go back and fix those if I can find my corresponding ancient pictures.

The addition of Pinterest and Instagram to the online social media world have created major changes in the world of blogging and the ways that bloggers are now expected to interact with those. I have been spending lots of time on both (follow me on Pinterest and Instagram) instead of blogging! But with Pinterest and Instagram, blogs now include jazzier graphics, multiple title pictures, and more professional photos so they appear better in those media. I may or may not try to do that later.

Because I am a professional technical writer, when I'm NOT working at a "day job", I tend to be more interested in blogging because I feel a need to be writing something. Since my previous post, I continued working at my longtime employer, then I took a 6-month leave of absence for a volunteering gig in 2016. I returned to that employer in January 2017, and I got laid off three weeks later! I guess the universe was telling me I had been there too long (many years). I did some local volunteering, and I made a lot of doll clothes for a local annual boutique and Etsy (with a corresponding Instagram).

Late in 2017, I got bored and wanted to be around people, so I got a part-time job at a coffee shop. Total mistake: I'm terrible at that type of work (poor short-term memory, being on my feet), and it wasn't at all social. And I actually don't like drinking coffee, which was the primary perk. I quit that job in three months (yes, I should have been blogging instead)! I soon I got my dream job working at a startup. I was learning fun new nerd stuff, writing documentation, and doing training, among other things. That lasted almost two years. Unfortunately the company shut down. I looked (unsuccessfully) for a new writing job, and then the pandemic hit. So here I am, needing to write blog posts again.

I did a lot of craft stuff along the way, of course, and I have recently tried my hand at sewing machine repair. I have also been spending time volunteering at FabMo, a nonprofit that rescues unwanted fabric and similar materials and distributes them to the public, diverting many tons of goods from the landfills. FabMo gets a lot of its materials as samples from interior design houses in San Francisco: fine upholstery and drapery fabrics, designer tiles, luxury carpet samples, and more. Darn, I'm drooling again!

I'm still a dog fanatic. We've adopted two new rescues (Pinto and Kona) to keep Lacey on her toes, and our older dog Tulip went off to college with my son. I also spend a lot of time with my mom's two standard poodles, Sugar and Spice, who have their own Instagram

  
Four dogs sitting, waiting for a treat 
Left to right: Spice, Sugar, Pinto, and Lacey

Pinto Beans is a heavy chihuahua mix at 17 pounds, and he likes to chase the biggest dogs at the dog park. Amazingly, he can keep up with them, barking his fool head off all the way. He's FAST.

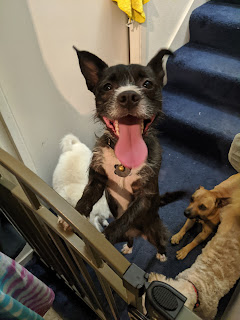
This is Kona the Destroyer, looking very pleased with herself! She's the scrawniest little pit bull terrier mix I've ever seen, full grown at just 20 pounds. 


Black and white dog with tongue out, leaning on a gate

That's it for now. I hope to put up my next post MUCH sooner than six years from now!