It's amazing how sometimes many disparate influences come together.
Colonial Days
Way back in March or April, my daughter's fifth grade class studied American colonial times. The teachers and parents put together an elaborate simulation of "Colonial Williamsburg", complete with tavern, church, government, leatherworking (cobbler), butter-making, and so on.
My part was the leatherworking activity, and of course I chose that one because I had never done leatherworking before! Arranging and participating in the activity was my first try at leatherworking. Fortunately I had lots of excellent help from Andy Stasiak of the local Tandy Leather Factory store--he even taught the kids himself! The kids loved the skunk skin he brought (though most of them wouldn't touch it).
A whole class of kids whacking leather!
That was a really noisy classroom! It was fun, though, and I learned that the mysterious toolset my dad had given me some time before was actually a pretty complete leatherworking set. I didn't do much with it at that point, though, other than play with it a bit.
Mexico and China
In Mexico and other Spanish-speaking countries, there is a craft called "papel picado", or "punched paper". Papel picado is created by using punch tools to make designs in multiple layers of brightly colored tissue paper. A few months ago, I was looking at paper picado designs with the goal of replicating them (somewhat) in my tie-dye. While I never managed to get exactly the results I wanted, I learned about another art form, and I did make a couple of fun tie-dyed banners.
Later, when I was visiting Japantown with the middle-schoolers, I bought some books. Besides books on shibori, I bought a book called "Cutting Paper Work of China". Well, it was probably called something else, but it was in Japanese, as was almost all of the text. What little English text there was (on the dust jacket) said that the book covered a folk art called "senshi". Senshi was/is practiced by housewives in China who cut paper into intricate designs of animals, flowers, and so on using scissors and small knives. Many of the designs and motifs struck me as being similar to papel picado, and the designs are fascinating in their own right.
Forward to Today...
All these things come together in my planning to make myself a tooled leather belt to replace yet another flimsy belt that is falling apart (and threatening to let me and my jeans down). Being the perfectionist I am, I want my (first) belt to be perfect, so I started practicing my leatherwork skills on something smaller: keychains/backpack tags/Christmas ornaments.
The first ones were pretty simple. I simply did individual capital letters with a border. I got lettering inspiration from another book, "The Art of Creative Lettering" by Becky Higgins, that I had handy from my scrapbooking days years ago.
Later, I started to branch out into birds and animals. Papel picado and my Chinese paper cutting book gave me ideas (such as the adapted bird on the branch, below), and I browsed the Internet for pictures of kittens and other creatures. I found pictures of peacocks in their full glory at http://www.peafowl.org (I had no idea there were so many types of peafowl!). The flower design in the upper right corner came from a Tandy pattern.
Tooling the Leather
There is a specific sequence for a lot of decorative leather tooling. First, you draw the pattern on paper, then dampen the leather (called "casing the leather") and trace the lines with a stylus (kind of like a ball-point pen with no ink). That gives the design on the leather like this kitten below (the lighter lines are where I used the stylus directly on the leather instead of through the paper).
You cut along the lines using a special leather cutting swivel knife (right, below). Beveling along the cut edge with a beveling tool (left, below) and a mallet gives the picture definition (see above and below the paws, and in the ears for beveling).
I used various stamping tools to refine the picture, adding stars to the pillow, and so on.
I used the knife again to make little cuts for the whiskers at the very end.
How About Some Color?
I also added color to several pieces. I used Tandy's Eco-Flo All-in-One finishes to both color and protect the pieces. In the picture below, I colored all four. The J, A, and M are all using the same Mariner Blue color, but I have rubbed the M with a piece of an old cotton dishtowel to make it shiny.
For the A in the following picture, I have rubbed the left side only. The All-in-One works really well--it only takes about 4-6 strokes with the cloth to get the leather shiny! I do more strokes to get the piece as shiny as possible all over.
For scale, the leather pieces I'm using are all about 2.5 inches tall.
Here are some pieces that I painted more elaborately with various colors of the All-in-One.
Diluting the paints gives a whole new range of possibilities.
Ooh, Ooh, Me Too!
My kids decided the leatherwork looked like to much fun to let me do it undisturbed. They jumped right in, putting their own spin on letters and other designs. My younger daughter found a dolphin design in a coloring book, and adapted it with her own ideas. She did two of those plus several others.
My older daughter did both pictorial pieces and geometric pattern pieces, though she wasn't interested in painting them:
We even had a couple of my older daughter's friends over to do some. They had a blast (and I thought the ringing in my ears would never go away!).
Gratuitous Dog Pictures
Lacey didn't get much chance to help out on these little projects, but I thought she could model some of them.
I think maybe it's just a bit overmuch on the bling, dahling!
To Be Continued at Some Point...
I'm having so much fun with my little keychains that it will probably take me a while to get around to doing the belt I'm planning (and there is still that jeans circle quilt languishing on the sewing machine). It's just so much fun to create all these little miniature works of art!
Wednesday, December 24, 2008
Saturday, November 29, 2008
Paint it Black, Part 2
Starting With Black
My latest effort has been trying out discharge dyeing on black shirts. This was pretty successful in my dyeing class, but I didn't get a chance to do it myself on the black shirts. So now that the class is over, it's my turn!
I took several black shirts of various sizes and brands (or at least models) and did them the way I'm used to doing shirts: in my favorite tie-dye patterns. I did a couple in the spiral tie (one as a "spiral", the other as "rays" or "sunburst"), one in my favorite V pattern, a crinkle, and one shibori-style just smooshed up (technical term) diagonally and tied.
I experimented a bit with the thickness of the Soft Scrub With Bleach. I was mostly using up the partially-filled squeeze bottles of Soft Scrub that I had left over from my class--I hate to waste anything, but it was time to start reclaiming my squeeze bottles.
Here is the "rays" shirt. I coated it thickly on one side.
On the other side, I added a little water to what was left in the bottle, shook it up, and squirted that over the whole second side. Note the little blobs of thicker Soft Scrub in places.
Here is the "rays" shirt with the thickly-coated side. Note the bright lines.
Here is the side coated with diluted Soft Scrub.
For the crinkle shirt, I coated one side in a thin layer of Soft Scrub by rubbing it in the puddle of drips from a different shirt (no waste!). Then I emptied another small squirt bottle onto it to make the web of white lines you see here:
Here is the side where I put the extra lines of thicker Soft Scrub. You can see brighter spots within the darker orange sections.
The second side has a more uniform effect.
This is the "spirals" shirt. I did thick layers on both sides, but I did not do the two narrow stripes on the other side.
With narrow stripes:
and without:
I put on thick bands of Soft Scrub on both sides of the folded V shirt.
Here is the first side of the V shirt.
And here is the second side. Not exactly what I had expected, but I had expected the Soft Scrub to penetrate more than just the single layer. It hardly penetrates at all beyond the first layer (just enough to make it look like a mistake).
For the "smooshed" shirt, I tied it pretty loosely, and pretty much used it to mop up all the remaining Soft Scrub dribbles on my table.
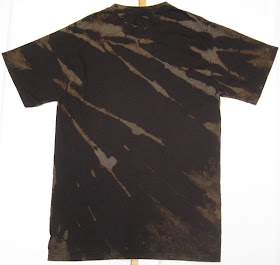
Here is the result. It had a thin layer of Soft Scrub, so it didn't bleach very strongly. Interestingly, though, it bleached to almost a heathery orange-grey, not to orange like the other shirts. Both this and the crinkle shirt are Fruit of the Loom Lofteez shirts, though the crinkle is a Medium and the other is a Small.
I really liked how the shirts came out, but I thought all but one (the spiral) needed, well, more. So I tied four of them back up again and redid them.
For the V, I refolded it the reverse way I had folded it before so I would get a design in the center of the plain back.
The shibori shirt just got more of the same:
For the rays shirt, I bleached it the opposite way (diluted, full-strength) so both sides now have both dark and light sections:
And I did something similar for the crinkle to give it more depth, though it ended up quite different from front to back.
Front:
And I did something similar for the crinkle to give it more depth, though it ended up quite different from front to back.
Front:
So I think once again I've failed in producing something boring enough for my "I'd die rather than wear tie-dye" friends, because these turned out pretty interesting (aside from their rather limited color palette).
Oh well, back to the lab again...
Monday, November 24, 2008
Paint It Black
Like most tie-dye fans, I often get all sorts of comments about being a hippie lost in the Sixties, and so on. Nope, I'm definitely not a hippie. But I'm getting used to the label, even if it's wrong.
And then there are people who would rather die than wear tie-dye, at least in public. You know who you are...
Anyway, sometimes it becomes a challenge to try to come up with something that doesn't scream "psychedelic throwback", something to make even the most staunch "I only wear dull clothes" person consider wearing my work. Hm, wait, is that something I even want to do?
Dyeing It Black
I tried doing some tie-dyeing with various shades of black dyes (Dharma carries four in their Fiber Reactive Procion line alone: "Black", "New Black", "Better Black" and "Jet Black"). But it's hard to get a good shade of black in tie-dye. Not impossible, but hard.
I made a few shirts a while back, but I wasn't very happy with the results. The black dyes are made of various mixtures of other colors, so some have tints of green, some blue, and some red, and they don't go well together. Further, the greys have a similar set of casts, so you have to really experiment with your dyes--more so than with your basic turquoise, fuchsia, and lemon yellow trio, which all go nicely together (unless you mix all three and get brown).
You can see tints of fuchsia in the following shirts (which, even though they are in blacks and greys, aren't at all dull!).
The following shirt shows more greenish tones in the main black parts, but also red tints and spots where the fuchsia ended up (fuchsia often doesn't dissolve well).
Interesting effects, and worth pursuing further, but not what I'd call "dull", by any means. Back to the lab...
Here She Comes Again
And what is a fluffy white dog to do? She sees all these black shirts laid out on the floor, and every gene in her little mongrel body screams "Shed!"
Looks like she owns them, doesn't she? And posing with her recycled jeans dog toy, as well!
To be continued...
Wednesday, November 19, 2008
Dye Week at the Middle School
After months of off-and-on preparation work, I finally did my week-long half-day dyeing class for a bunch of middle school girls. We spent the time exploring several different ways of using "resists" with dye to create patterns on fabric. Like any class, it had both successes and failures, but overall, I think it went well, and both the girls and I learned a lot.
Day by Day
Monday we did basic tie-dye patterns such as stripes and spirals and rays, and each girl tie-dyed a white t-shirt. This is the same sort of thing I've been doing with groups for quite a while now, and the individual results mostly varied depending on how carefully they tied and dyed their shirts.
Tuesday we did stitch resist on bandanas. Stitch resist didn't work very well for the class. Most of the girls (grades 6-8) had trouble stitching their designs (on cotton bandanas) and pulling and tying them tightly enough, so the stitching didn't really resist the dye and their designs got lost. On the other hand, a shibori technique of folding and clamping silk hankies with various clips worked very well. Almost all the girls came out with strongly-geometric designs that were really beautiful.
Here is the group with their shibori silk hankies:
What beautiful patterns!
Wednesday we did discharge dyeing (bleaching dark colors to have light-colored patterns). We started with an experiment where we put Soft Scrub with Bleach on many different scraps of fabric to see what effects it would have. We saw that on the all-synthetic socks we got no effect, but that on dark blue fabric we got nearly white patterns. We then did designs on black T-shirts. Since I had gotten black shirts specifically meant for discharge dyeing, and I had run out of prep time beforehand, I hadn't tried one before class. They turned out to work well, bleaching much faster than I had expected, to a nice rust color (they don't bleach to white from the black). Several girls also bleached patterns onto jeans with stencils (I love that part--those jeans are now their own designs, not those of some brand name designer!). This technique was a big hit! One girl liked it so much she did more of it for the rest of the week during any free moments. We also did "regular" tie-dye on tote bags while they were waiting for the Soft Scrub to work.
Thursday we did "fake batik" (using glycerin soap instead of wax) on bandanas. The soap batik counts as the main failure for the week. Even though I had been successful with it in my trials at home, the conditions in class made it a lot harder. The main difference was the temperature of the melted soap when the girls tried to apply it to the cloth. At home, I worked right at the stove, and the soap stayed an even high temperature the whole time. At school, I couldn't have the girls working over the portable electric burner I used, so I took the pot to their table once the soap was melted. The soap cooled much too quickly, clogged up the tjanting tools, and hardened before going onto the fabric. Since the soap didn't penetrate the fabric properly, so it didn't resist the dye, and the designs were mostly lost. Wax would have had all the same problems under these working conditions (no heat at the working table). One additional problem with soap, though, is that very thin lines can get washed out in the soda ash soak, and many of the girls' lines were too thin as well.
Friday I gave them each another cotton bandana, and we all folded them into eighths (triangles). I then showed them the marking-pen-and-pleating technique that I first learned from Michael Fowler's Art of Tie-Dye DVD. They dyed their pieces, and then I let the pieces sit about an hour. I rinsed them in cold water enough so we could look at the designs and hang them out to display for the end-of-week assembly. They came out beautifully, with bold geometric patterns. We finished the week with a short but fabulous fashion show at the assembly.
Now That It's Over
I had a lot of help with running this class. One of the moms came in to help for the whole class, and my housemate came in for two days as well (many thanks to both of them!). For a class of nine girls, that ended up being about the right amount of help, so nobody had to wait too long before we could help them The girls did need a fair amount of help, especially with the stitching and the batik, though not as much help as the first graders I usually work with.
If I were to do this class again, I'd do it a bit differently. I'd skip the stitch resist and the batik completely and save those for the adult classes. I'd do more "classic" patterns like crinkle on white shirts and bandanas. One thing I'm glad I did right was to confine the discharge dyeing to using just the Soft Scrub, and not using buckets of bleach in water or spray bottles of bleach and water. I had several pretty high-energy kids in this class, and those could have been a disaster. The Soft Scrub is really easy to deal with from a safety and control perspective.
Budget is always a factor for classes like these. I had a budget of $20/girl for the whole week, or $180 total. Bandanas are good pieces for the class. They cost about $1 each in bulk. I buy them at the same time I buy lots of other stuff, like all the inexpensive white t-shirts (about $2 each) and black t-shirts (about $3 each) . Silk hankies were less than a dollar each and the results were very satisfying; I'd do more of those next time. Tote bags were about $3 each. I spent about $22 on four bottles of Soft Scrub, and most of it got used up! I spent about $1.50 per girl on gloves (they preferred larger reusable latex gloves over the close-fitting disposable nitrile gloves), and the rest was trash bags (for smocks), dye (the largest portion, about $25) and chemicals. I've already got many sets of goggles and most of the infrastructure equipment (squirt bottles and such).
One thing the kids liked, of course, was that there was a lot of stuff to take home with them, and it was even better because they had made the pieces beautiful.
So would I teach this class again? Oh yeah, next chance I get!
Tuesday, November 18, 2008
Dressing for Success
Some friends of mine recently got married. When I got their invitation, the immediate thought (wail, more like) was "I haven't got a thing to wear!"
For the last several years I have pretty much always worn at least some tie-dye, usually a tie-dyed shirt and tie-dyed socks with blue jeans, or a tie-dyed "farmer's dress", or whatever. It's not a religious thing, but I like the bright colors, I have a lot of it, and it's comfortable. The last wedding I went to was a tie-dyed affair anyhow, so I was fine wearing one of my tie-dyed casual dresses (the one in my picture to the right with the bears-in-heart tapestry).
But this wedding was going to be a formal-to-semi-formal affair with dancing! My usual togs just wouldn't do. The groom-to-be and I joked about my having to pull out my formal tie-dye ("no, no, it only has to be semi-formal"). Pretty soon, it had to happen: I had to make myself a very fancy tie-dyed dress.
Designing
Designing the dress was fun. I had set myself a couple of constraints: the dress had to be tie-dyed, and it had to be silk (to lend it formality). Further, I would make it (almost) exclusively from silk charmeuse scarves from Dharma. With that decision, I could easily make prototypes of the dress. I also decided to make it a two-piece dress so it would be easier to get in and out of (and so I could wear the skirt with different tops later). I had been hankering to make myself a handkerchief-hem skirt for a while, too, so that became part of the design.
I started with paper towels and one of my favorite models, Barbie. Barbie is very cooperative for such endeavors--I have been making clothes for her since I was a kid. A little tape, some snips here and there, and soon we had a couple of prototypes (my daughter did one too).
I took the best prototype picture, massaged it a bit, and made what was essentially a coloring book page of it.
I borrowed my daughter's oil pastels and played with colors. So did my kids! I did the upper set.
Dyeing
I got a bunch of silk charmeuse scarves. The eight skirt pieces (two layers of four scarves each) were tied to make a diagonal stripe, while the others were done as diagonal stripes or X's. I also tied a sash.
I dyed them all using diluted turquoise, turquoise, electric blue, and strong navy and left them covered overnight.
Constructing
Once the scarves were dyed, washed, and dried, they made a glorious armful of colored silk. The white appeared on some scarves (but not all) where the dye hadn't penetrated. I had been aiming for a little white. The strong navy color came out purple (because I was dyeing silk instead of cotton), but fortunately purple is fine with me. After all, I always tell my students that tie-dye NEVER turns out exactly how you expect!
Now it was time to start putting them together. Easier said than done!
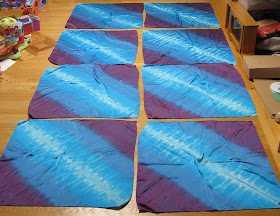
These are the eight scarves that will become the skirt.
I found information on "Making An 8-Point Skirt" on the web. I aligned each set of four scarves with the turquoise sections forming the diagonals of the squares as below, sewed each set together into a square, and put in the elastic waistband. I used 1.25-inch-wide elastic to give the waistband some strength. Those eight silk charmeuse 35" scarves make the skirt quite heavy!
Here is the skirt.
This is the top. The body of the top is essentially a tank top that is attached to the collar at the neck opening. The body is made of one 44" scarf that I cut in half diagonally. I used an existing tank top that I had as a pattern for the scarf pieces for the body.
The collar is one more 35" scarf set diagonally on the body. Since 35" was too big, I cut it in quarters and sewed it back together after taking part out of the middle (so it would preserve the turquoise sections). I essentially removed a thick "plus" ( + ) from the middle of the scarf. It has a V-neckline in the front and a more squared neckline in the back, and it can be worn either way.
Here you can see the blue broadcloth lining and the interfacing I used to give the collar layer a bit more stiffness and fullness. The body part is not lined, since it is very thick silk.
The Results
I finished the dress with only about five minutes to spare before I had to dress to go to the wedding! Here I am at the wedding in the dress.
The dress definitely didn't come out the way I expected it to, but I'm pretty pleased with it. I've worn it to three fancy occasions now (in less than a month!), and I expect to wear it a lot more.
I didn't expect the purple (short) sections to stick out the way they do--I think it's because I used such thick silk, so those sections don't have anywhere else to fall to. However, the weight of that heavy silk makes the skirt really flare out during turns and spins, which I love! I love ballroom dancing, especially swing and waltz, and this is definitely a great skirt for that. It's also got that gorgeous glossy silk glow that I like--it fills some of those Barbie doll dress fantasies I never quite grew out of.
I just wish the Barbie doll figure came with the dress!
Dog
Okay, here are the gratuitous dog pictures:
Ooh, she sees silk on the floor... "must go shed on it..."
"Isn't this turquoise just my color?"
Sorry, Lacey, the skirt is a little too big for you!